

Projects
A project is a git repo that Thulu uses as the base for tasks. Thulu either clones it from GitHub or builds it from a folder you upload from your computer. When a task linked to a project leaves the first column, Thulu creates a task-<id> branch from the default branch and the agent works there. The project also stores what an agent needs to know about the repo: a description it reads at init, which agent runs in each stage, how to bring the app up in the sandbox, and where it runs in production.
A task can have no project (a research task, a question), but an agent working on code stays blocked until you link one.
Before you start
Section titled “Before you start”- To create or edit a project you need the admin role in the workspace. On an uploaded project, the developer role is enough to upload a new version of the folder and merge a task’s branch. With a lower role you can see the page, but the init script is read-only.
- If the repo is private, you need one of two things: the GitHub App installed on your organization, or a GitHub token. Both are explained in Git and GitHub.
- For the stage template to be useful, create the agents first. The template lists the columns of the board that are neither a start nor an end column: on the factory board, “In progress”.
Connect a repo
Section titled “Connect a repo”-
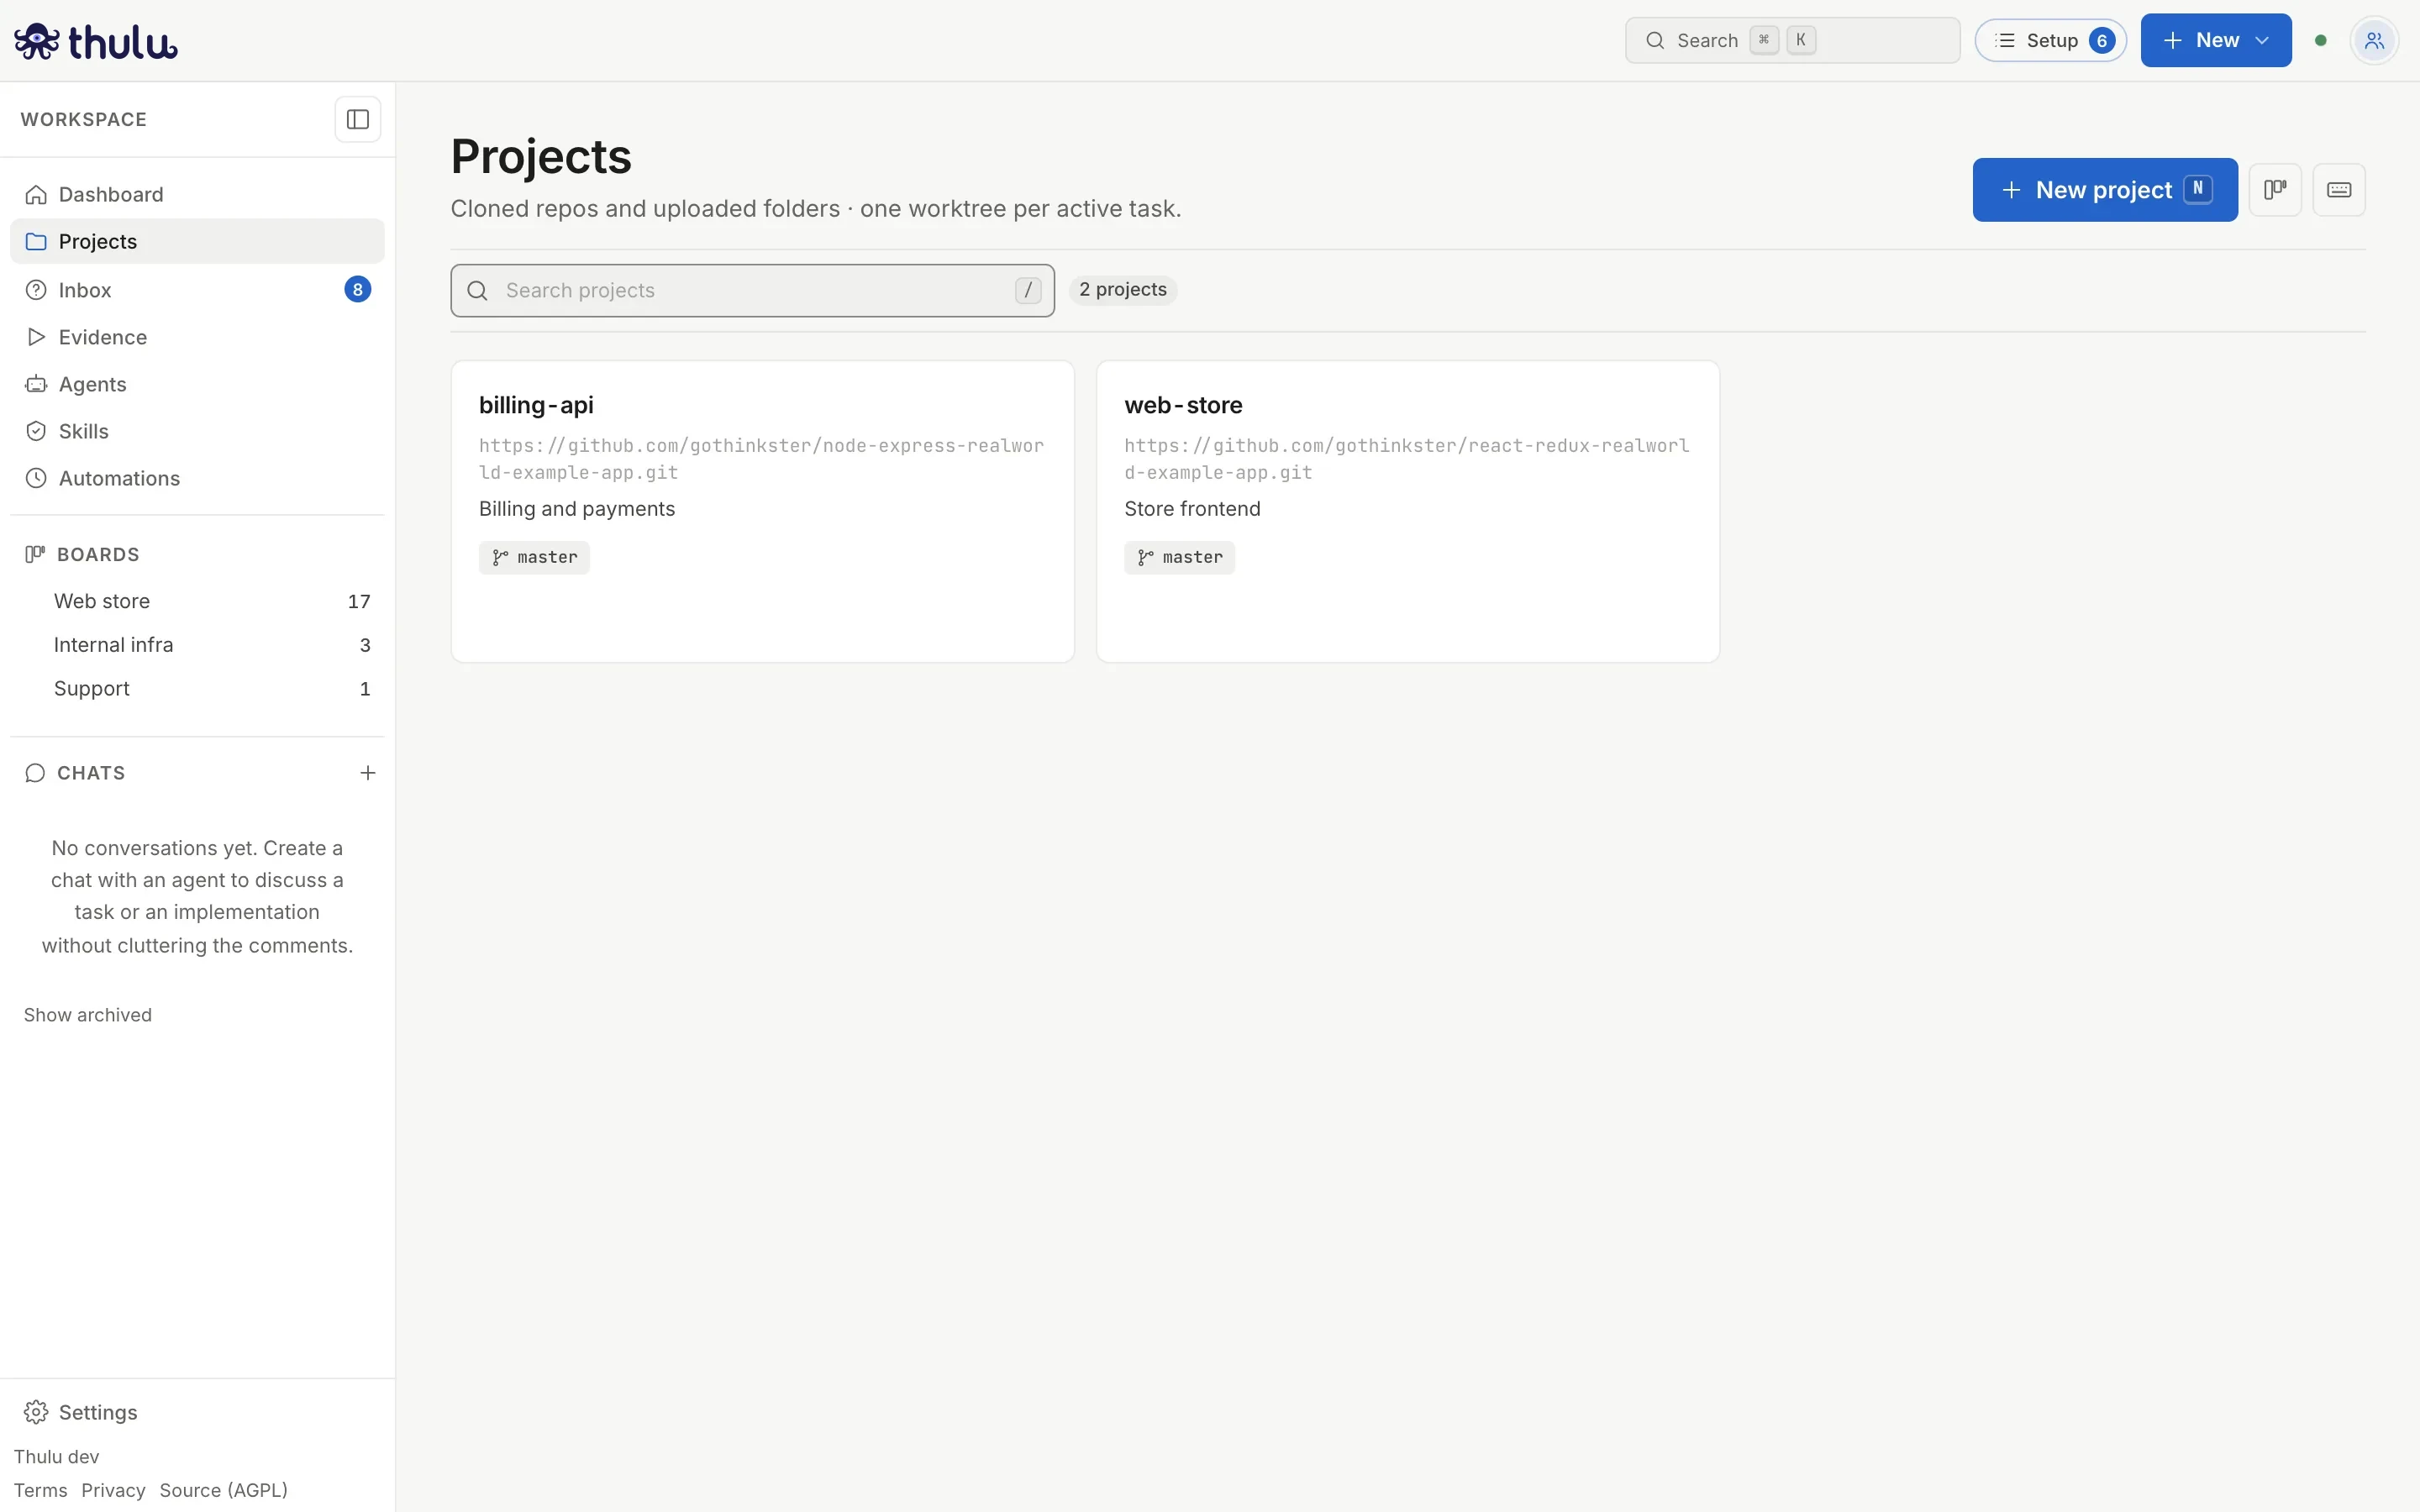
Open “Projects” in the sidebar and click “New project” (or press N).
-
Type the “Name”. It is unique within the workspace and it is what you see on board cards, so keep it short (
conduit-api, not “New version of the Conduit API”). -
Under “Where the code comes from”, leave “Git repository” selected (it is the default). The other option, “Upload a folder”, is explained in Create a project from a folder.
-
Under “Repository access”, choose how Thulu reaches the repo. The modal preselects the option that asks the fewest decisions:
- “GitHub App”: appears only if the operator configured the App. You pick the organization and the repo from two lists, and Thulu fills in the URL, the name (if it was empty) and the default branch. If the App is not yet installed on your organization, “Connect GitHub” takes you to GitHub and, when you come back, the modal reopens with what you had already typed. If your user is not an admin of the organization, GitHub leaves the installation pending until an admin approves it.
- “Saved credential”: you pick a token from the credentials page. With “New credential…” you add it right there: name, “Personal access token” and “Save credential”. Thulu tests it against GitHub when you save it; if GitHub rejects it, it is saved anyway and a notice tells you it will not be able to clone. A classic token needs the
repopermission (andworkflowif agents will trigger Actions). - “Public repo”: clones without credentials.
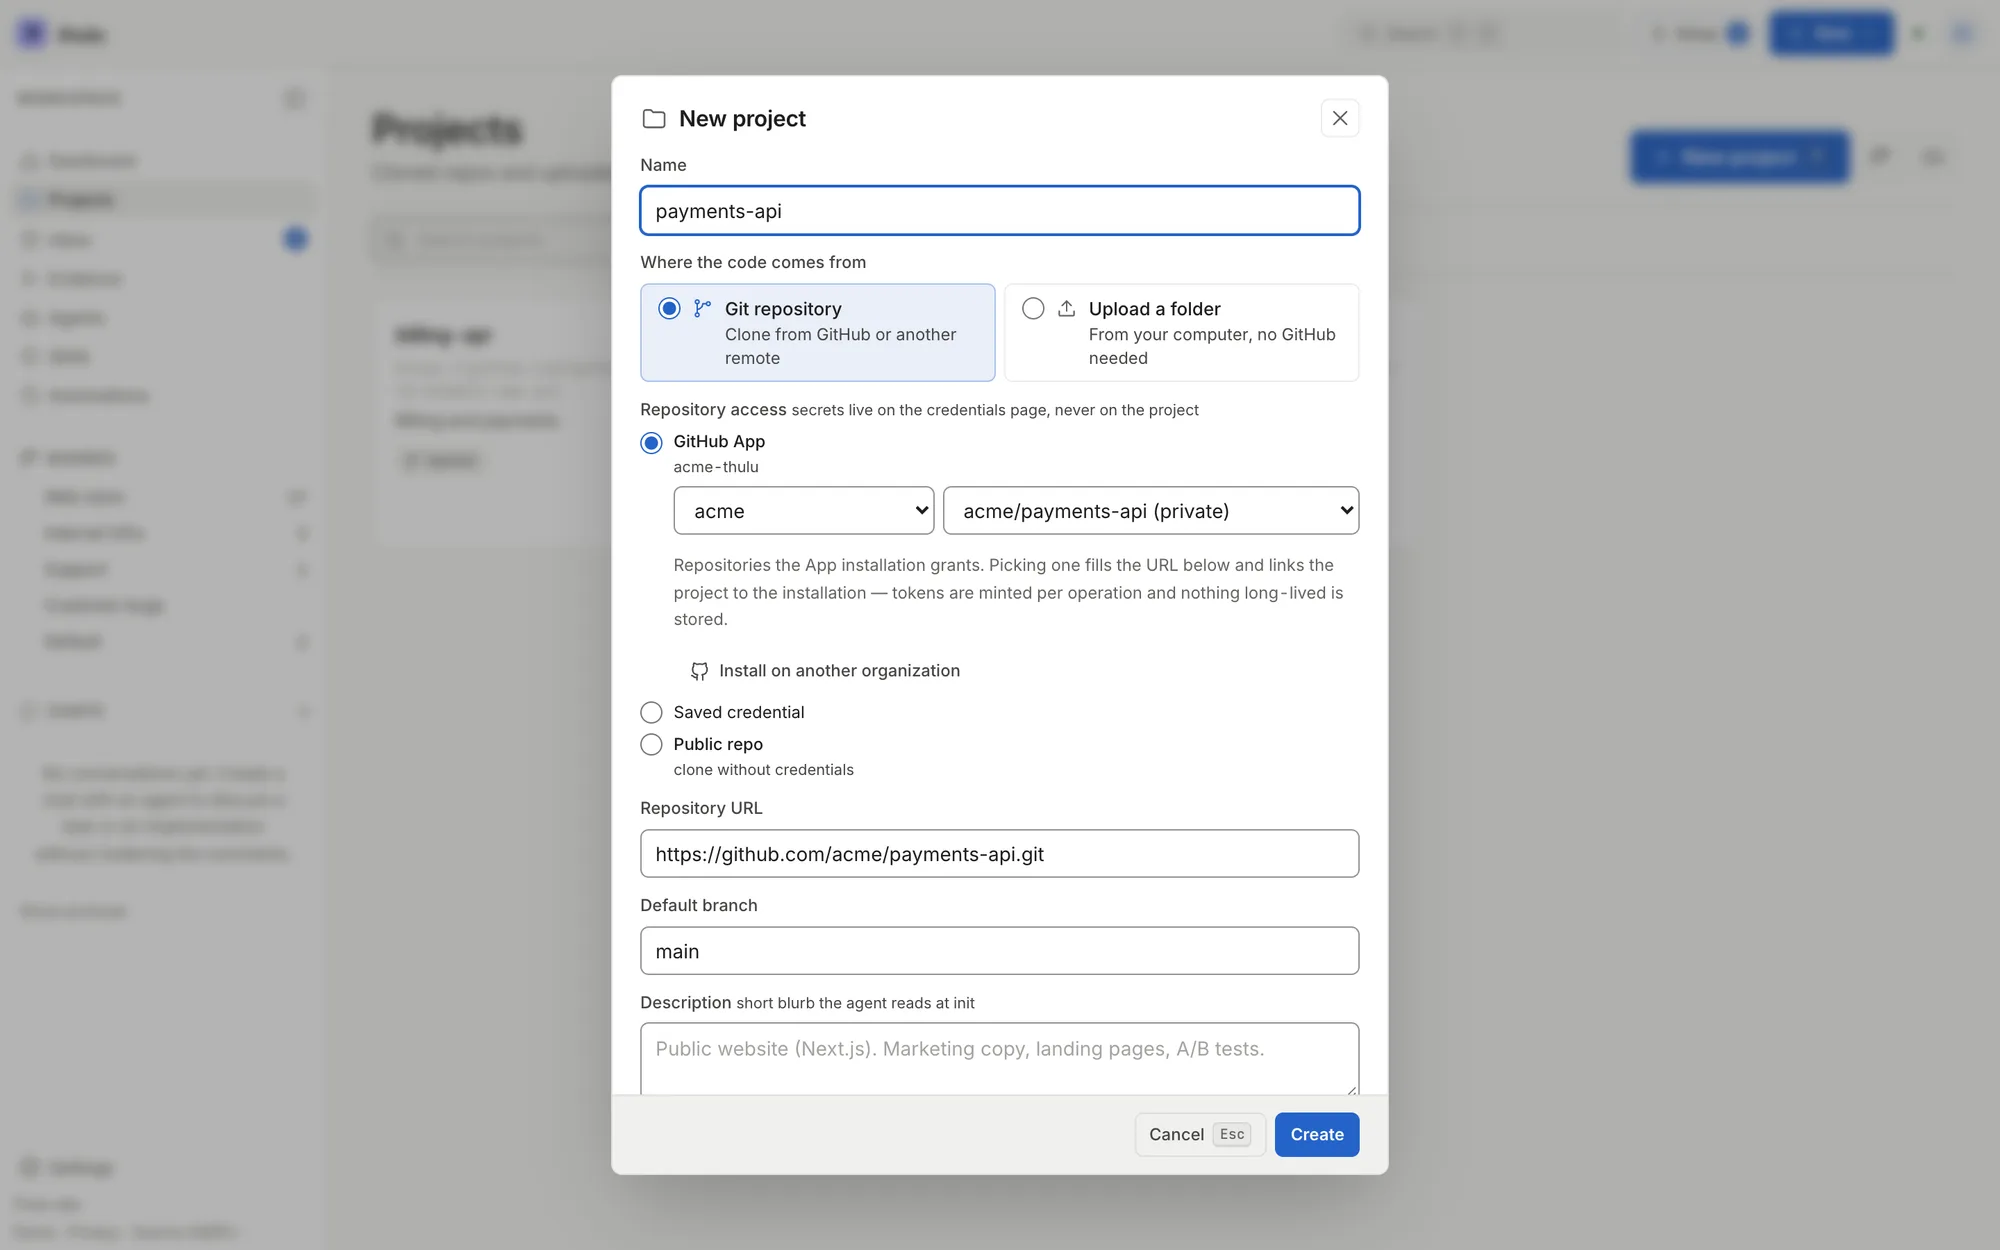
When you pick acme/payments-api, Thulu fills in the name, the URL and the branch. "Install on another organization" takes you to GitHub to add another organization. -
Paste the “Repository URL” (HTTPS, for example
https://github.com/org/repo.git). A GitHub SSH URL is converted to HTTPS automatically. -
Check the “Default branch”. If you leave it empty, the project uses the repo’s own default.
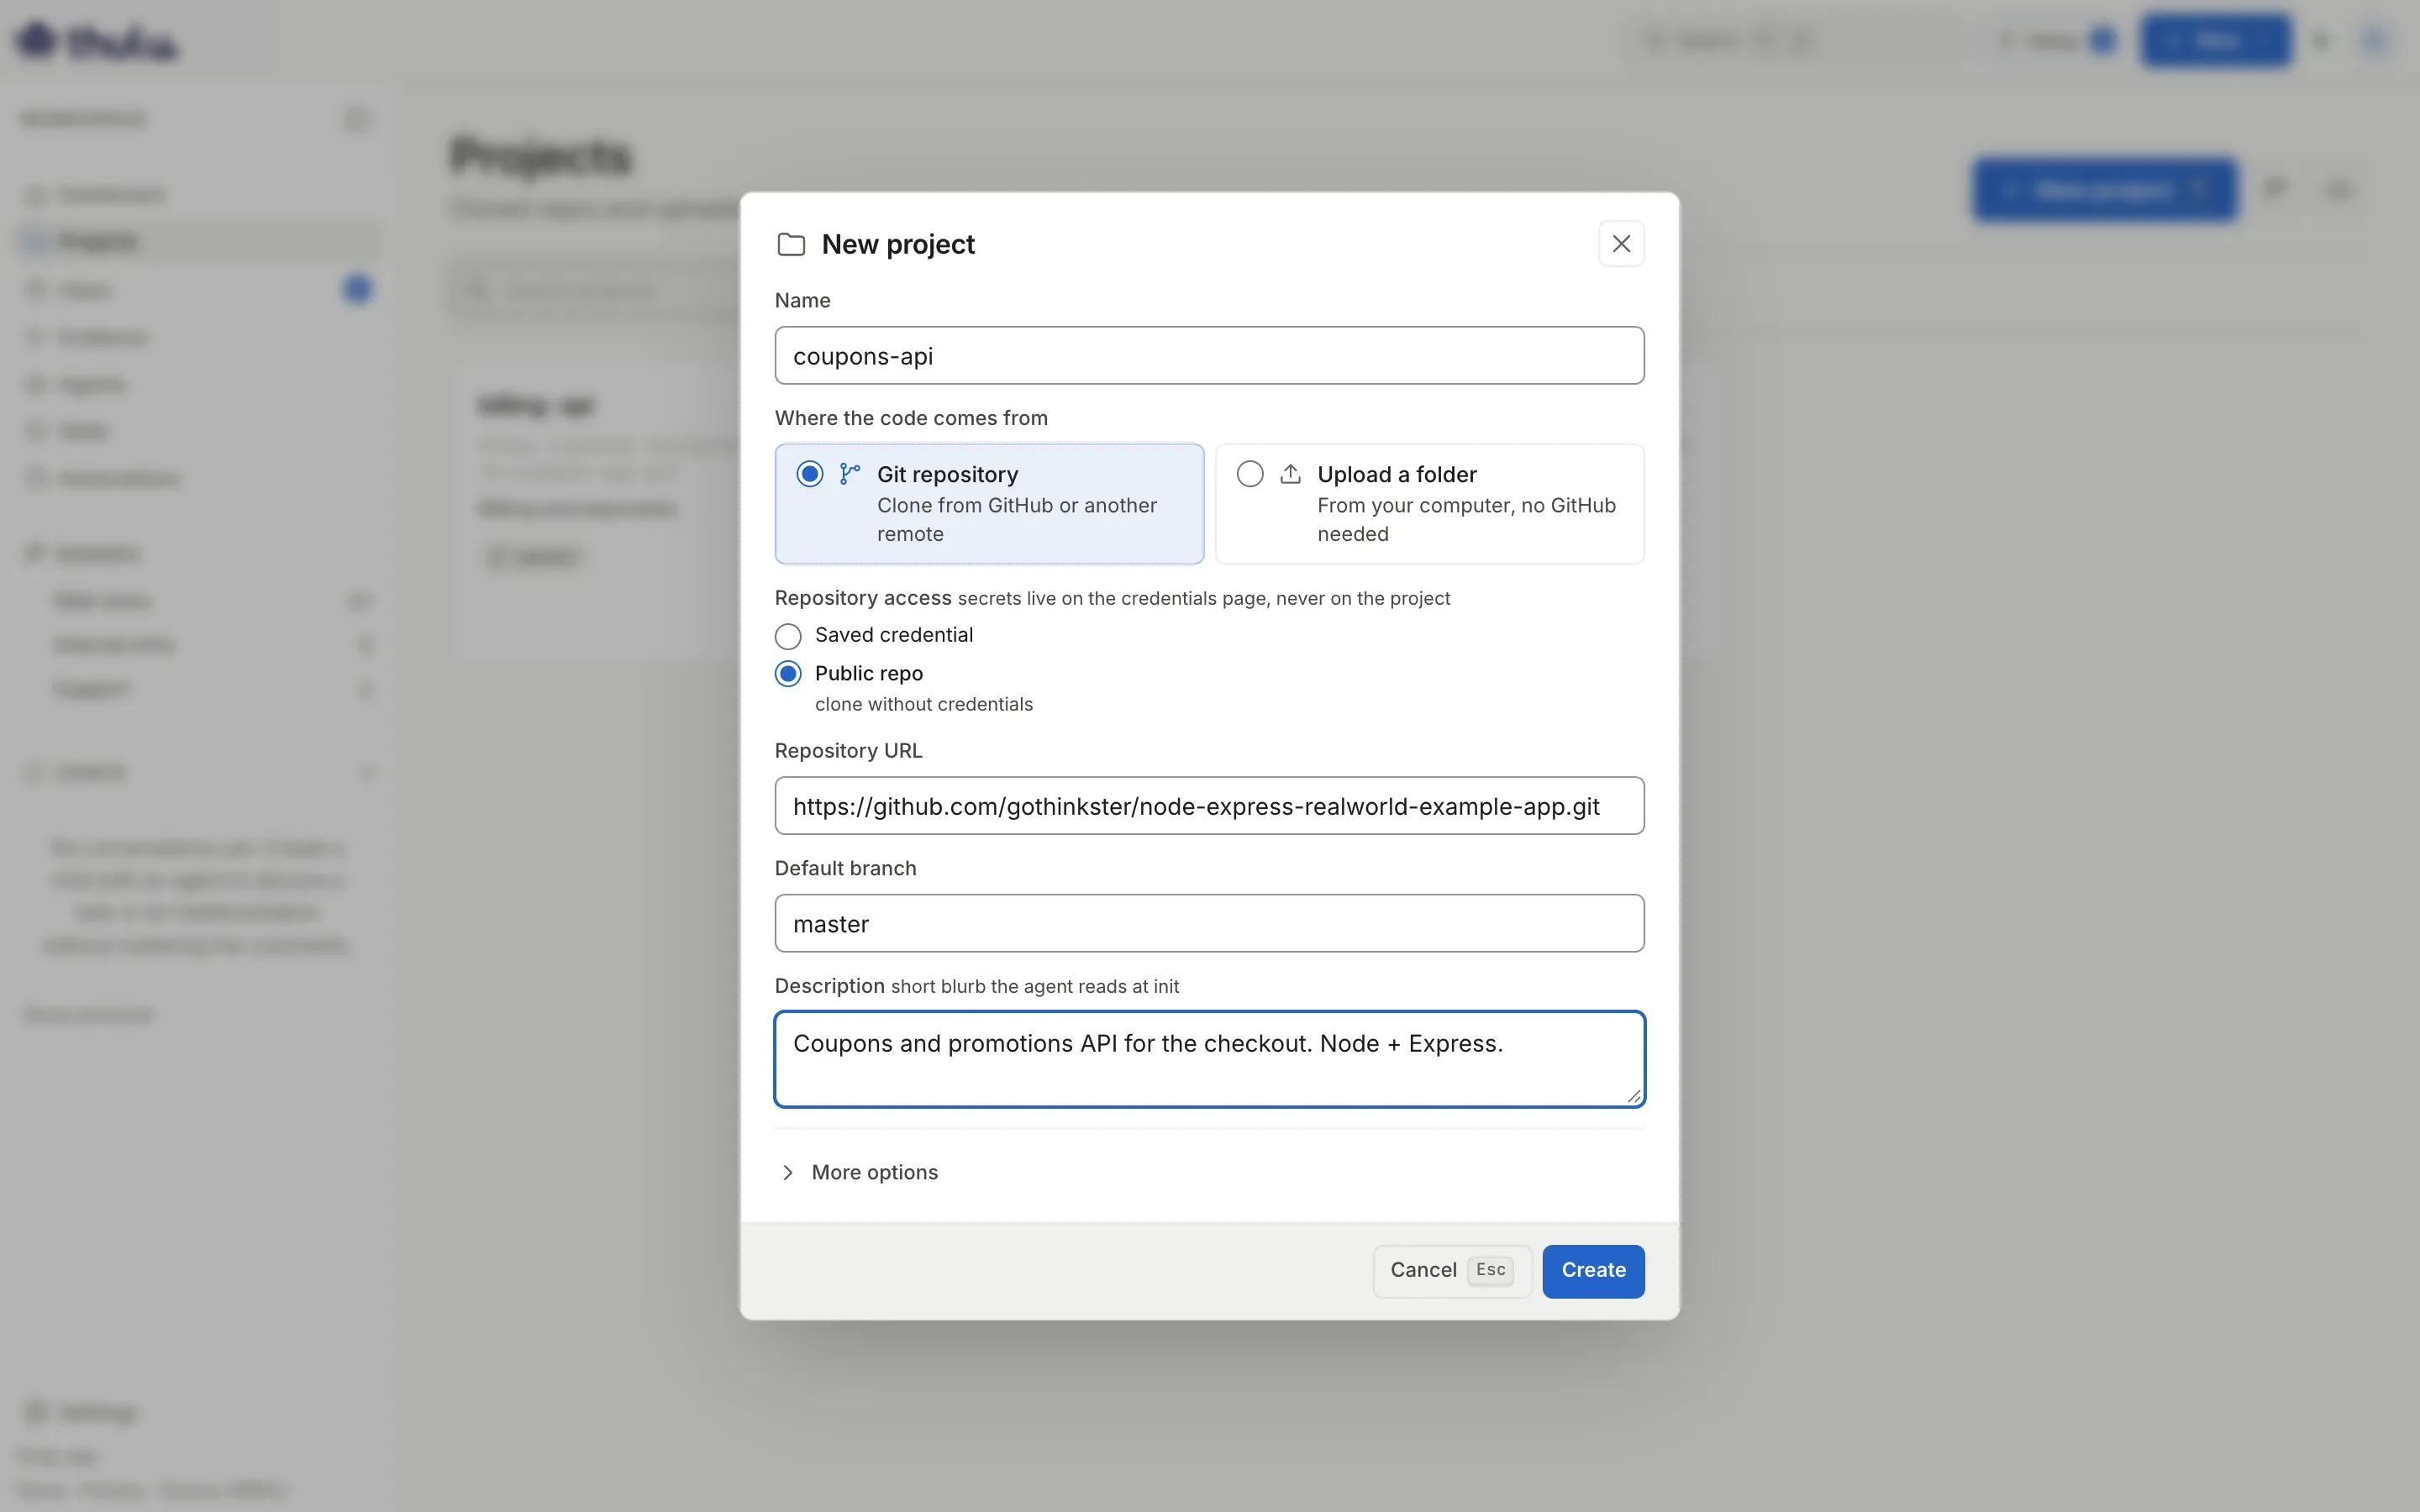
The required fields and the description go at the top. Board and template are under "More options". -
Write the “Description”. It goes into the prompt of every run that works on the project, so use it for what the agent cannot work out from the code: what the repo does and what it must not touch.
-
Open “More options” if you want to change what is left:
- “Default board”: you can leave it on “— instance default —”. It is only used when a task is created without a board (through the API, or by an agent from a chat). From the board, a new task always lands on the board you have open.
- “Stage template”: the default agent for each stage. The table lists the columns that are neither a start nor an end column. A new task linked to this project starts with those agents already assigned.
-
Click “Create”. The modal closes and the clone continues in the background: the card says “Cloning” until it finishes, and the project page updates by itself. If the clone fails, the card says “Clone failed” with the cause (for example, that the repository was not found) and git’s technical detail collapsed. A failed clone is not retried: delete the project and create it again once the cause is fixed.
Create a project from a folder
Section titled “Create a project from a folder”If the code is not on GitHub, or you do not want to give Thulu access to your organization, you can upload the project folder. Thulu stores the repository itself, and agents work on it the same way as on a GitHub clone: one task-<id> branch and one worktree per task, and the init script and the dependency cache work the same.
What changes is the exit. An uploaded project has no pull requests, no CI and no review on GitHub, and the agents’ GitHub tools do not apply. A task’s work goes back to the main branch with “Merge into…” from the task, and the code leaves with “Download .zip” from the project.
| Use | When |
|---|---|
| “Git repository” | The team works on GitHub and wants to review every change in a pull request, with CI and deploys through Actions. |
| “Upload a folder” | The code is on your computer or reached you as a .zip, there is no GitHub involved, or it is a prototype where merging and downloading is enough. |
-
In “Projects”, click “New project” and, under “Where the code comes from”, choose “Upload a folder”.
-
Drag the project folder onto the box or click “Choose folder” (the browser may ask you to confirm the upload). A .zip also works with “Choose .zip”; if the whole zip is inside one folder, Thulu strips it.
-
Check what the browser left out before anything is sent. The box shows how many files remain and how big they are, plus two expandable lists:
- “files left out as possible secrets”:
.envand.env.<something>(except.env.example,.sample,.template), private keys (id_rsa,*.pem,*.key),.aws/credentials,.netrcand similar. - “folders left out”:
node_modules,.venv,__pycache__,.next,.cacheand other dependency or cache folders, wherever they are.
The daemon applies the same rules again when the upload arrives. Symbolic links are not uploaded either.
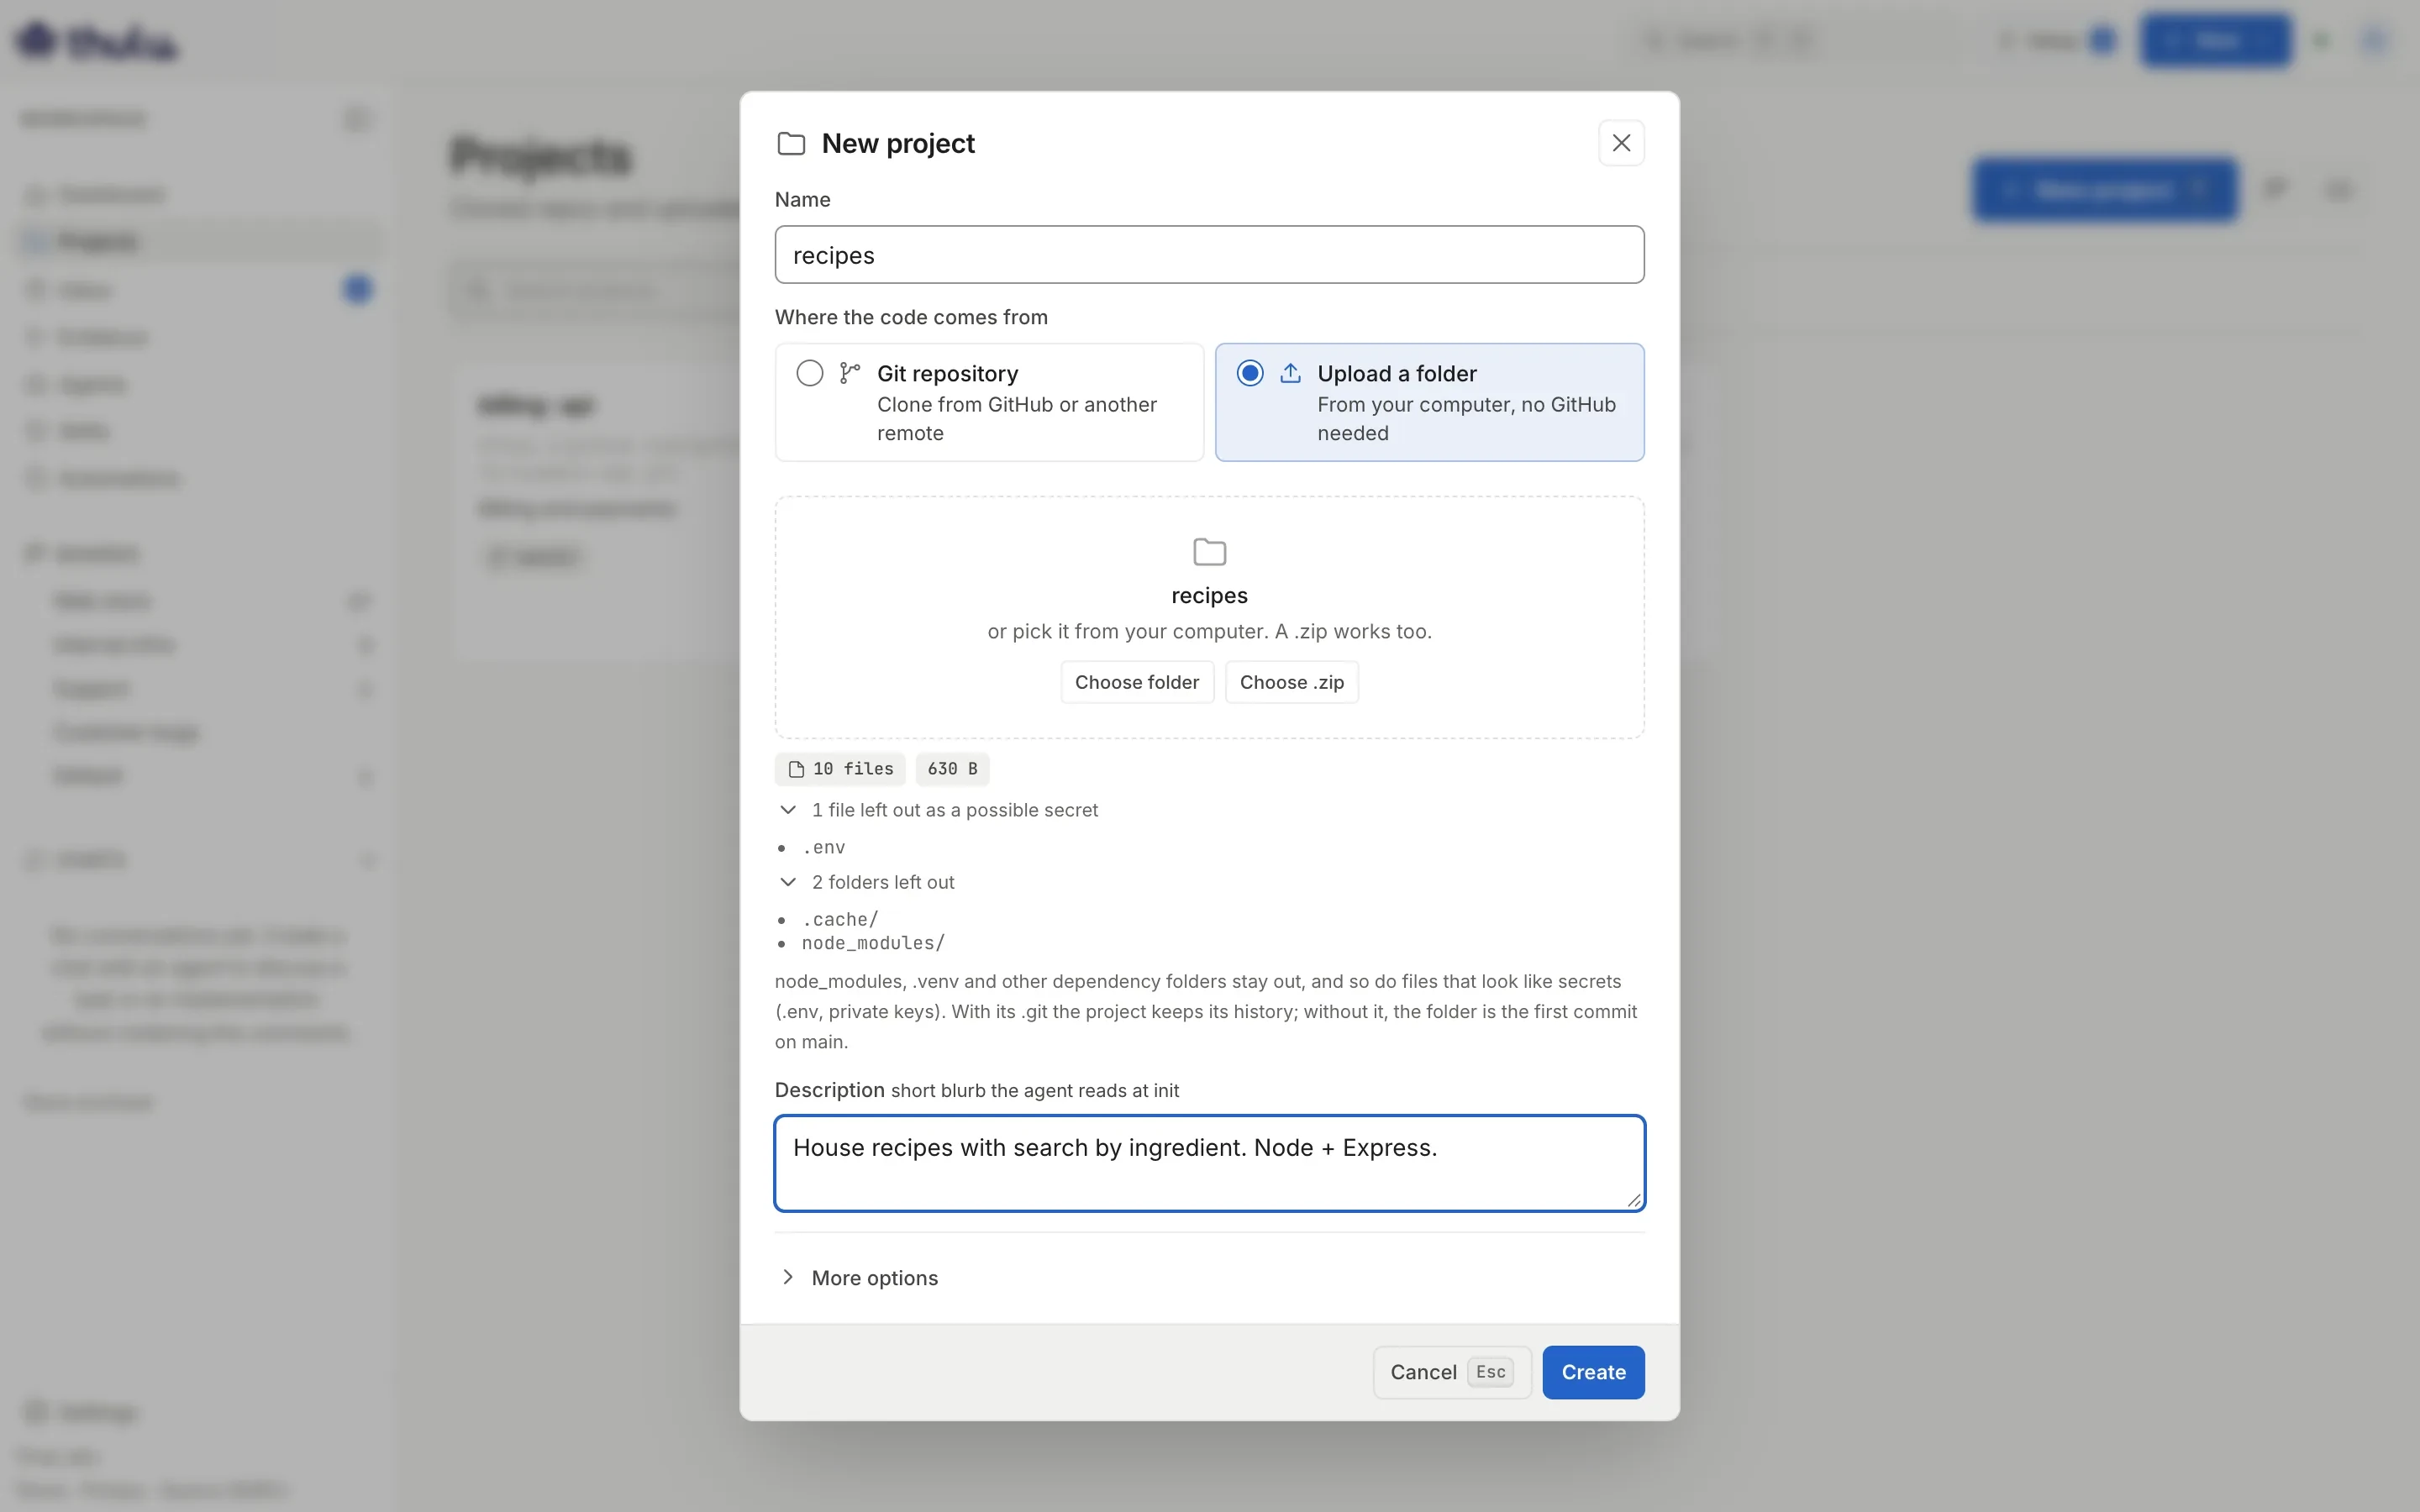
The name is filled in from the folder name. What is left out shows before you click "Create". - “files left out as possible secrets”:
-
If you want to change the “Name”, do it now: Thulu filled it in from the folder name. Write the description and open “More options” for the board and the template, as in Connect a repo.
-
Click “Create”. The button goes through “Packing…” and “Uploading…”, with a progress bar, and the modal shows the result.
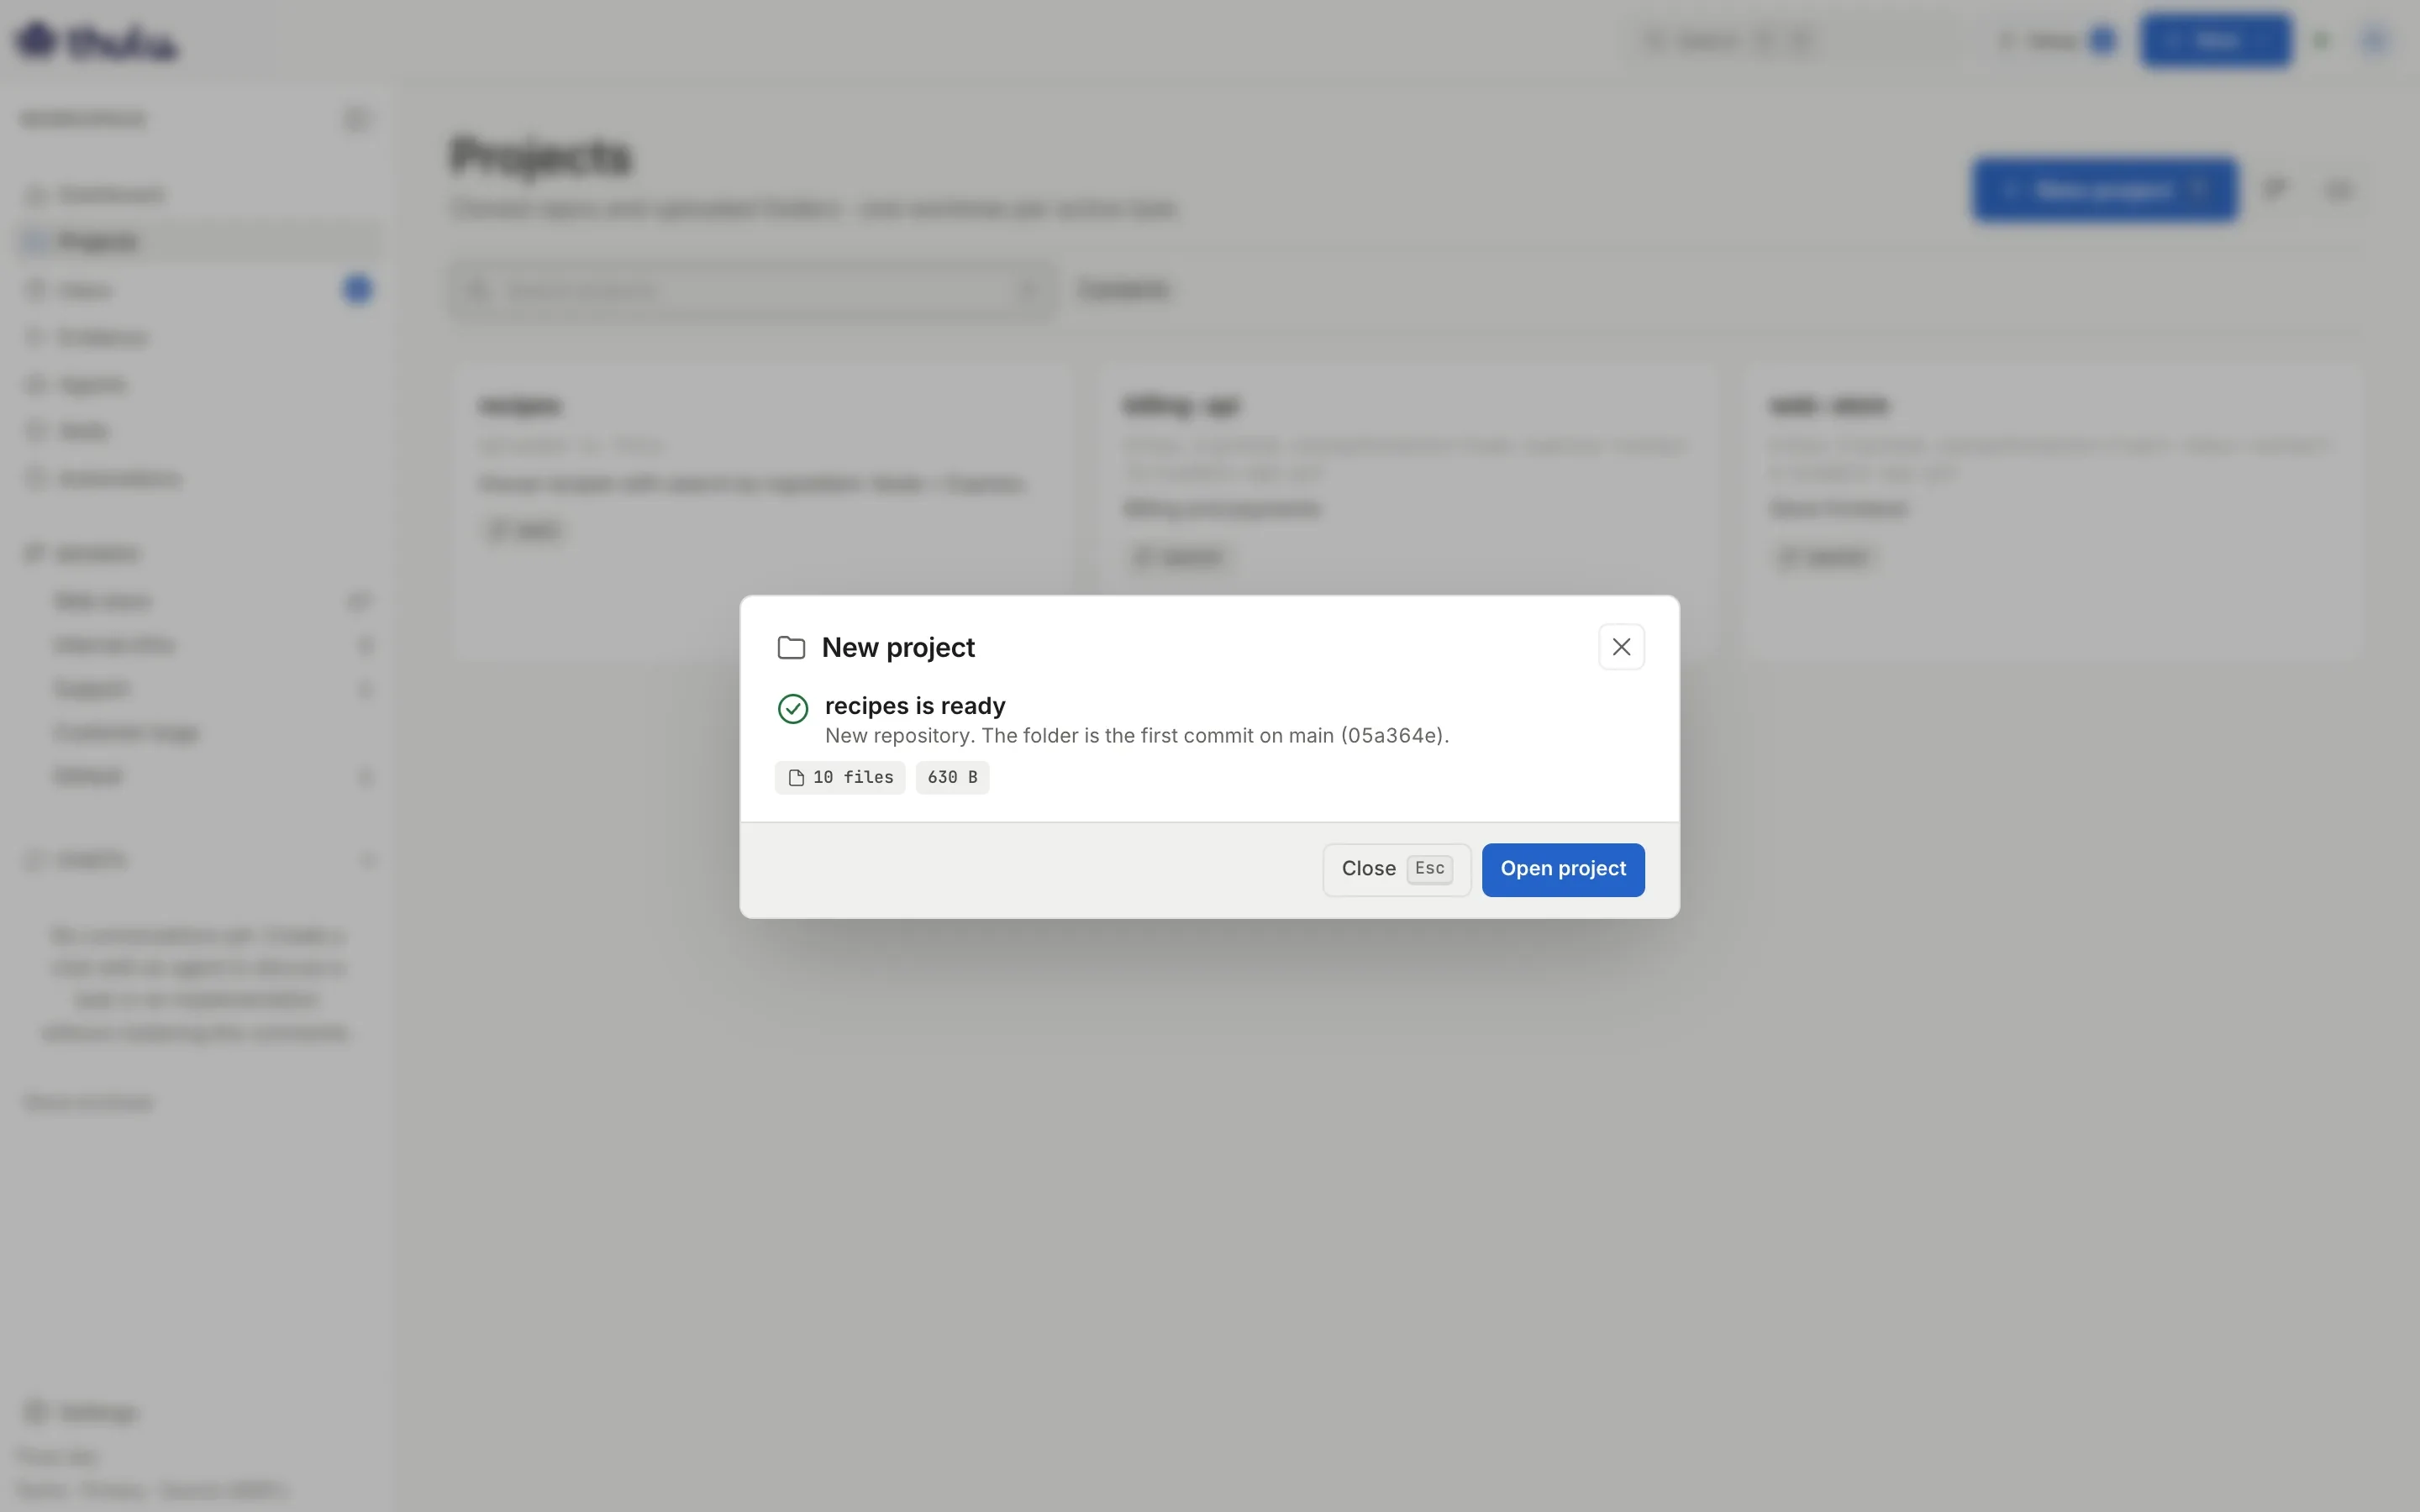
Without a .git, the folder is the first commit on main. -
Click “Open project”. In the list, the card says “Uploaded to Thulu” where a cloned project shows the URL.
If the folder comes with its own .git with commits, Thulu keeps the history, the branches and the tags, and the branch its HEAD points to becomes the default branch (“History kept. main is at …”). Whatever differs from that commit goes in on top as a new commit. Without a .git, the folder is the first commit on main.
Limits: 200 MiB compressed, 20,000 files and 1 GiB uncompressed. The upload counts toward the workspace’s storage quota. thulu export carries an uploaded project’s repository inside the bundle, because there is no remote to fetch it from again.
The code of an uploaded project
Section titled “The code of an uploaded project”On an uploaded project, the “Repository” tab shows the “Code” panel instead of “GitHub access”, and the “Repo” button at the top does not appear.
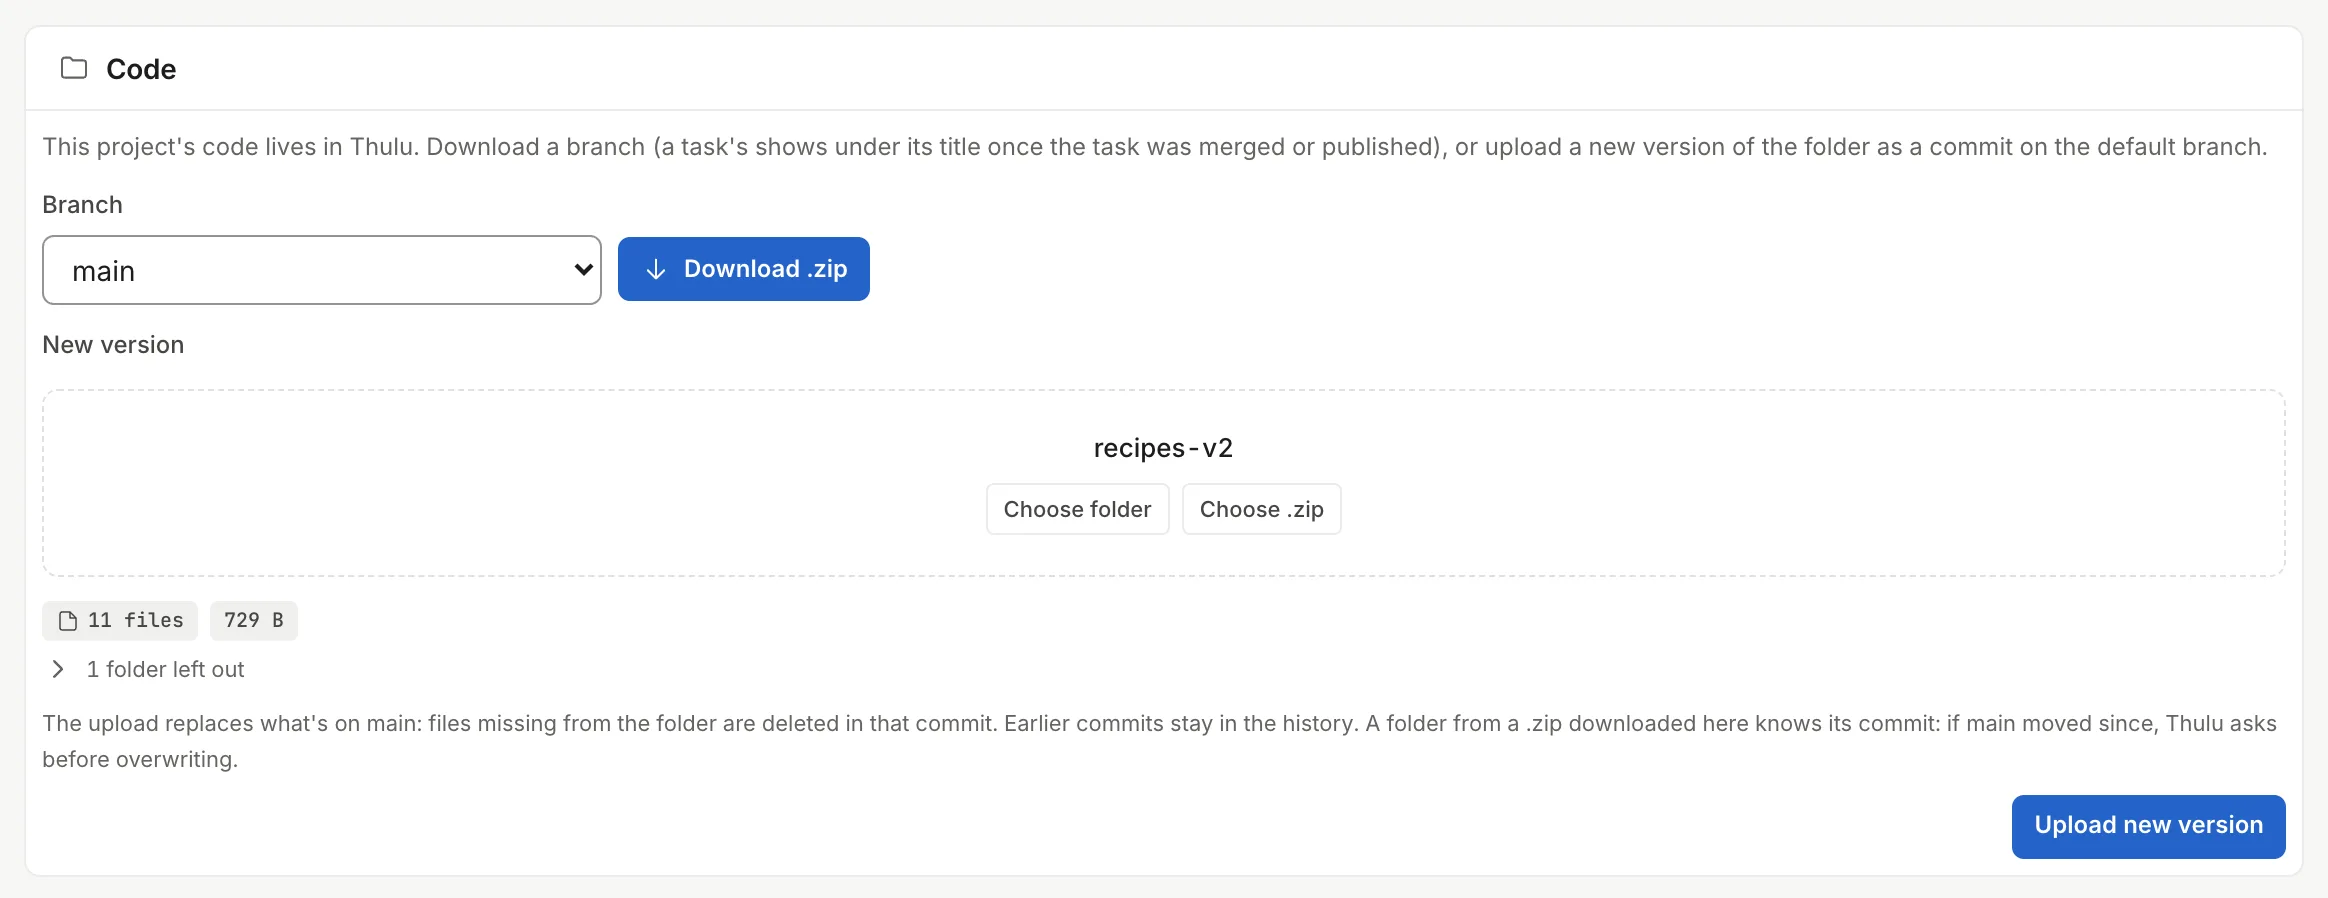
To download the code, pick the “Branch” and click “Download .zip”. The list has the main branch, the ones that came in the folder’s .git and, under “Task branches”, each task’s branch with its title once the task has merged or published its branch.
To change the code from your computer, upload the whole folder again:
- Download the main branch with “Download .zip” and work on that copy.
- Under “New version”, drag the folder or click “Choose folder” (or “Choose .zip”). The same exclusions apply as when you created the project.
- Click “Upload new version”. The panel confirms “New commit 0237388 on main.” or, if the folder is identical to the last commit, “Nothing changed on main”.
Merge a task’s branch
Section titled “Merge a task’s branch”On a project cloned from GitHub, a task’s work reaches main through a pull request. On an uploaded project, you carry it with “Merge into…”, which appears in the “Branch and PR” row of the task panel once the task has a branch. If all of the task’s projects are uploaded, “Force PR” does not appear, neither in the row nor in the “…” menu.
- Open the task and, under “Branch and PR”, click “Merge into…”.
- Under “Into branch” choose the target; the main branch is the default. If the task has several uploaded projects, you pick the “Project” first.
- Click “Merge”.
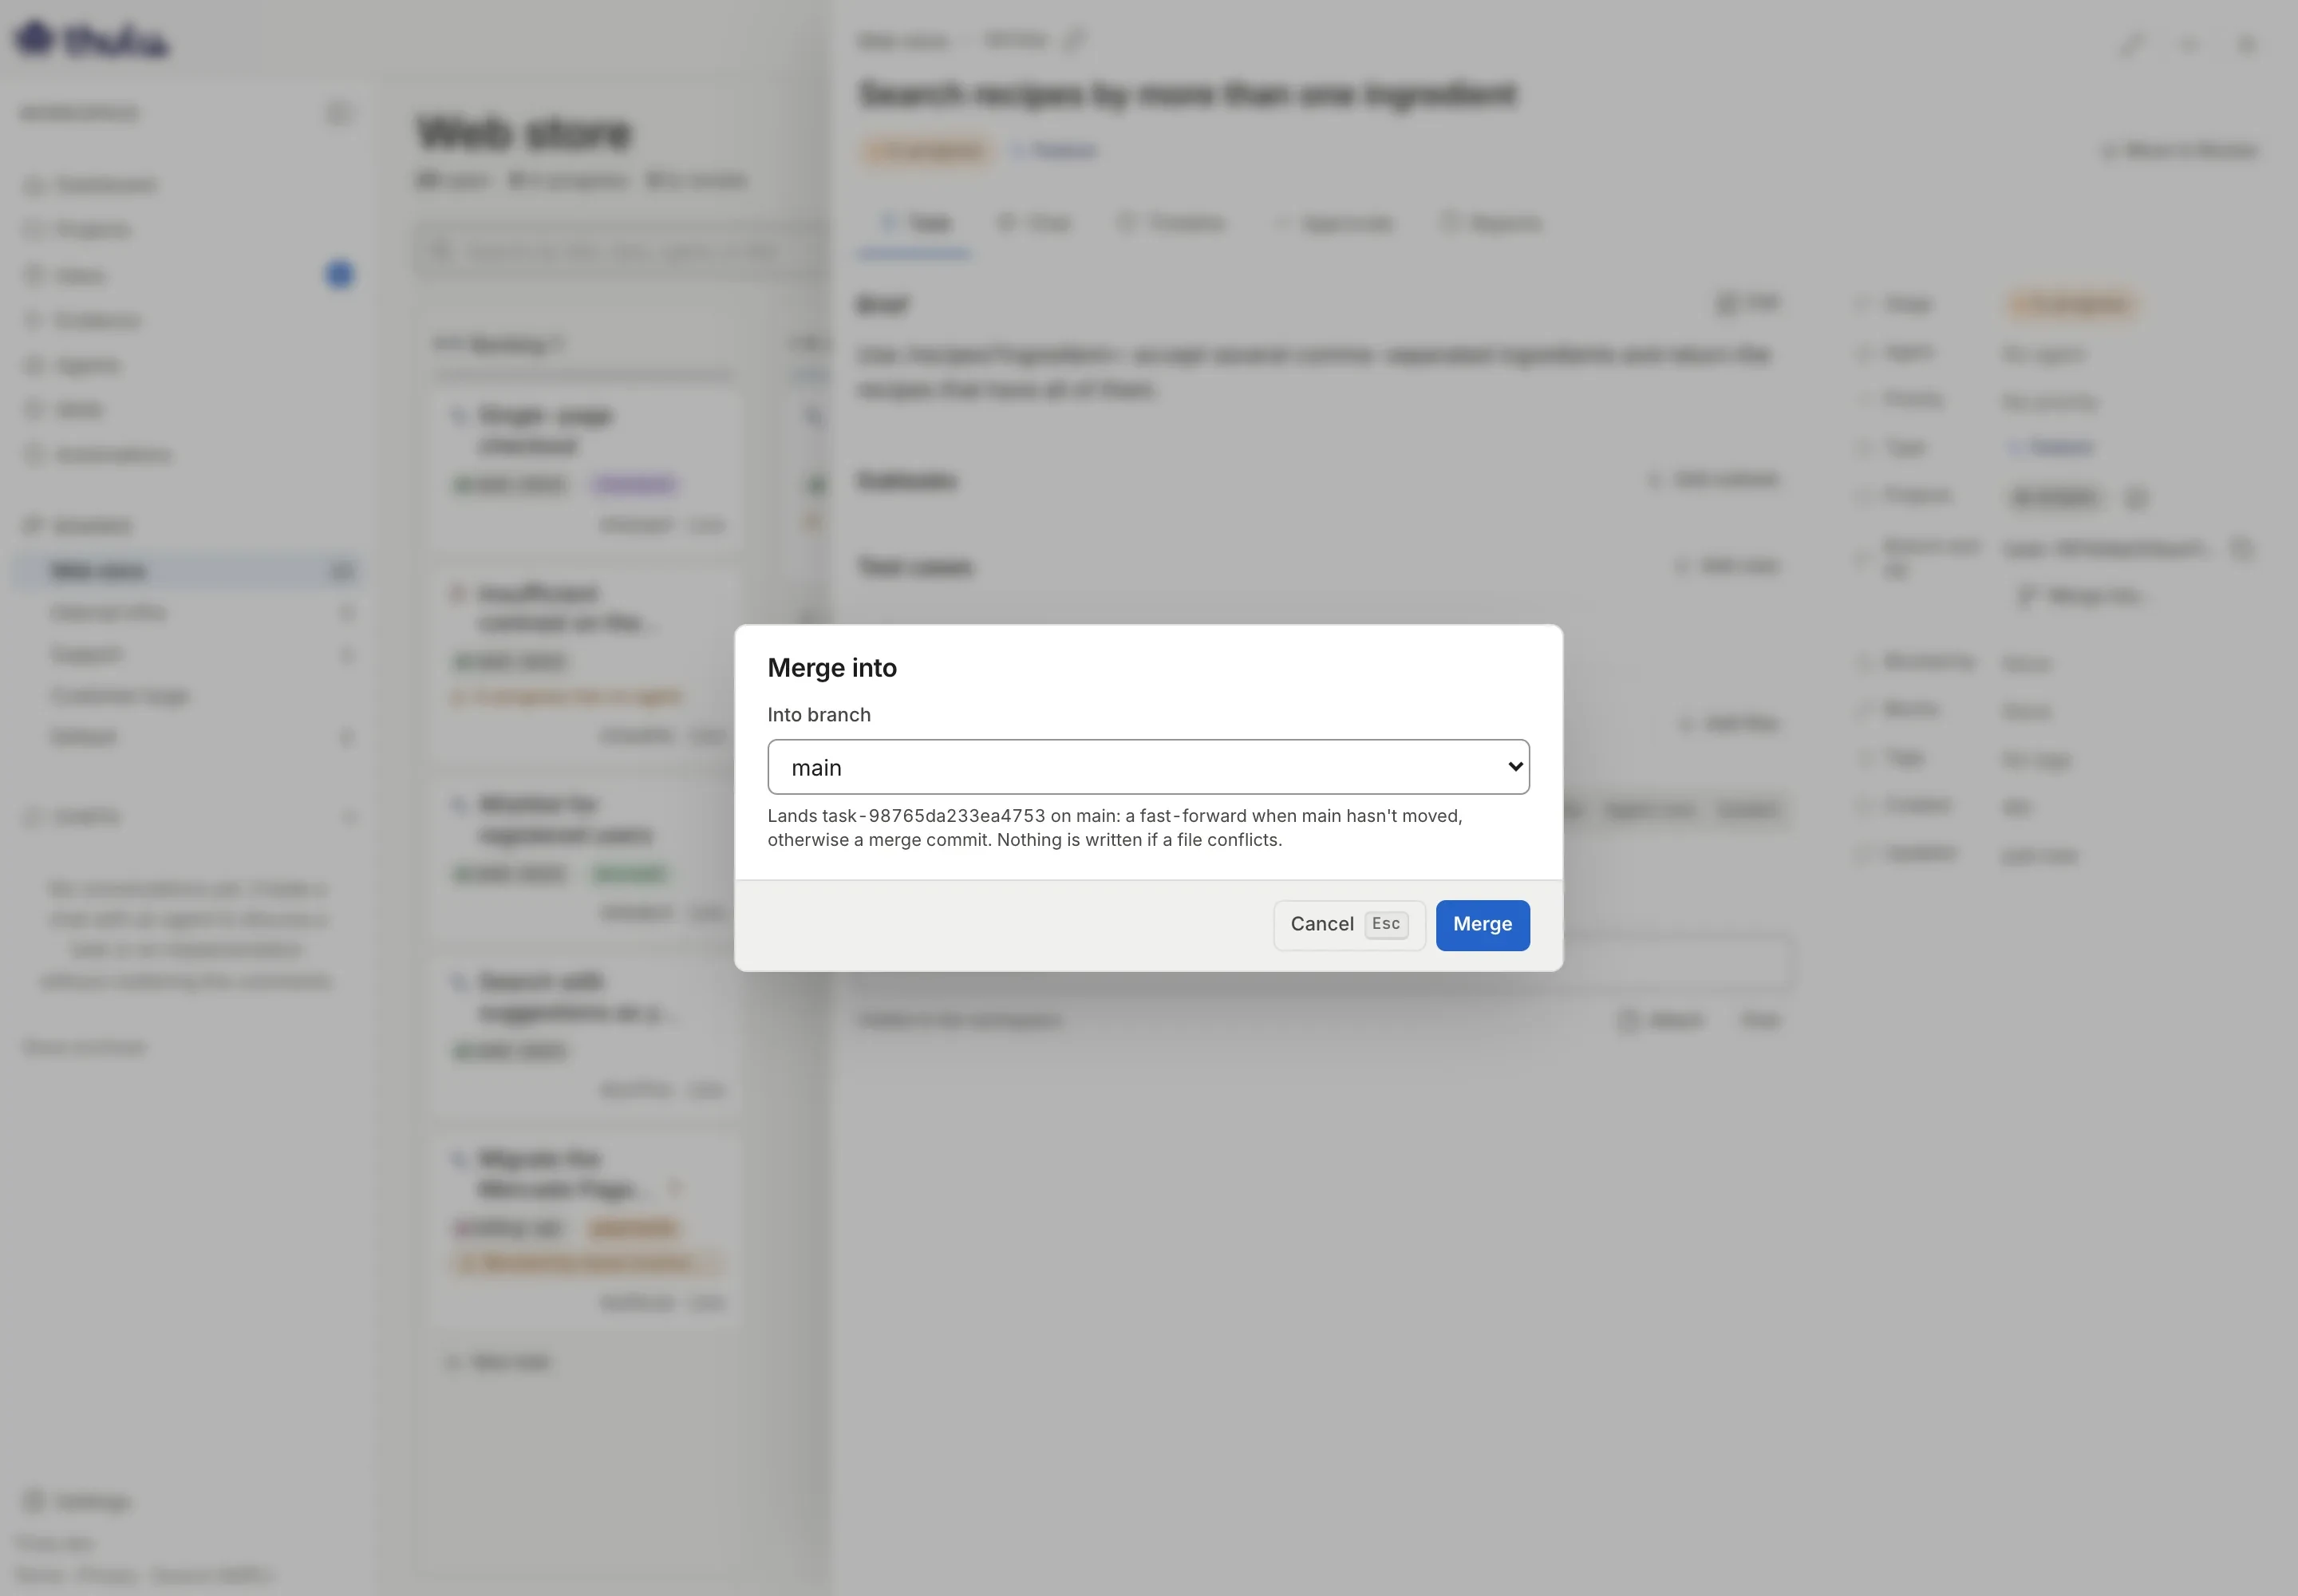
Before merging, Thulu commits whatever the agent left uncommitted in the worktree and publishes the branch in the project’s repository, putting it on top of the current main. Then it fast-forwards main to the task’s branch if main has not moved, or creates a merge commit if it has. The notice “Merged into main (f20ef2c)” appears and the task’s activity adds “Merged task-… into main”. The task stays in its stage: move it yourself when it is time. If main already had everything, the notice says “main already has all the task’s commits”.
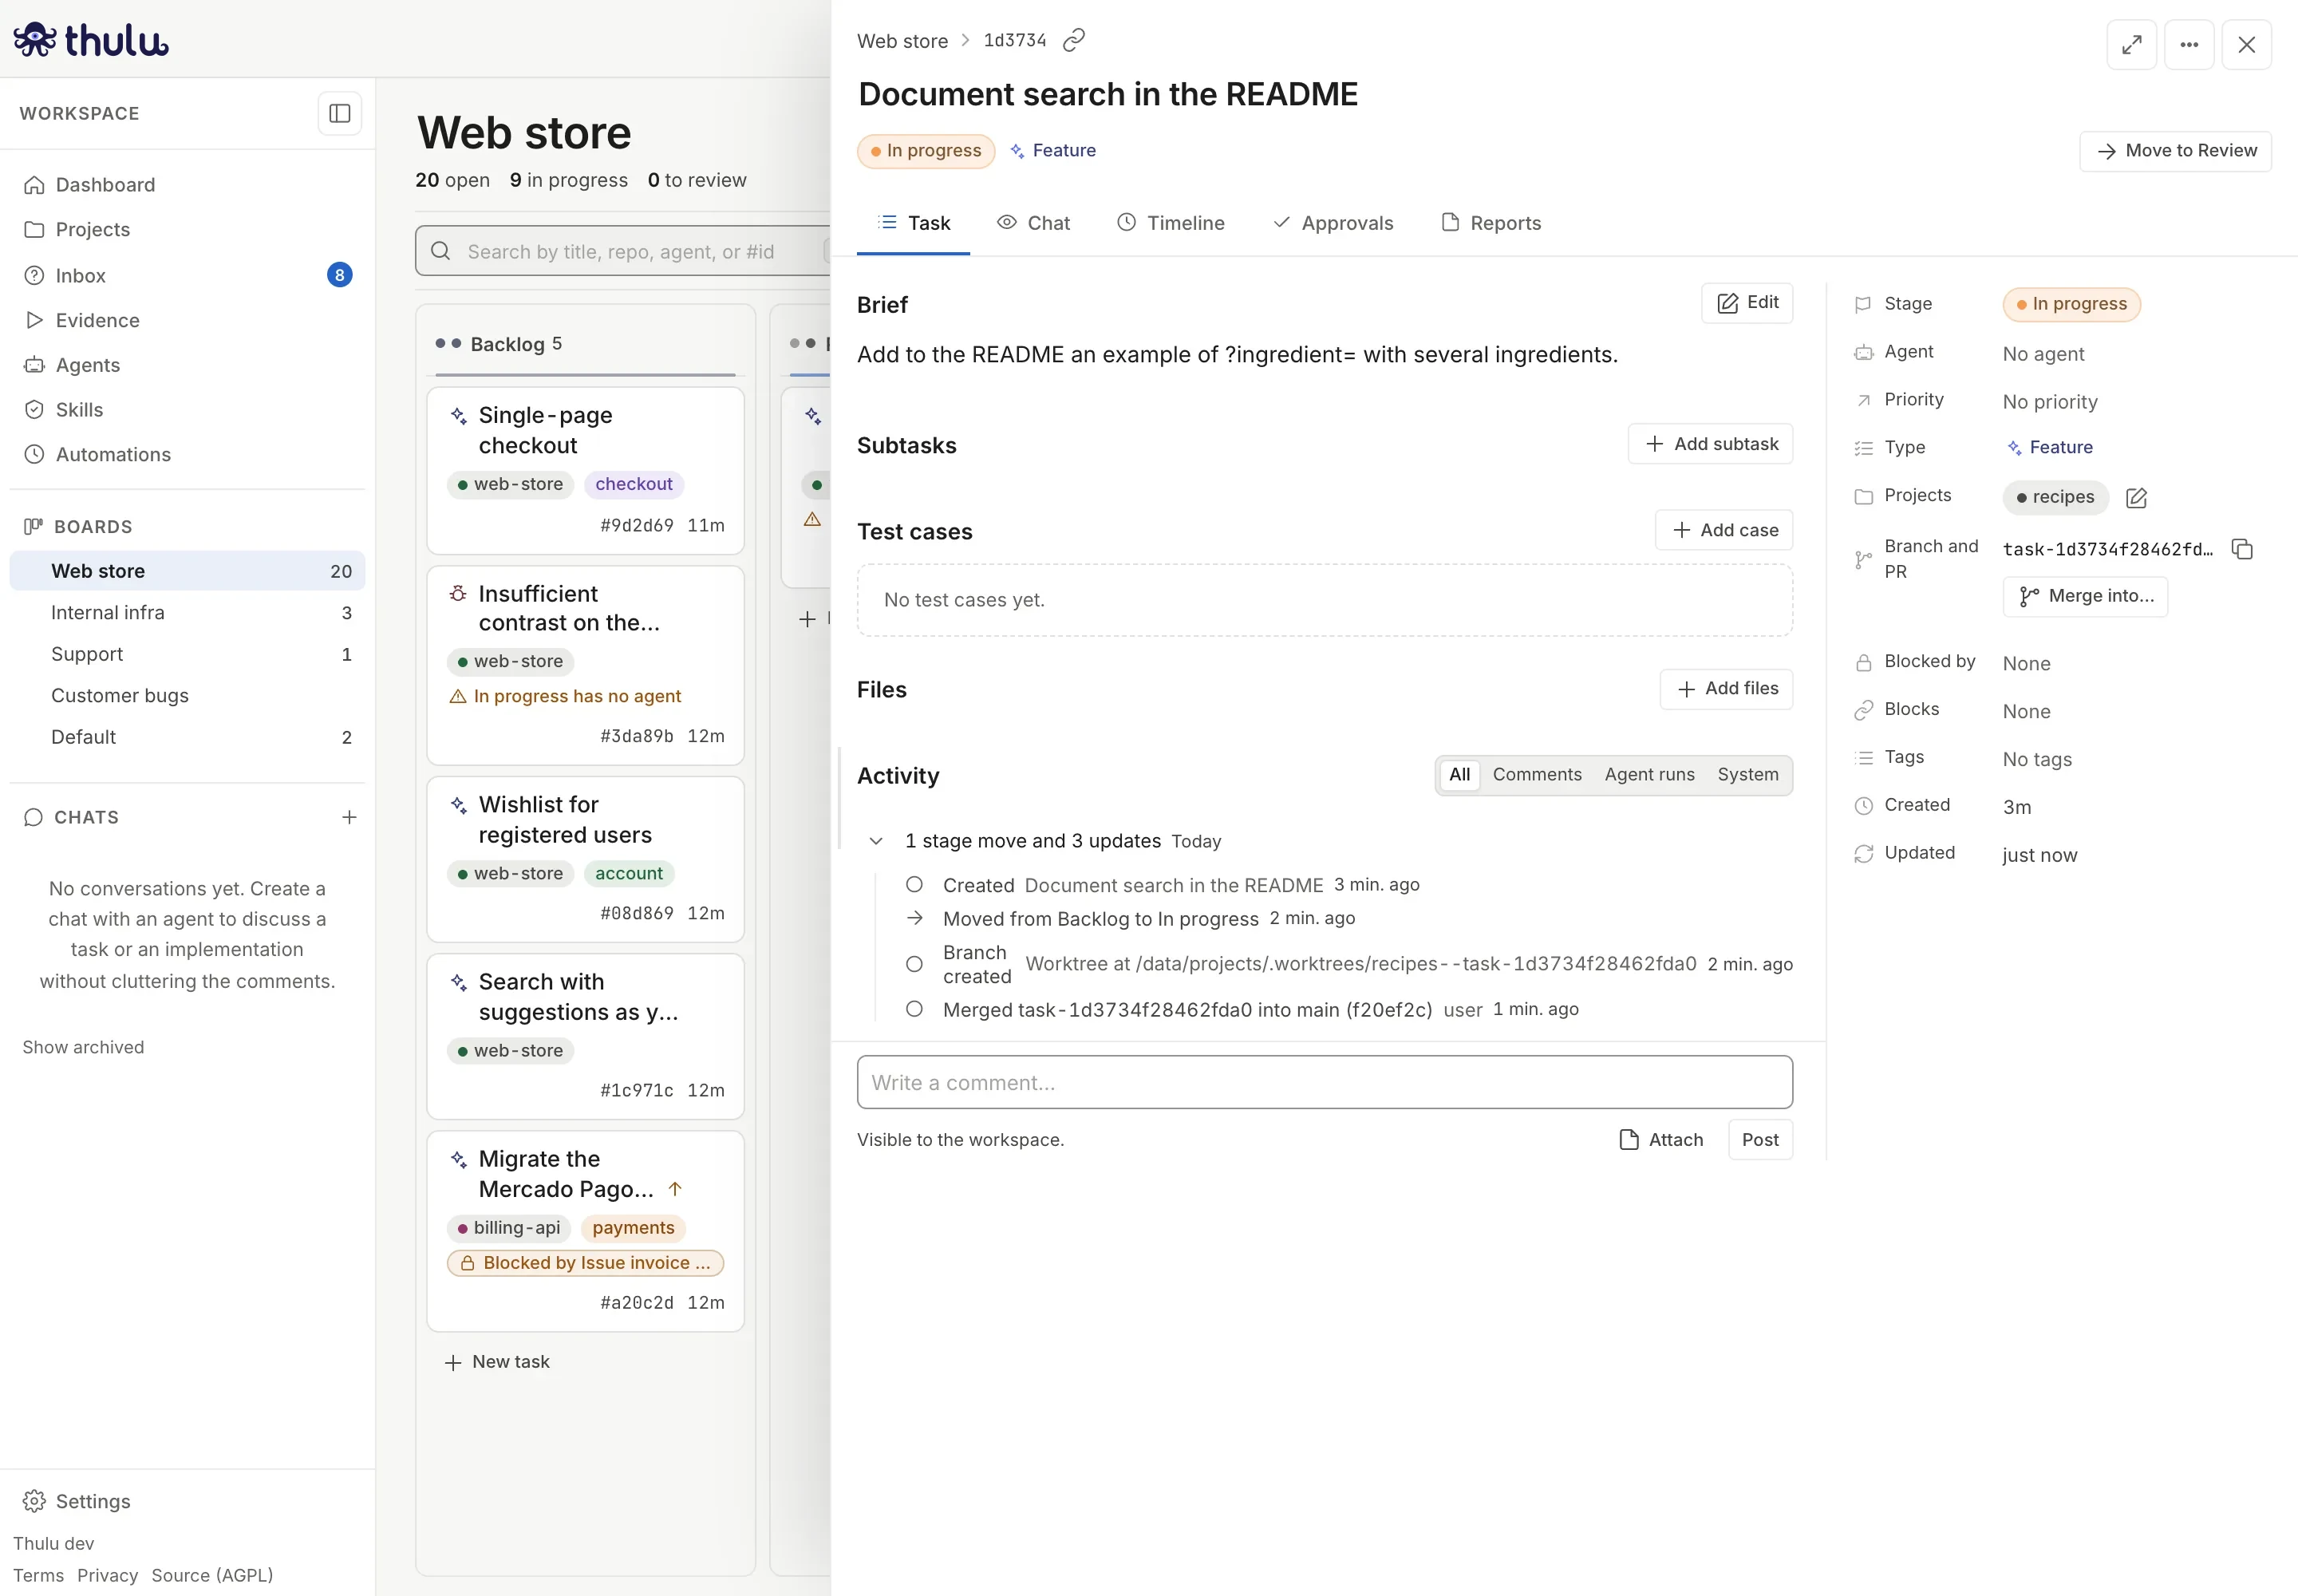
If a file collides with the target branch, Thulu writes nothing and the modal lists the files:
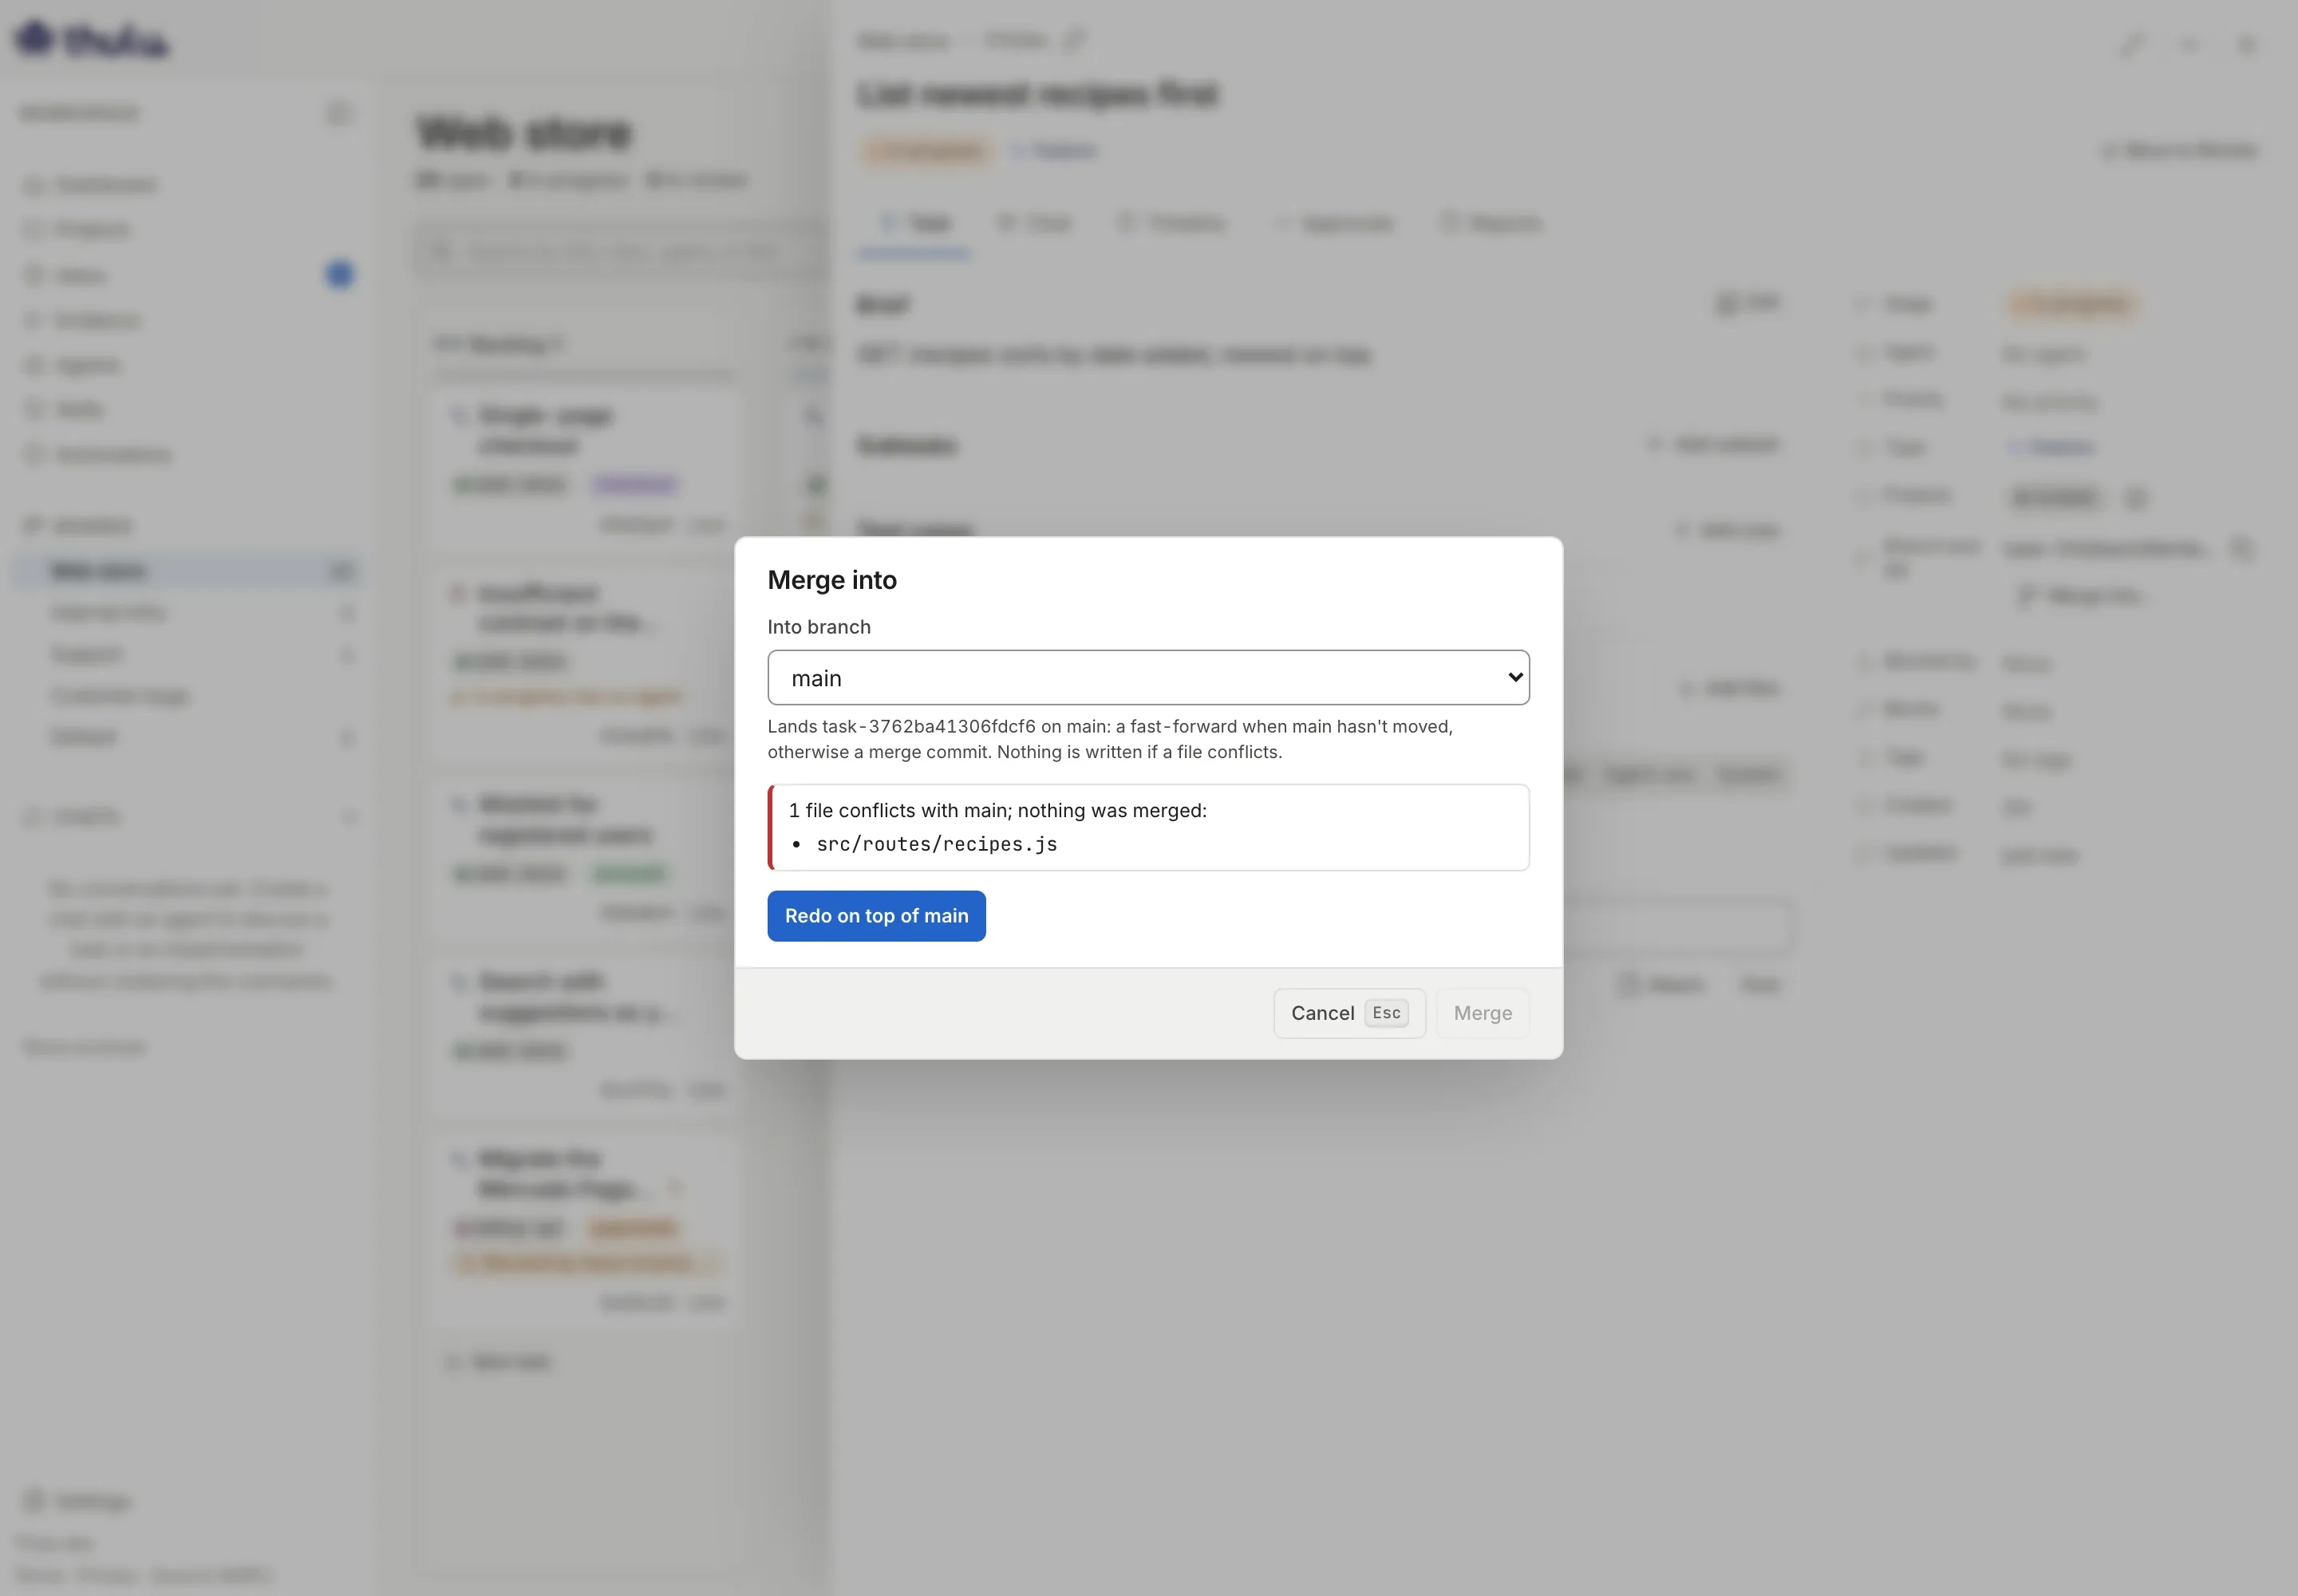
The task’s branch started from a main that no longer exists, and the change has to be redone on top of the current one. The modal offers two ways out:
- “Redo on top of main” creates a copy of the task, with “(redone on main)” in the title and a note in the description that lists the files that collided. The copy starts a new branch from the current main when it leaves the first column. Merge the copy and delete the original.
- “Return to the agent” appears only with agents on Kubernetes, where the agent can bring main into its branch and resolve in its own copy. It leaves a comment with the list of files: if a run is working on the task it receives it right away, and if not, the next run reads it. With agents on Docker the agent sees the
.gitread-only and cannot resolve it, so the button does not appear.
The project page
Section titled “The project page”When you open a project you see four tabs. At the top right, “Tasks” opens the project’s default board with the search filtered by its name, and “Repo” opens the repo on GitHub.
| Tab | What it has |
|---|---|
| “Overview” | Metrics for the work on the project over a date range: open and completed tasks, lead time, rework, runs, cost and where time piles up per stage. |
| “Environments” | Where the repo runs (dev, staging, prod) and the connection to the cloud, telemetry and Evidence. |
| “Repository” | Which credential or GitHub App installation it uses to reach GitHub (on an uploaded project, the “Code” panel), the init script with its dependency cache, the prompts and hooks per stage and the active worktrees. |
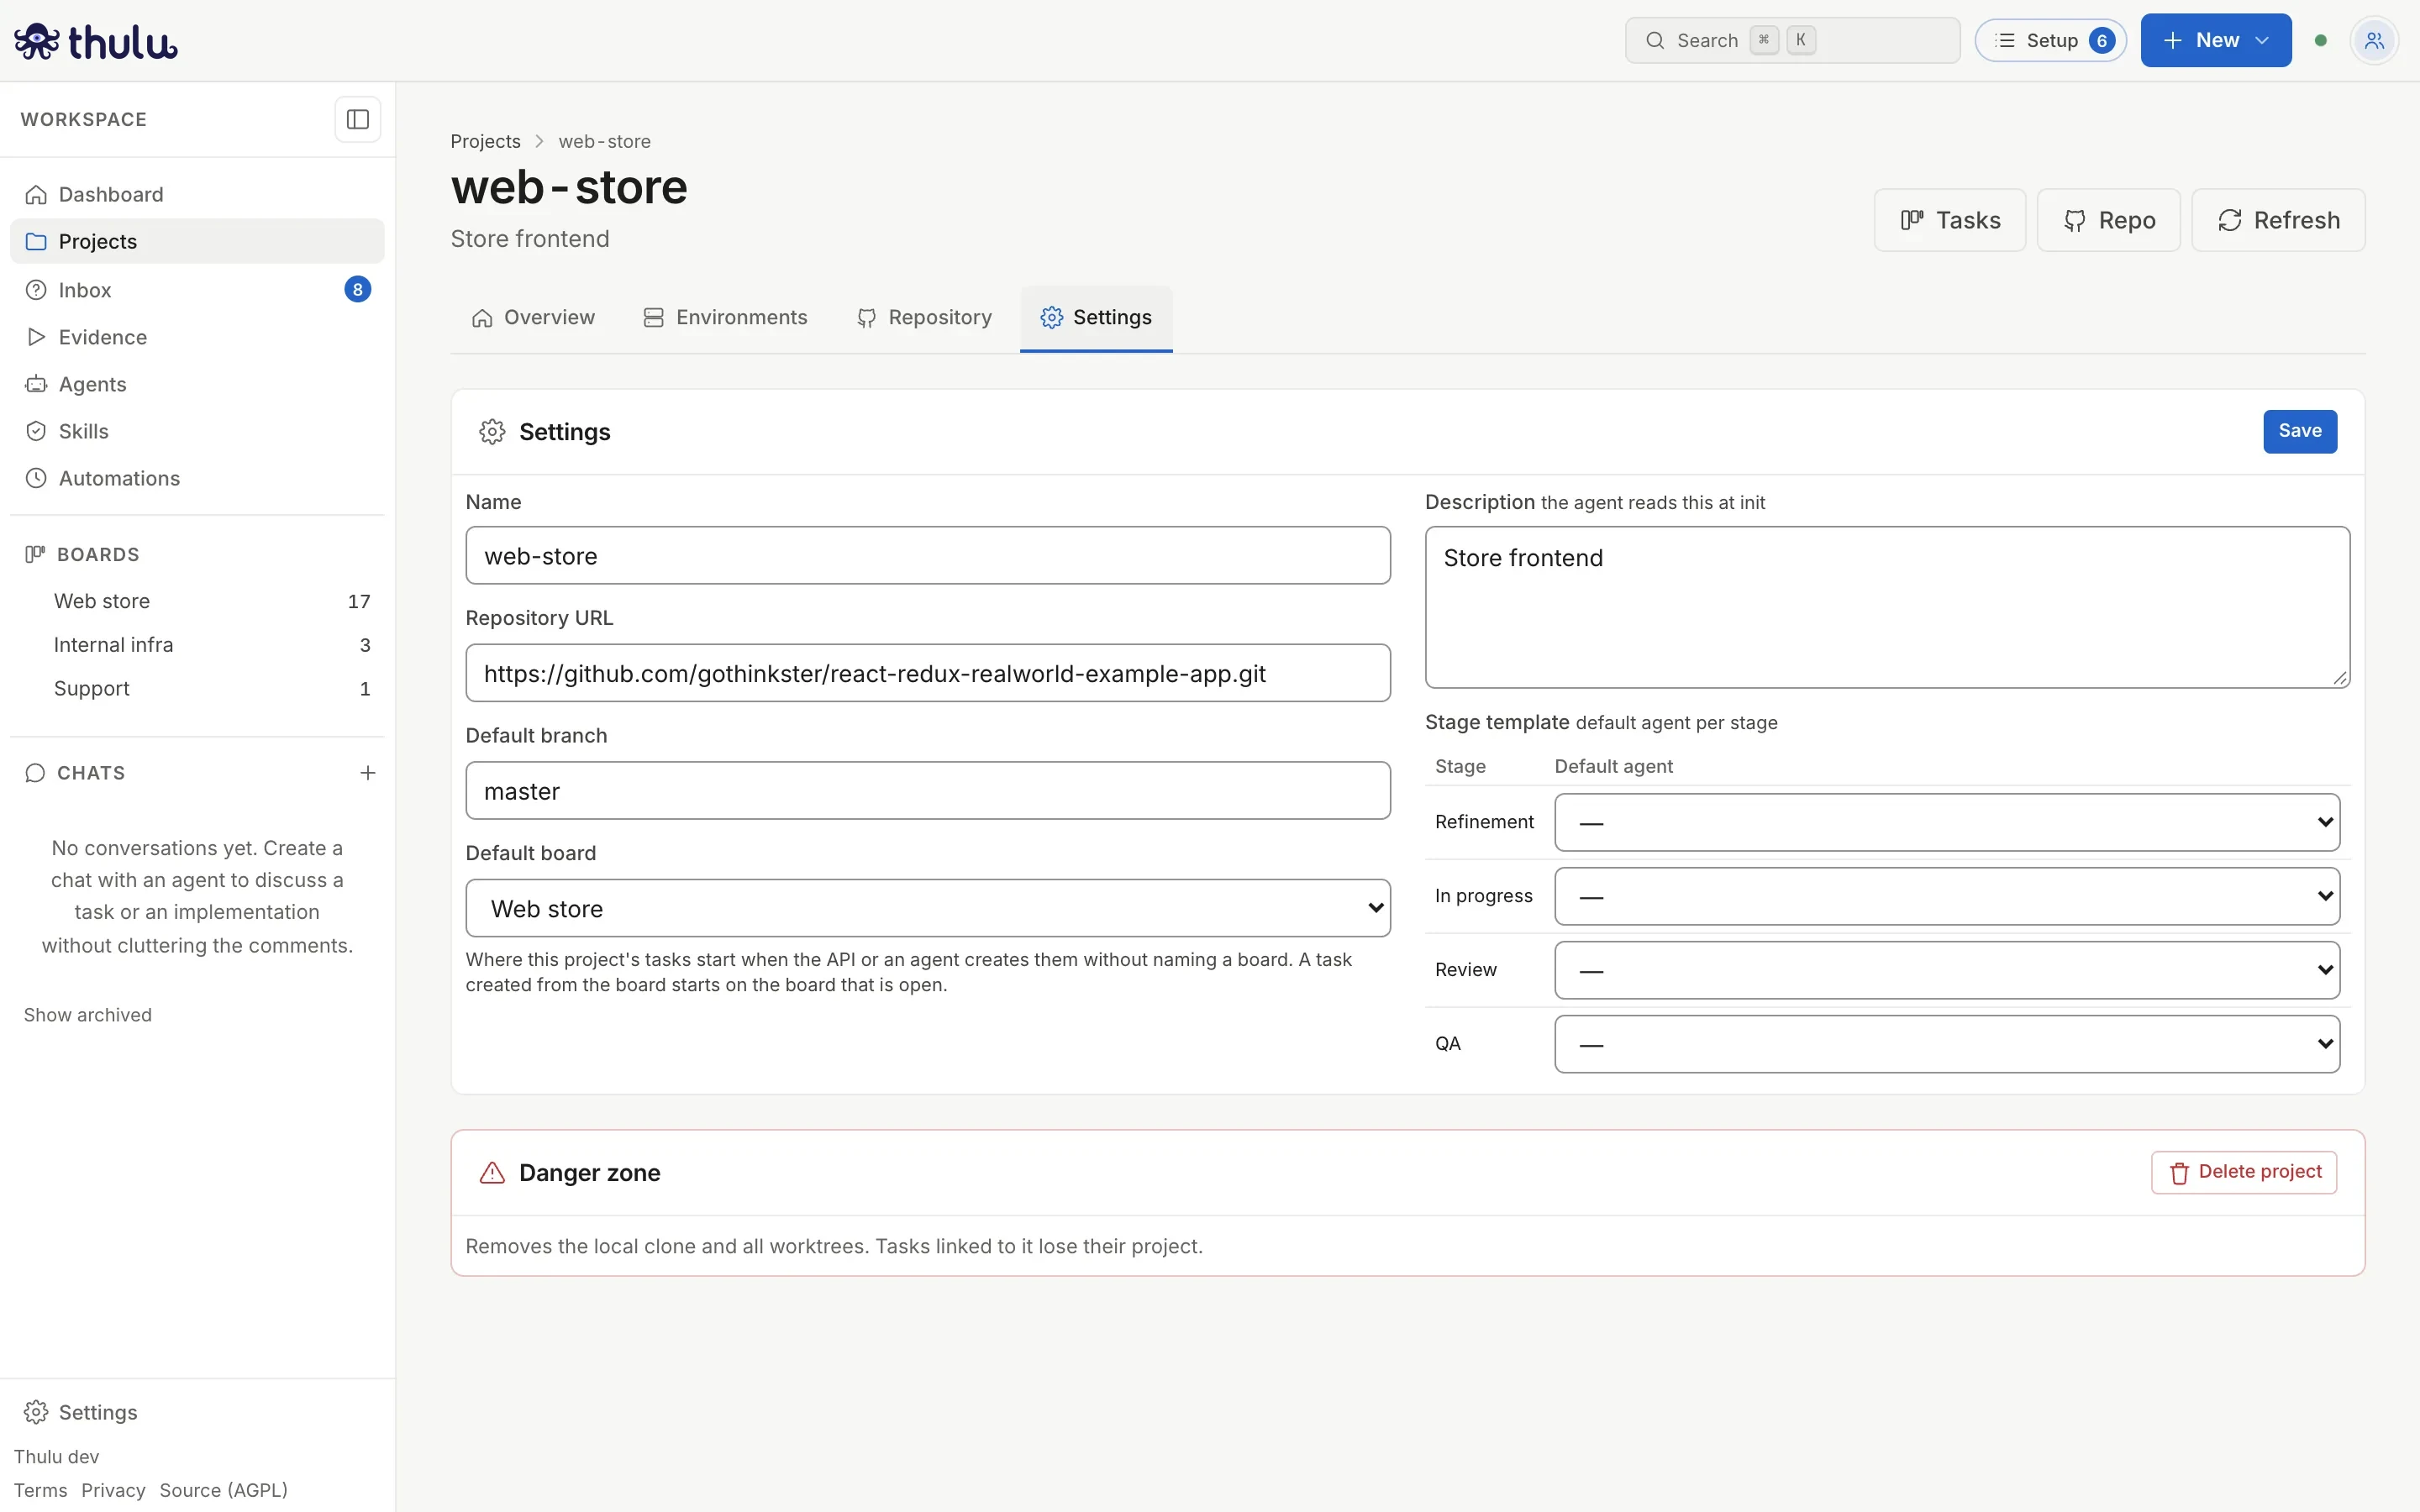
| “Settings” | Name, URL, branch, board, description and template, and “Delete project”. |
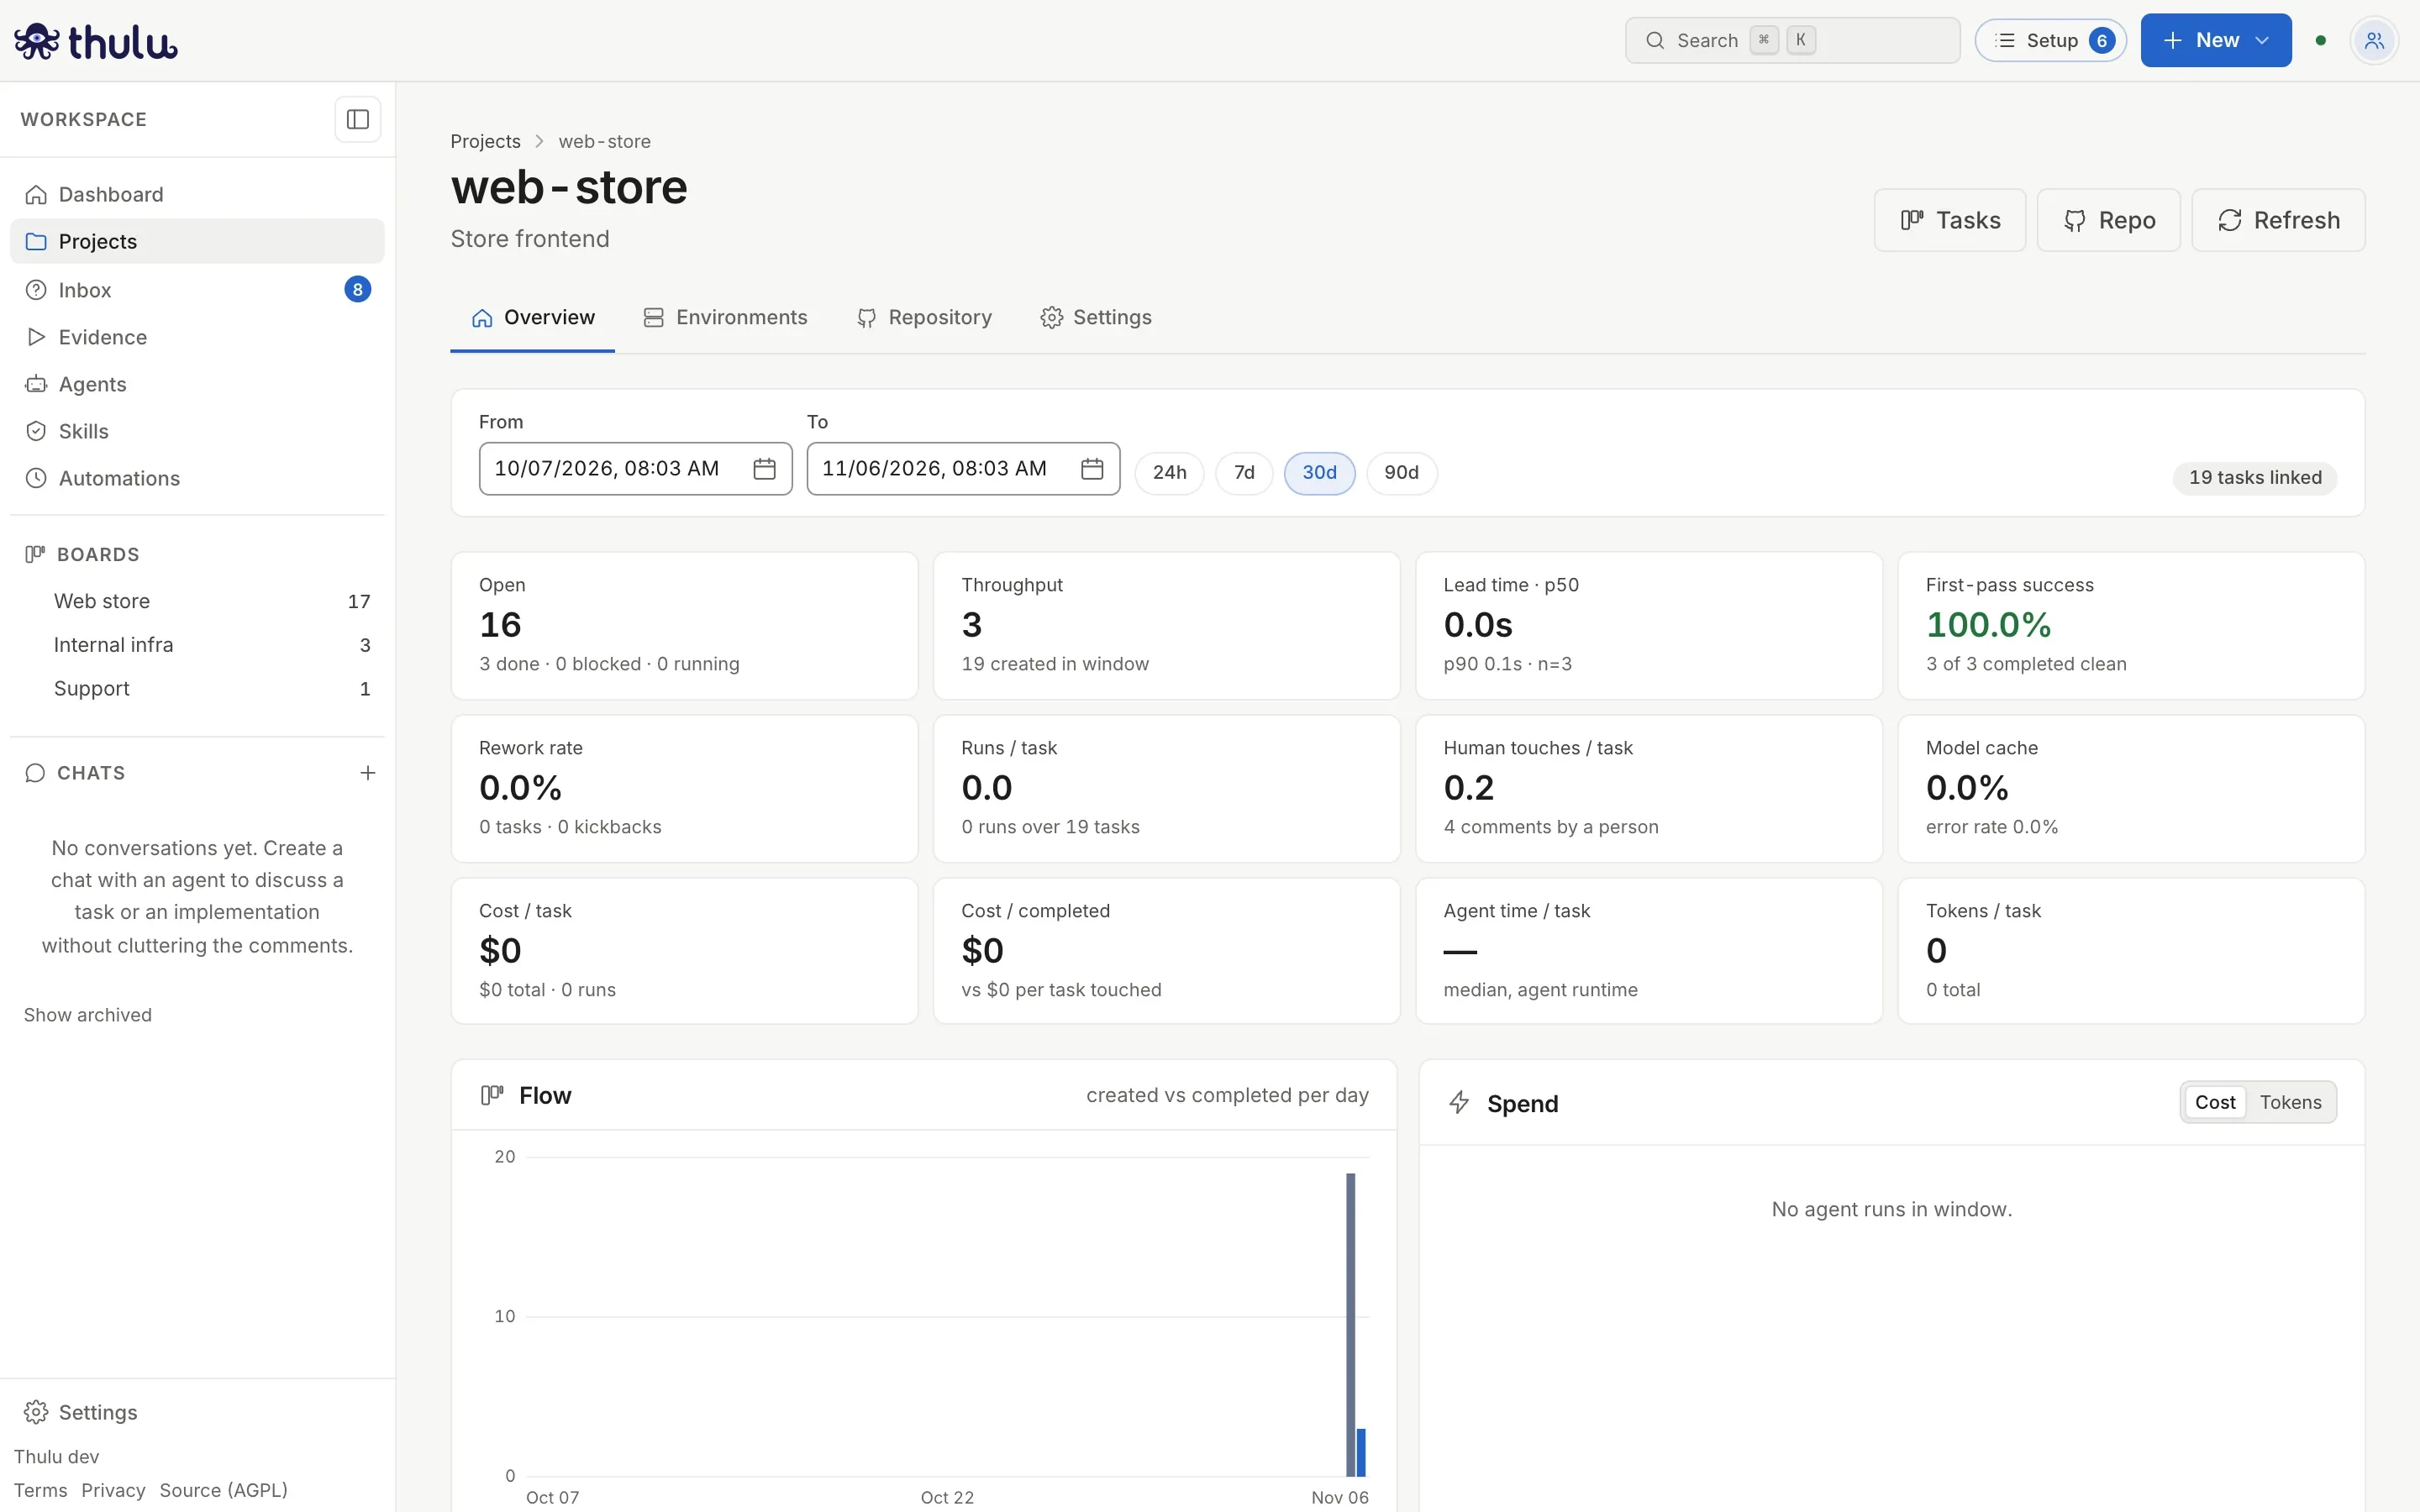
The Overview metrics and how to read them are in Metrics and dashboards. “Open” counts every unfinished task, including those waiting in the first column, and “Model cache” refers to the model’s prompt cache, not the dependency cache.
Write the init script
Section titled “Write the init script”The init script says how to bring the project up inside a task’s sandbox: what to install, which services to start and which port the app listens on. Agents run it with the sandbox MCP’s init_run tool instead of guessing the commands, and if it breaks (a new dependency, a port that changed) they fix it and save it as a new revision, which stays in the history and in the audit log with the agent as author. Without a script, every task starts from scratch. The sandbox itself is explained in Sandbox.
-
Open the project and the “Repository” tab. The “Init script” panel shows the current revision, who saved it and its note.
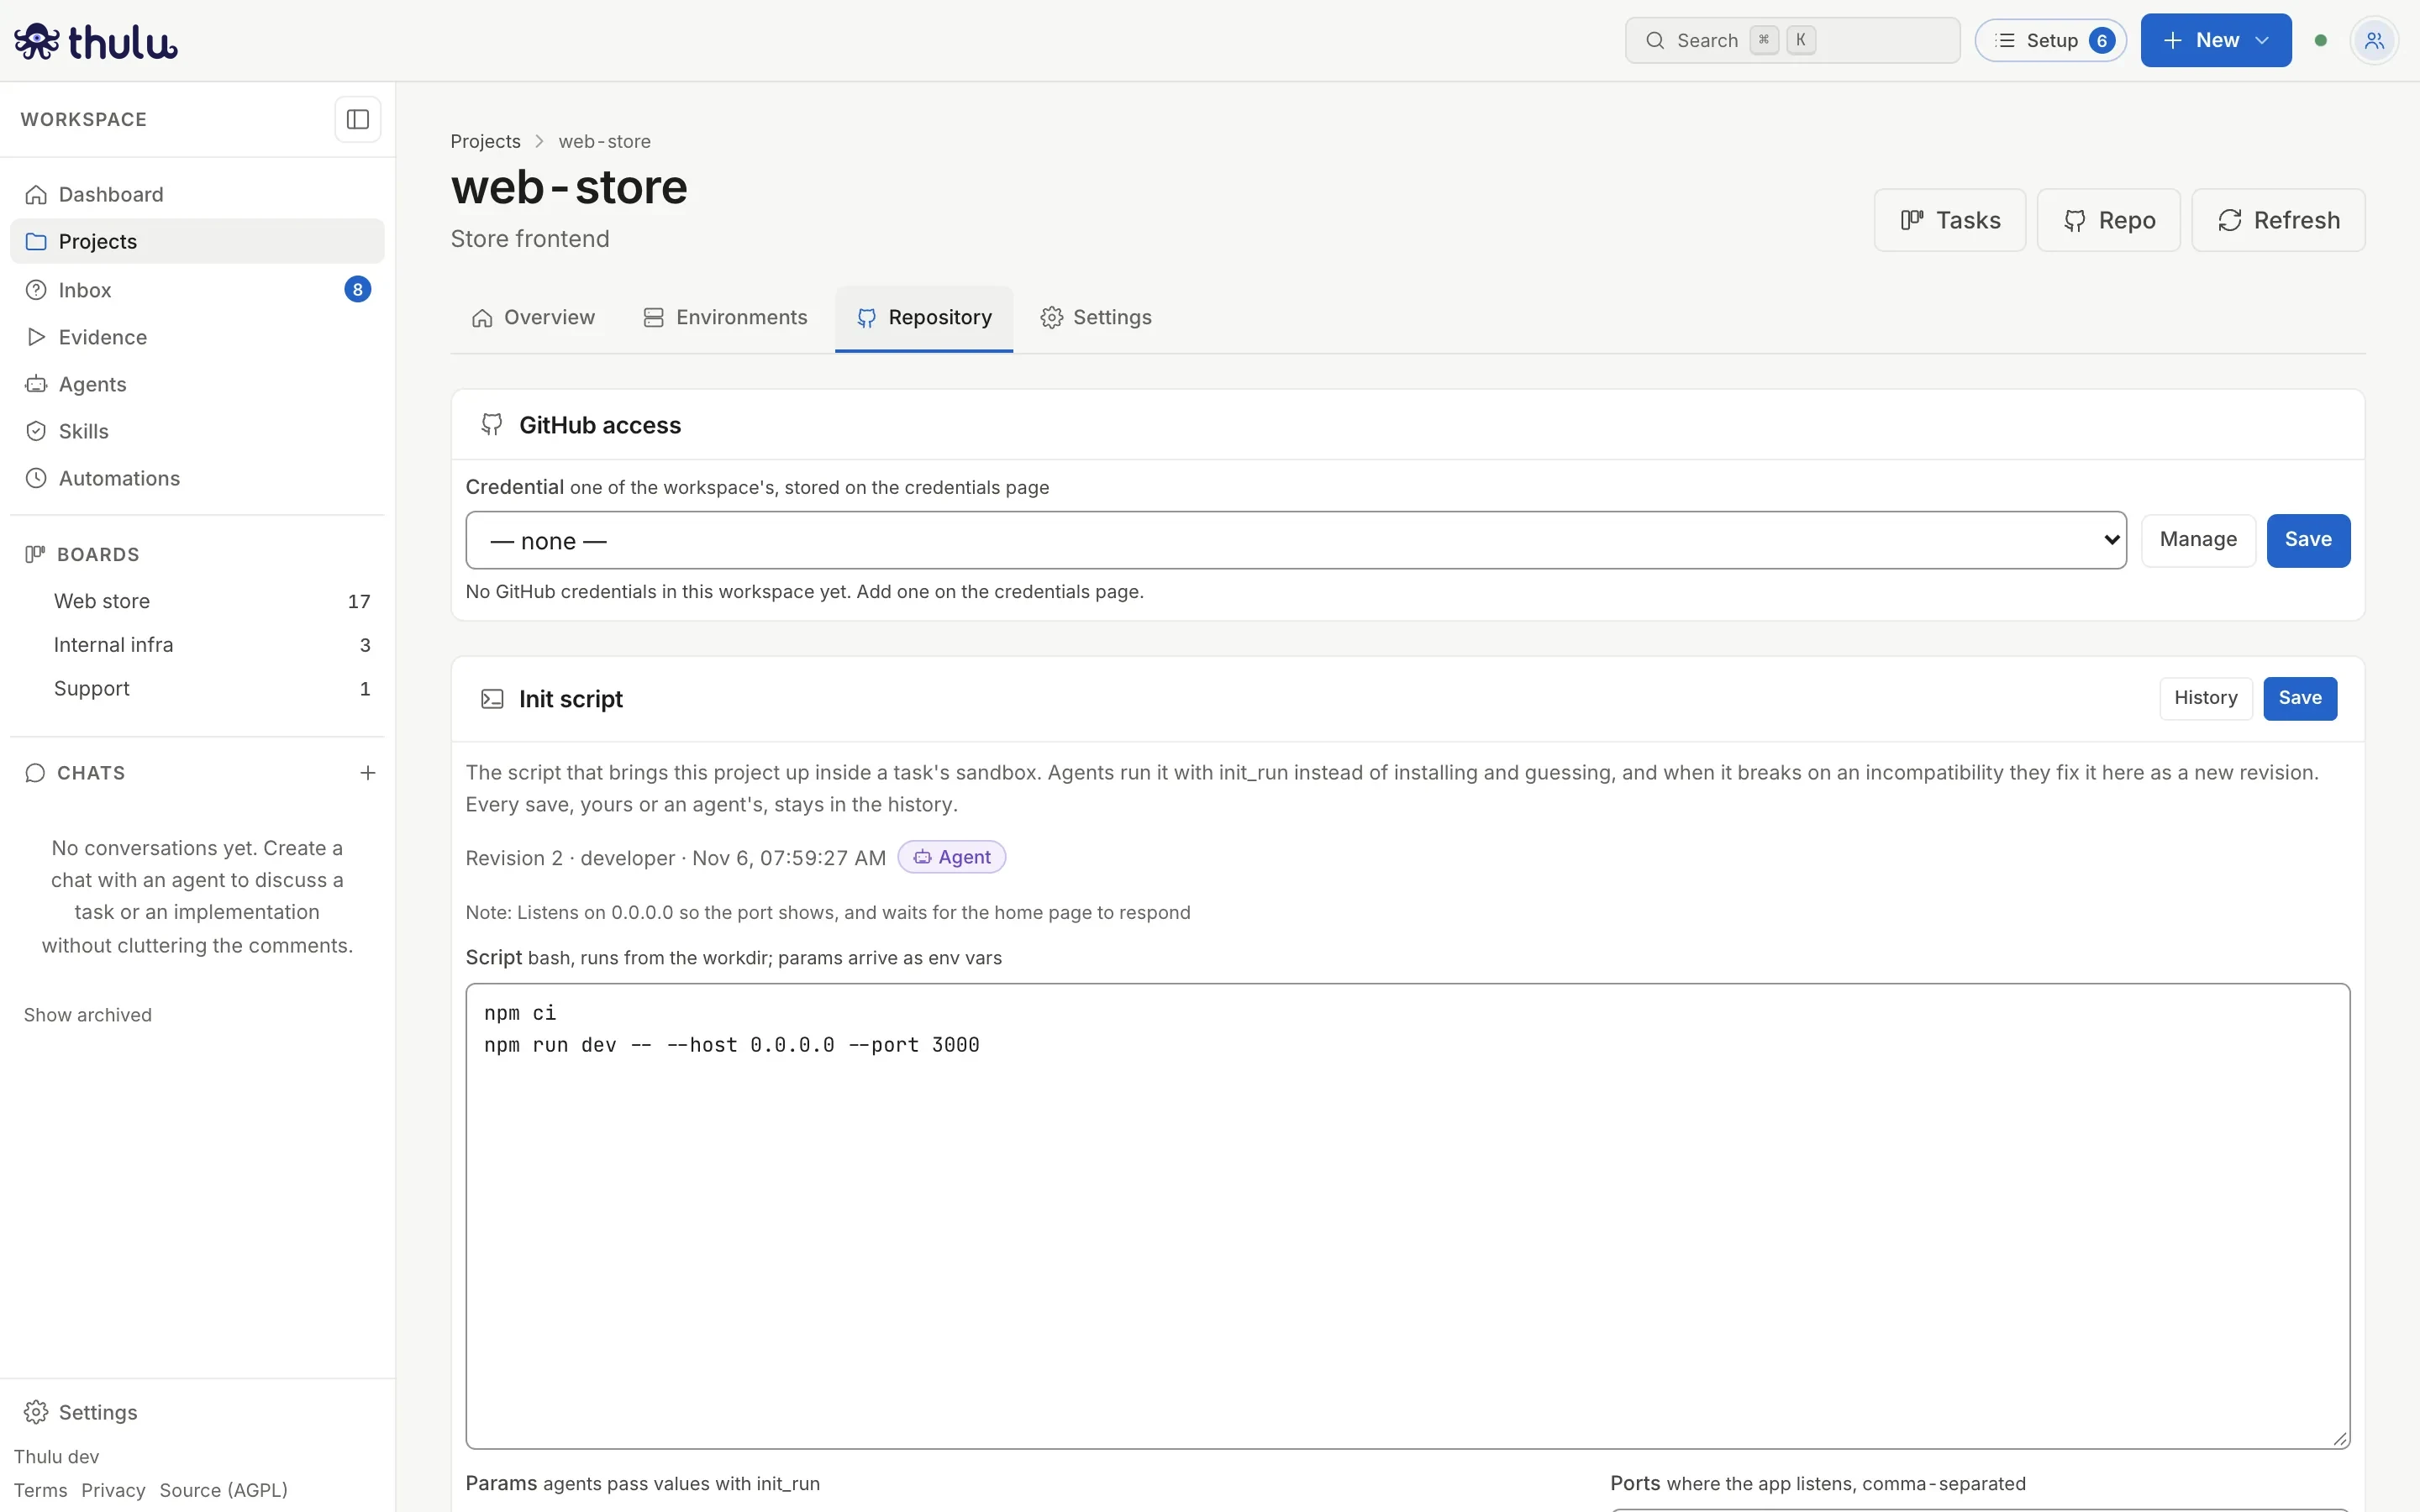
An agent saved revision 2: the "Agent" label and the note say what changed. -
Write the “Script”. It is bash, runs from the workdir and receives the params as environment variables. A new project starts with
#!/usr/bin/env bashandset -euo pipefail. If Thulu recognizes the stack from a file at the repo root (npm, pnpm, Yarn, Go or pip), the panel says “This repo looks like …” and offers “Start from a template”, as long as the project has no saved revision. The script has to leave the app running in the background and exit. -
If the script needs values that change per task, add them with “Add param”: an uppercase name (
PORT), a default, a description and “Required”. Names that start withOCTOPUS_are reserved. -
Fill in “Ports” (where the app listens, comma-separated) and the “Ready command”: a command that exits with 0 once the app responds, for example
curl -fsS http://localhost:3000/.init_runrepeats it until it passes or until the “Ready timeout (s)” (300 by default, up to 900). “Workdir” is the repo folder where the script runs;.is the root. -
Write a “Note” (optional) with what changed and why: it is what shows in the history.
-
Click “Save”. “Saved as revision N” appears.
Install phase and snapshot
Section titled “Install phase and snapshot”Installing dependencies is what takes longest when you bring a project up. The collapsible “Install phase” section separates installation from startup so that Thulu can skip it or restore it from a snapshot.
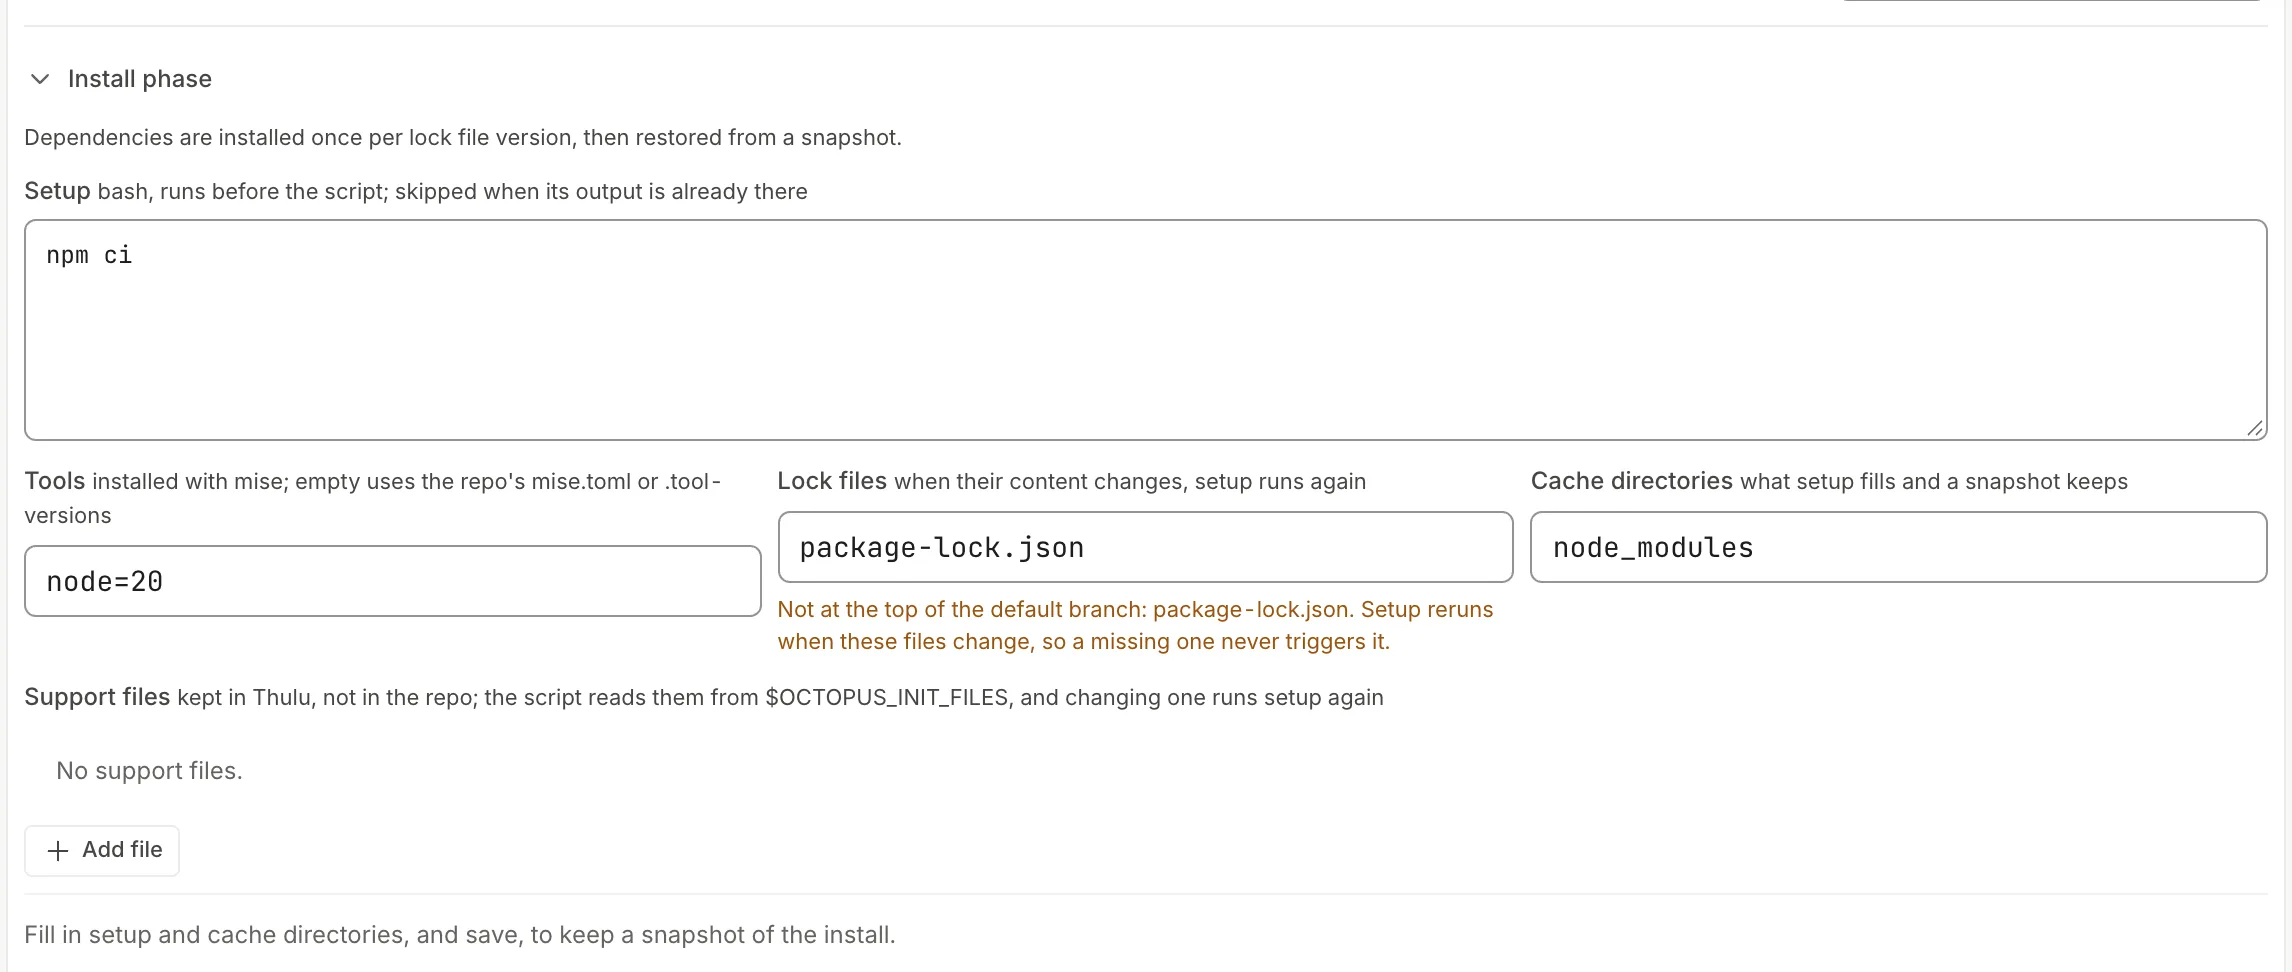
| Field | What to enter | Example |
|---|---|---|
| “Setup” | The commands that install dependencies. It runs before the script and is skipped if its result is already there. | npm ci |
| “Tools” | Language versions, as name=version separated by commas. They are installed with mise once per workspace. Empty uses the repo’s mise.toml or .tool-versions. |
go=1.25.1, node=22 |
| “Lock files” | Files whose content defines the dependencies. If they change, setup runs again. | package-lock.json |
| “Cache directories” | What setup leaves in place and what is kept in the snapshot. Paths relative to the workdir. | node_modules |
| “Support files” | Files the script uses that the repo does not carry (a seed, a static server). They are kept in Thulu and the script reads them from $OCTOPUS_INIT_FILES. They are never written to the repo. |
seed-users.mjs |
When init_run runs on a task, it does this in order: it installs the tools (from cache if they are already there), and then it skips setup if that checkout already installed with the same lock files, or restores the snapshot if there is one for that version, or runs setup with the workspace’s package caches already full. Only then does it run the script.
The prewarm builds the snapshot, from the default branch and in a separate sandbox: when you save a revision that changes the lock files or the setup, every 10 minutes if they changed on the default branch, and by hand with “Prewarm now”. The “Last snapshot” line shows the key, the date and the size. A task whose branch changed the lock files does not use the snapshot: it runs setup, which still downloads less because the packages are already in the workspace cache.
The “Dependency cache” panel in Infrastructure shows the operator the hit rate, how much time was saved on that installation and how much space each workspace’s cache takes.
History and restore
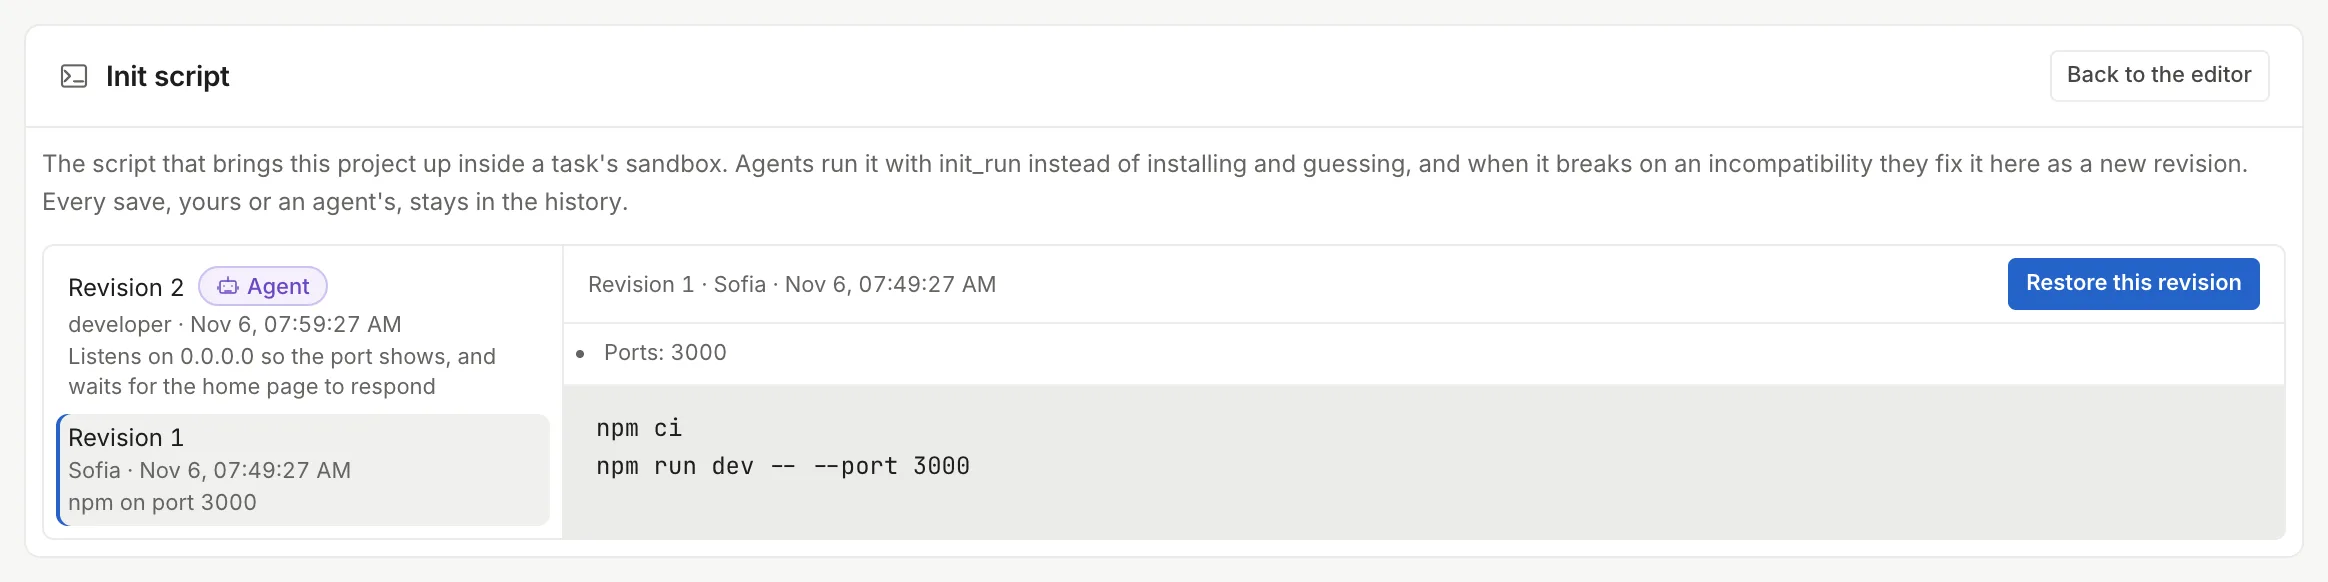
Section titled “History and restore”Every save, yours or an agent’s, is a revision that is never deleted. An agent’s revisions carry the “Agent” label and say which agent saved it, in which stage and on which task, with a link to the task (“developer in Development · task #578dfc”). The change also goes in the workspace audit log.
- In the “Init script” panel click “History”.
- Pick a revision from the list. On the right you see its ports, ready command, params and the script.
- Click “Restore this revision” and confirm. It is saved again as the newest revision; the one that was current stays in the history.
- “Back to the editor” takes you back to the form.
Link tasks to a project
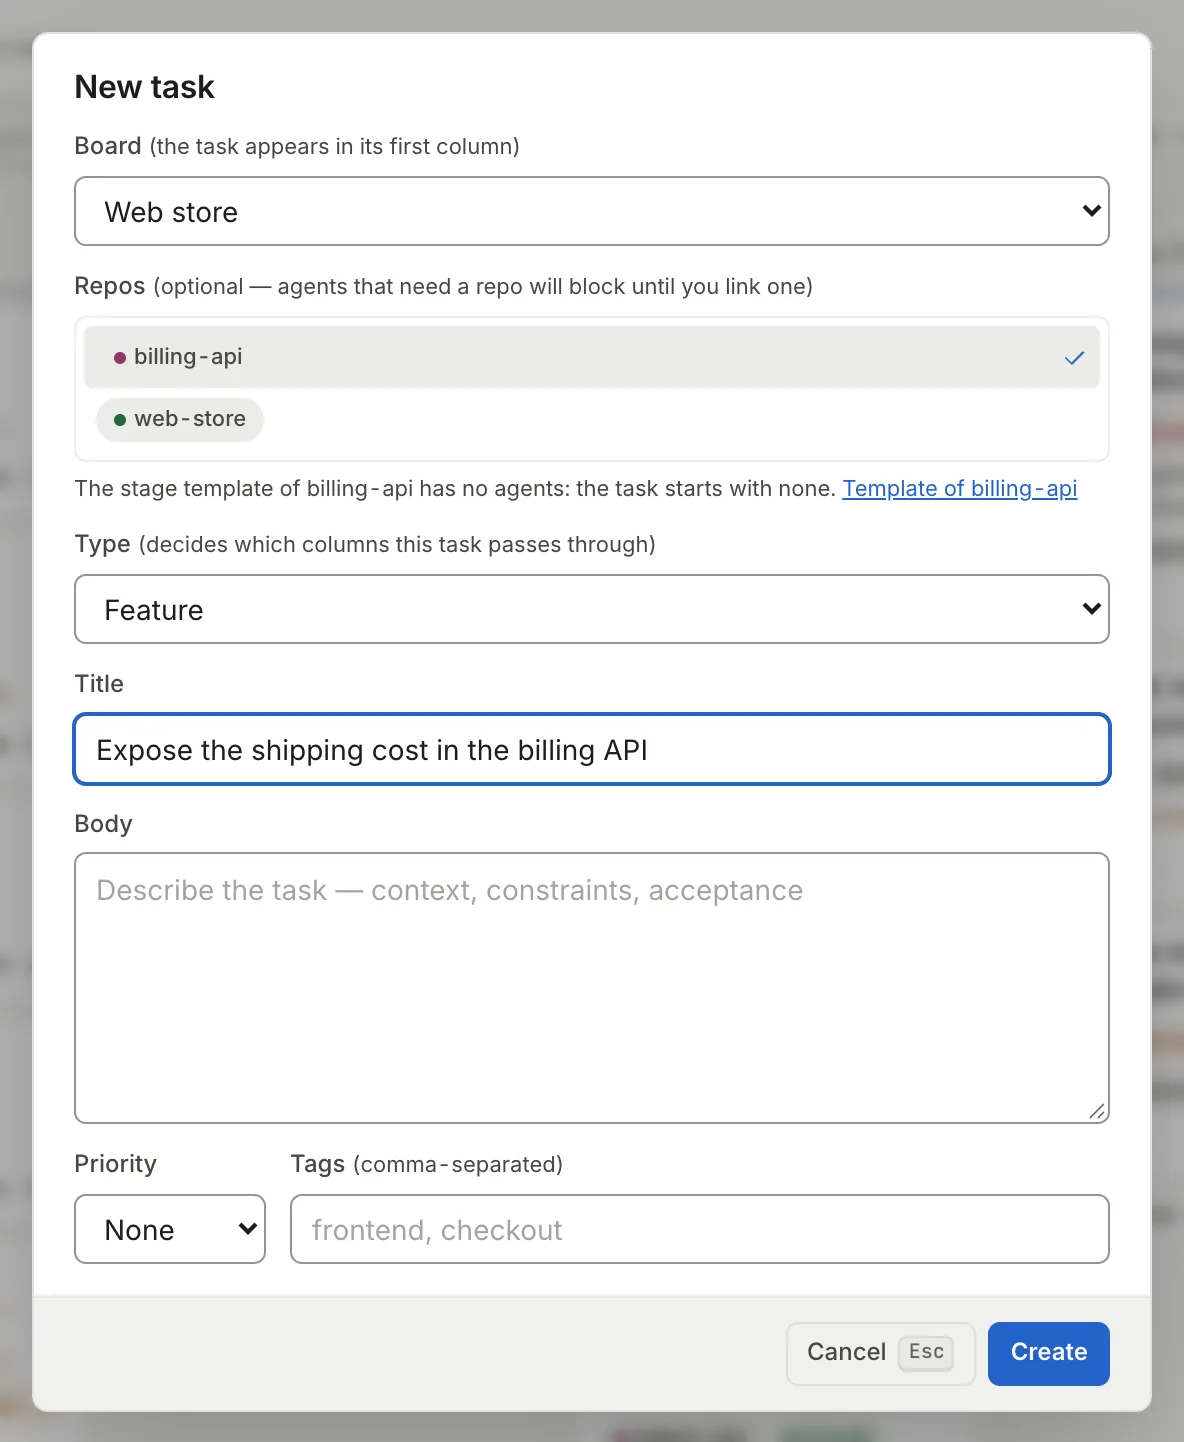
Section titled “Link tasks to a project”In the “New task” modal, “Repos” shows the workspace’s projects as chips: click the ones the task will touch. When you create it, the task takes the agents from the template of each chosen project. If you choose several and two templates put different agents in the same stage, the one from the project that appears first in the list wins.
In the task panel, the “Projects” property has a pencil (“Edit linked projects”). Search for the project and pick it; to unlink, remove it from the same list.
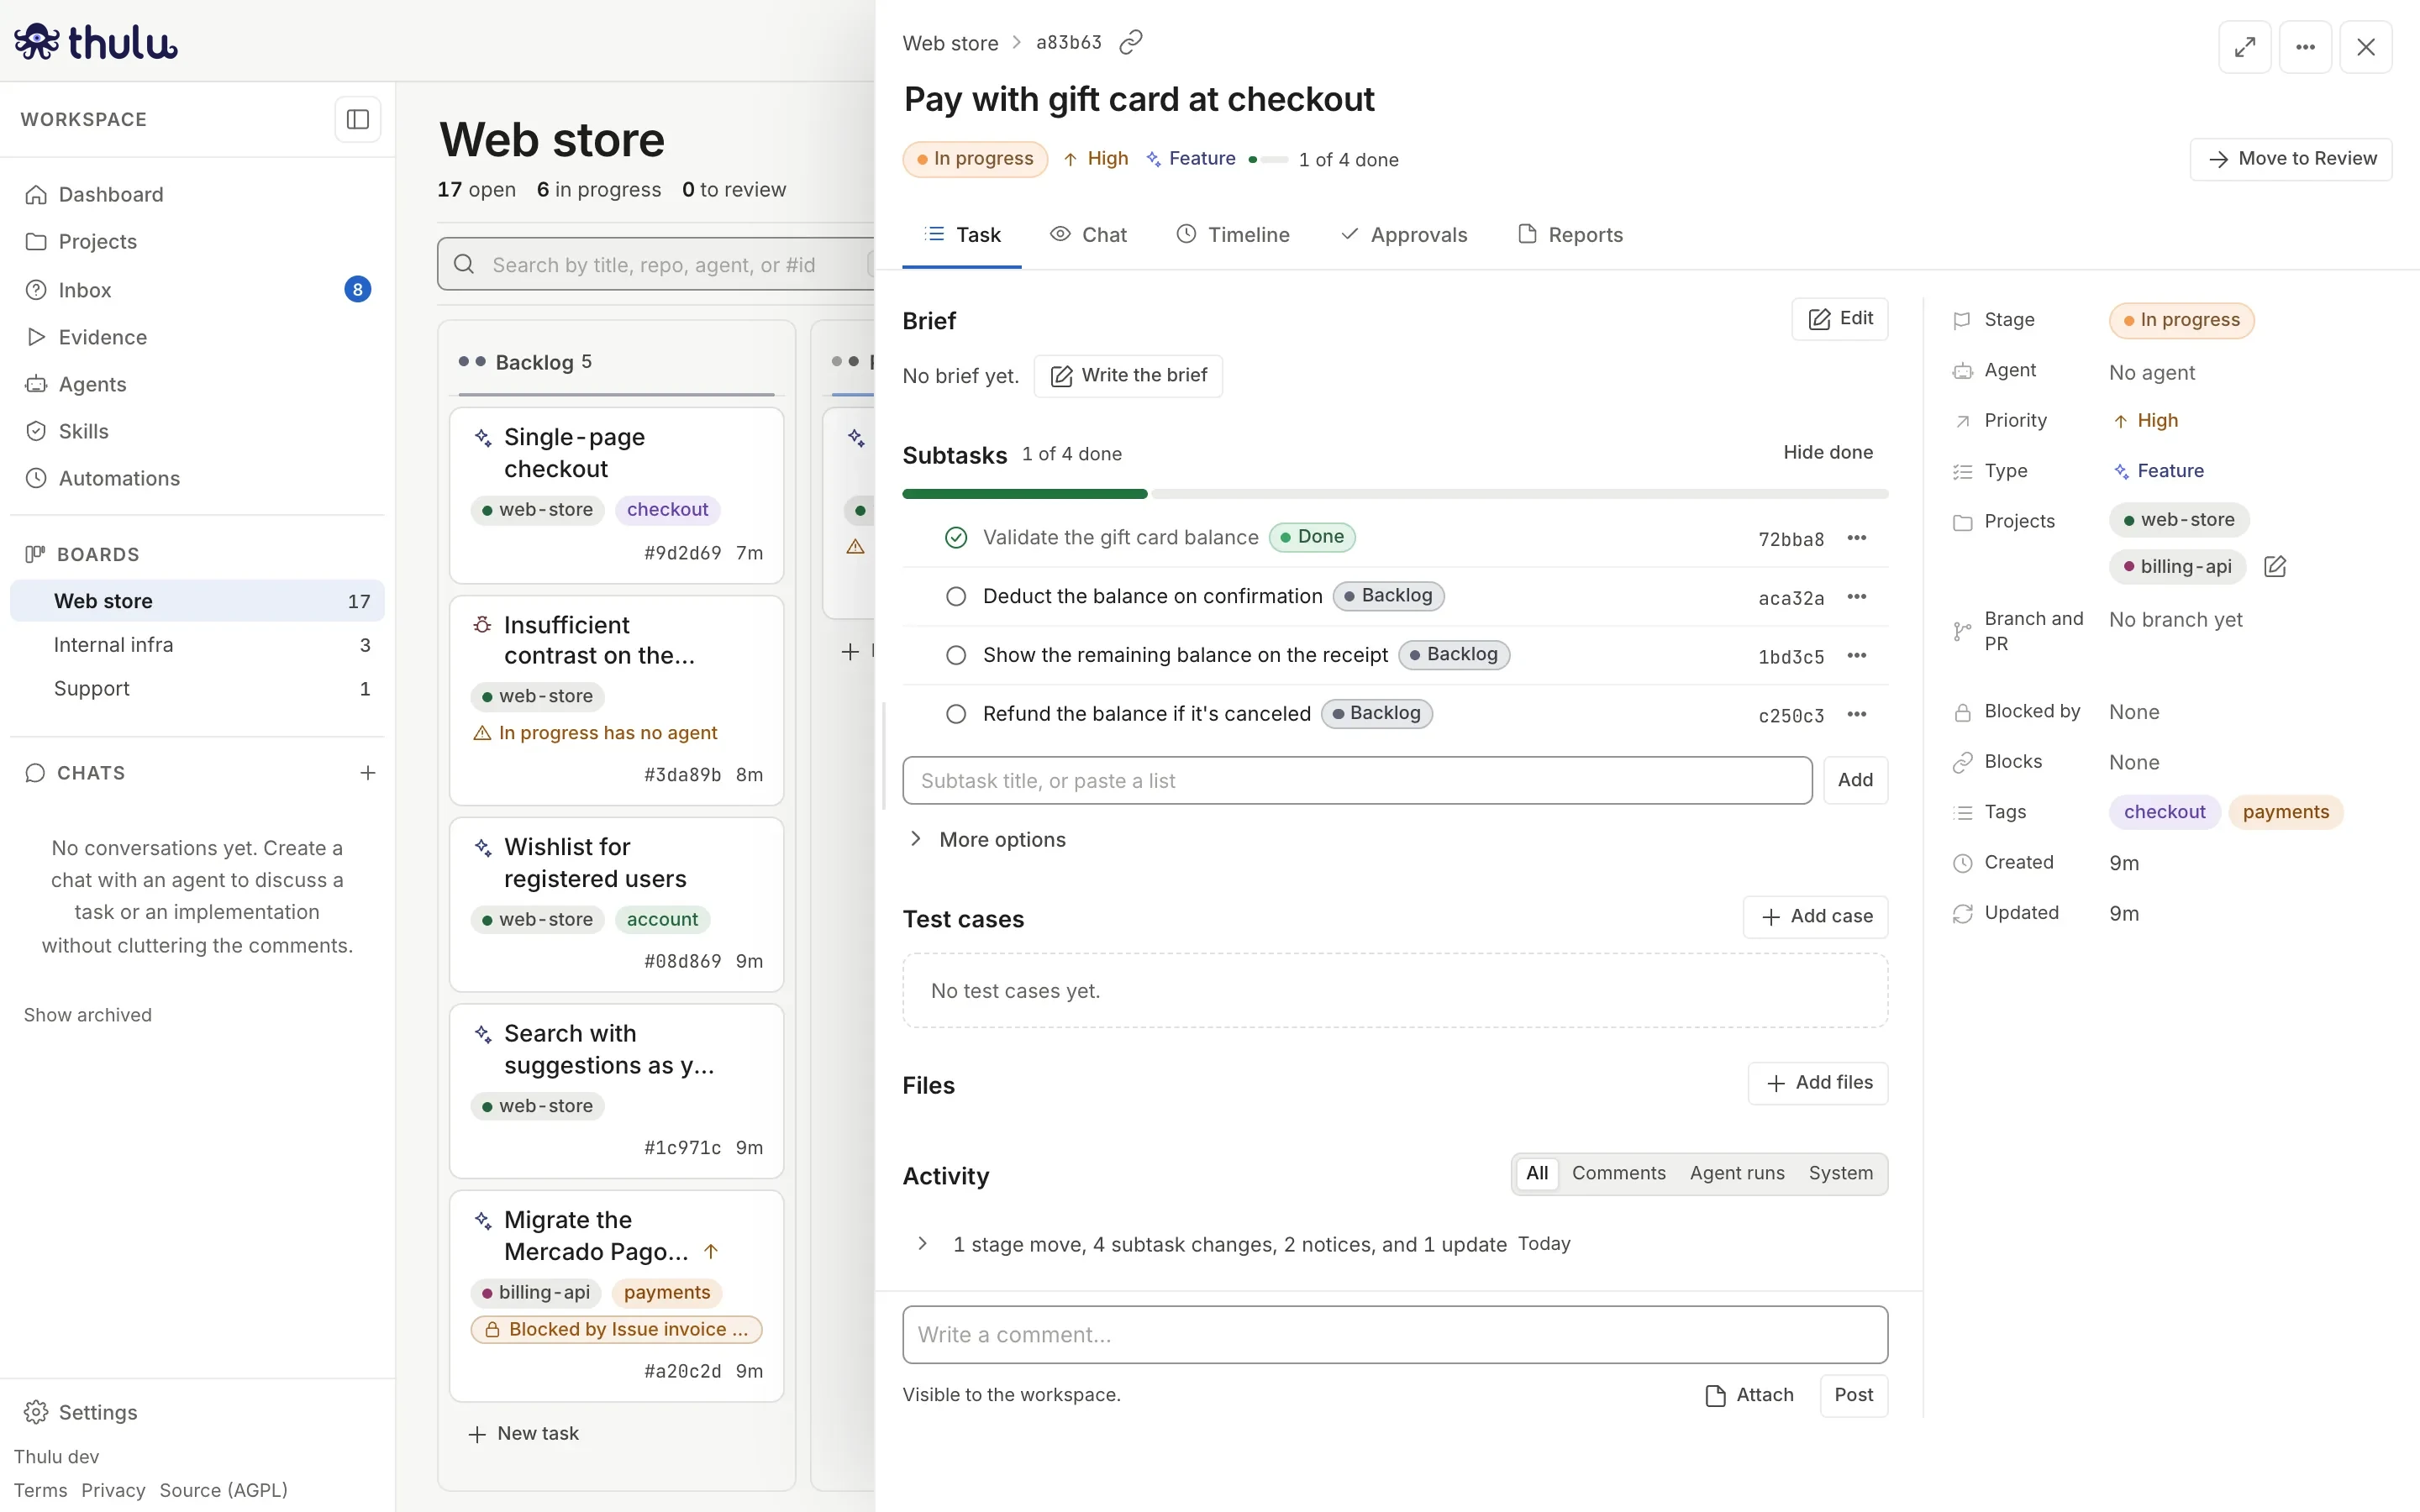
Linking a project here does not apply its template: if the task had no agents, assign them by hand under “Agent”.
A task that touches several repos has one task-<id> branch and one pull request per project. If you create it through the API without a board and its projects have different “Default board” values, Thulu rejects it until you name one.
Environments
Section titled “Environments”The “Environments” tab describes where the repo really runs. With a named environment, an agent can ask for the error rate of prod instead of the project’s in general, and Evidence knows which URL to run its cases against.
- Under “Environments” click “Add environment”.
- Fill in the name (lowercase:
dev,staging,prod) and, if you want, a “Display name” for Evidence and a “System” (the same value in all the repos of one deployment). - Choose the provider. Today Thulu reads metrics from AWS and Google Cloud; Prometheus and “Other” can be registered but are not collected.
- Fill in “Region”, “Account” (AWS account id or GCP project id), “URL” and, if needed, “Selectors” (one
key=valueper line to narrow the resources). - Check “Production” if it is the production environment. In Evidence, editing a production environment requires the admin role.
- Pick the cloud credential or create one right there, and click “Save”.
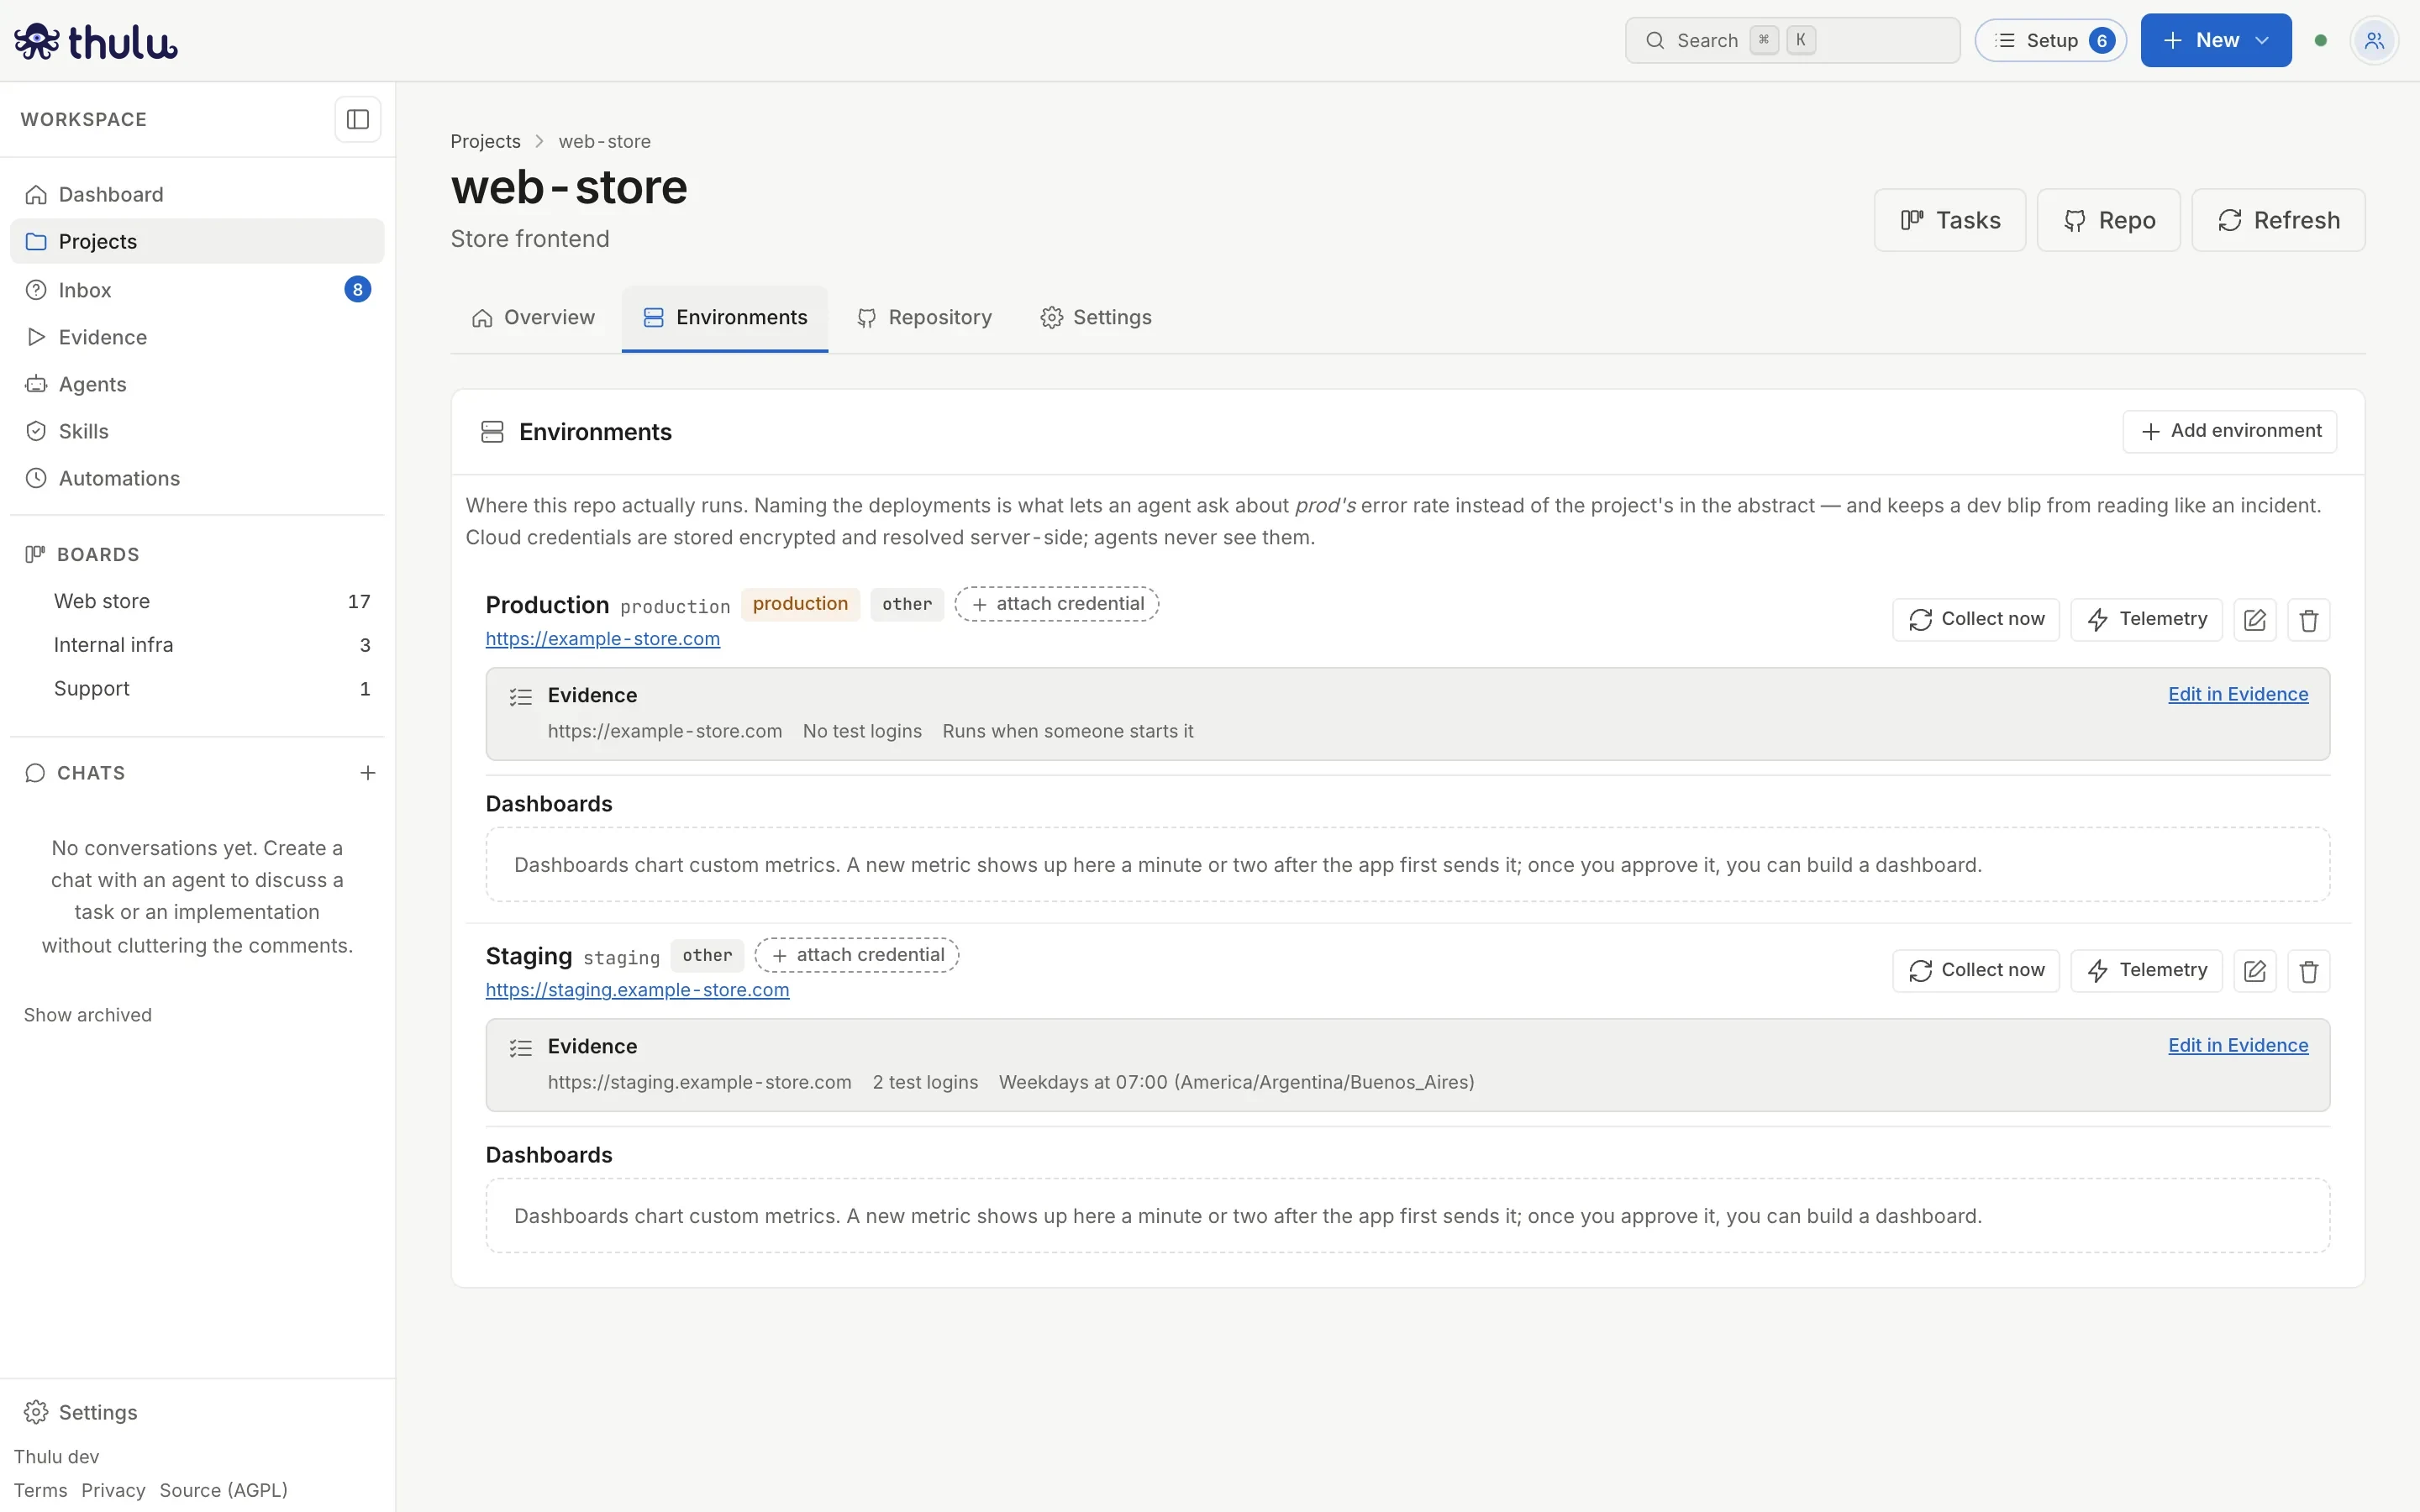
What each environment enables is on other pages: metrics, telemetry and dashboards in Metrics and dashboards, and tests against the environment (test logins, schedule, Sandbox environment) in Evidence.
Settings, prompts and hooks per stage
Section titled “Settings, prompts and hooks per stage”The “Settings” tab has the same fields as the creation form (except GitHub access, which is under “Repository”) with its own “Save”. Changing the template does not touch tasks that already exist.
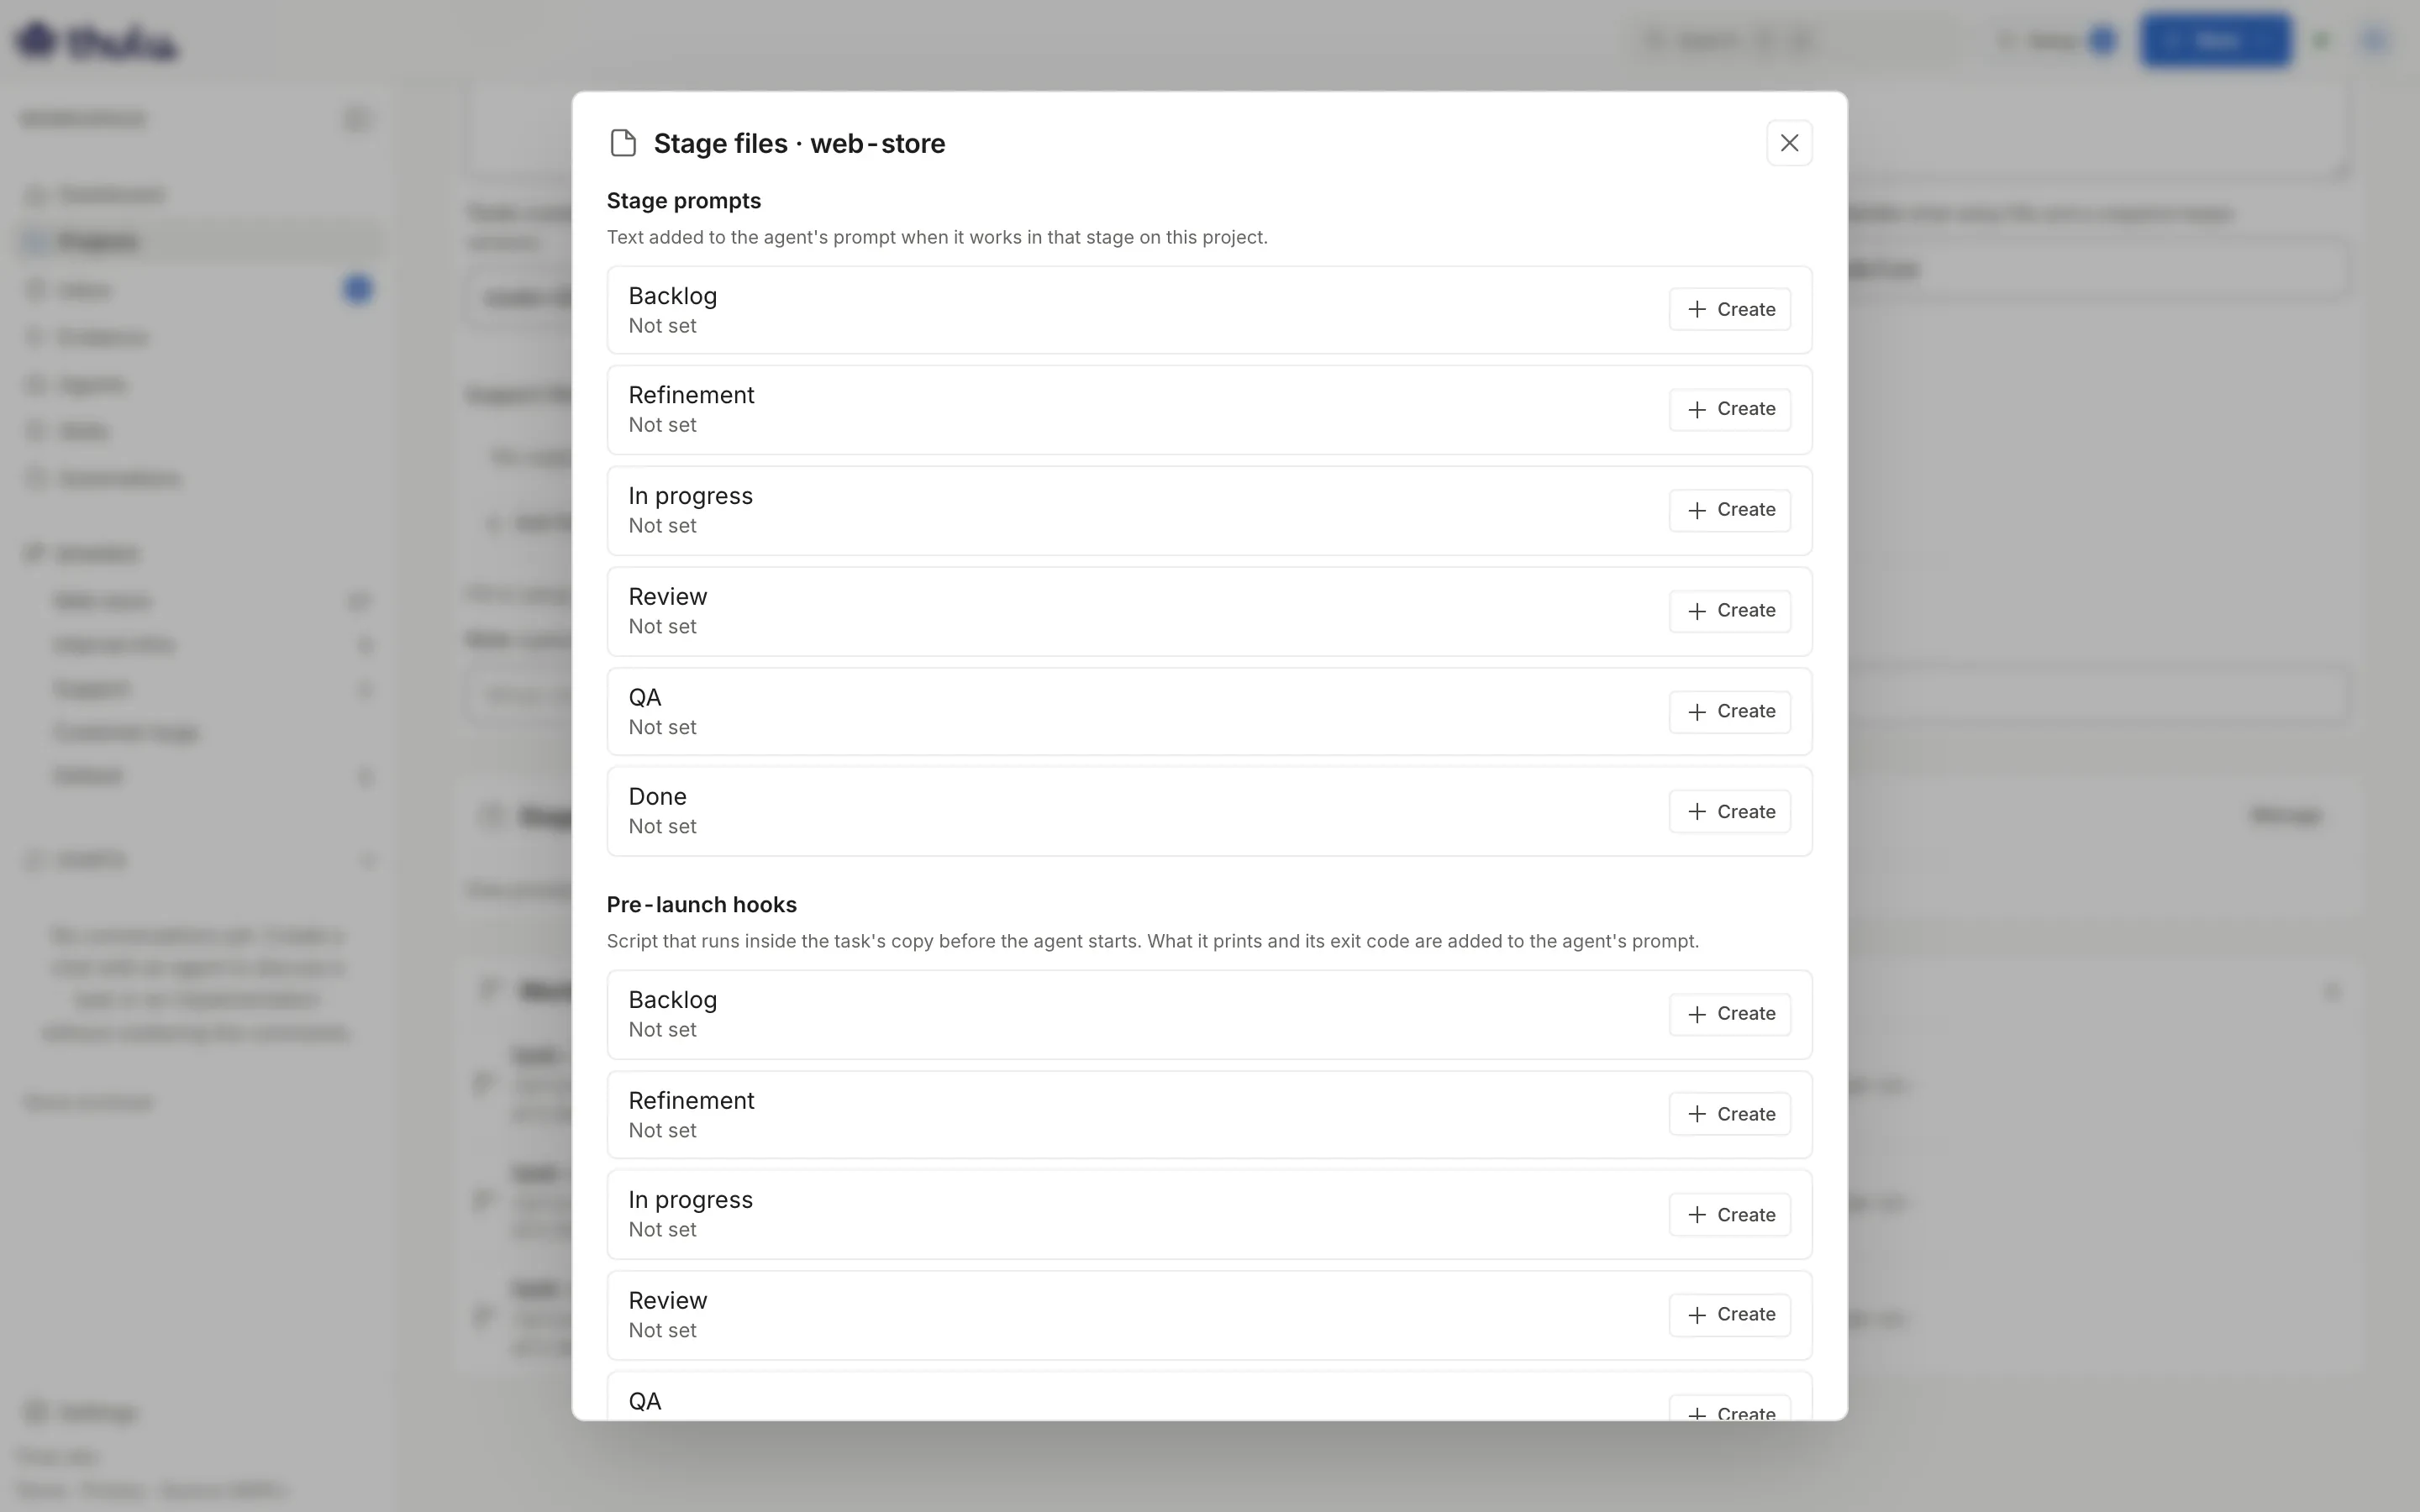
Prompts and hooks per stage are on the “Repository” tab, in the “Stage prompts & hooks” panel. “Manage” opens a modal with one row per stage:
- A prompt per stage is text added to the agent’s prompt when it works in that stage on this project (“in Review, run
npm testbefore approving”). - A hook is a script that runs inside the worktree before the agent starts. Its output and exit code go into the prompt. Use it to hand the agent fresh data (the test results, the state of the migrations) without it having to ask.
Click “+” on the stage, write the file and save it with the button or with ⌘S. If you delete a stage from the board, its files stay as “Orphaned files” with a “Clean up” button.
Delete a project
Section titled “Delete a project”Use the trash can on the card in “Projects” or “Delete project” in the “Danger zone” of “Settings”. Thulu asks for confirmation, deletes the clone and all the worktrees, and the linked tasks are left without a project. It cannot be undone, and the branches of tasks that were not pushed are lost with the clone: push anything you want to keep first. An uploaded project has no remote: Thulu also deletes the repository it was storing, so download the branches you want to keep first.
Common problems
Section titled “Common problems”- The agent does not start on a task with a project. Check whether the task has an agent in that stage. The template is copied only when the task is created with the project already linked.
- The agent reinstalls everything on each task. The script has no “Install phase” or is missing “Cache directories”: without those there is no snapshot. If the snapshot block says “Fill in setup and cache directories, and save”, that is the cause.
- “Merge into…” does not appear. The task does not have a branch yet (it is still in the first column) or none of its projects is uploaded. It does not appear on a subtask either: the branch belongs to the parent task.
- “Create” with “Upload a folder” uploads nothing. If the box says “No files left to upload…”, the folder had only dependencies or secrets. If the notice says “The upload weighs … the limit is 200 MiB”, leave out the builds or the heavy files and try again.
- “Prewarm now” does not appear. You need the admin role and an installation with the sandbox runtime.
- The project card says “Clone failed”. The cause is in the notice on the project page; fix it (URL, branch, credential), delete the project and create it again.
- The agent changed the script and now it does not come up. Open “History”, compare with the previous revision and restore it.