

Recommended flows
Each walkthrough gathers several wiki pages in the order in which to do them. The effort comes from adding up the flows measured on those pages: actions, screens (the same screen counts each time you return to it) and fields to fill in. The time is an estimate for someone doing it for the first time, not counting how long the agent takes to work.
If you aren’t yet clear on what a stage, an agent or a run is, read What is Thulu first.
| Walkthrough | What for | Estimated time | Actions / screens / fields |
|---|---|---|---|
| From zero to the first task with a PR | Watch an agent work a real task | 45 to 60 min | 68 / 30 / 18 |
| Build your own process | Columns, agents per stage, review and approvals | 1 to 2 h | 63 / 23 / 21 |
| QA with filmed cases and Evidence | Test each change with video and repeat the cases in each environment | 1 h | 46 / 17 / 18 |
| Work as a team with agents | Add people and split up questions, approvals and mentions | 15 to 20 min | 39 / 17 / 14 |
| Install and operate your own installation | Run Thulu on your server and keep it up | 1 h | 54 / 16 / 16 |
| Review monthly costs and flow | Know how much was spent, on what and where tasks get stuck | 5 to 10 min | 12 / 7 / 1 |
From zero to the first task with a PR
Section titled “From zero to the first task with a PR”For someone entering a new workspace on the SaaS version who wants to see a Claude Code agent open a pull request in their repo. You need beta access, an Anthropic API key (or an Amazon Bedrock or Google Vertex profile) and permission to install a GitHub App on the repo’s organization. On your own installation the walkthrough is the same from step 2.
-
Create the account in MisterD ID, verify the email and sign in to octopus.misterd.dev. You land on the Dashboard of an empty workspace of your own, with the “First steps” and the “Setup” button in the header. Details in Get started on the SaaS version.
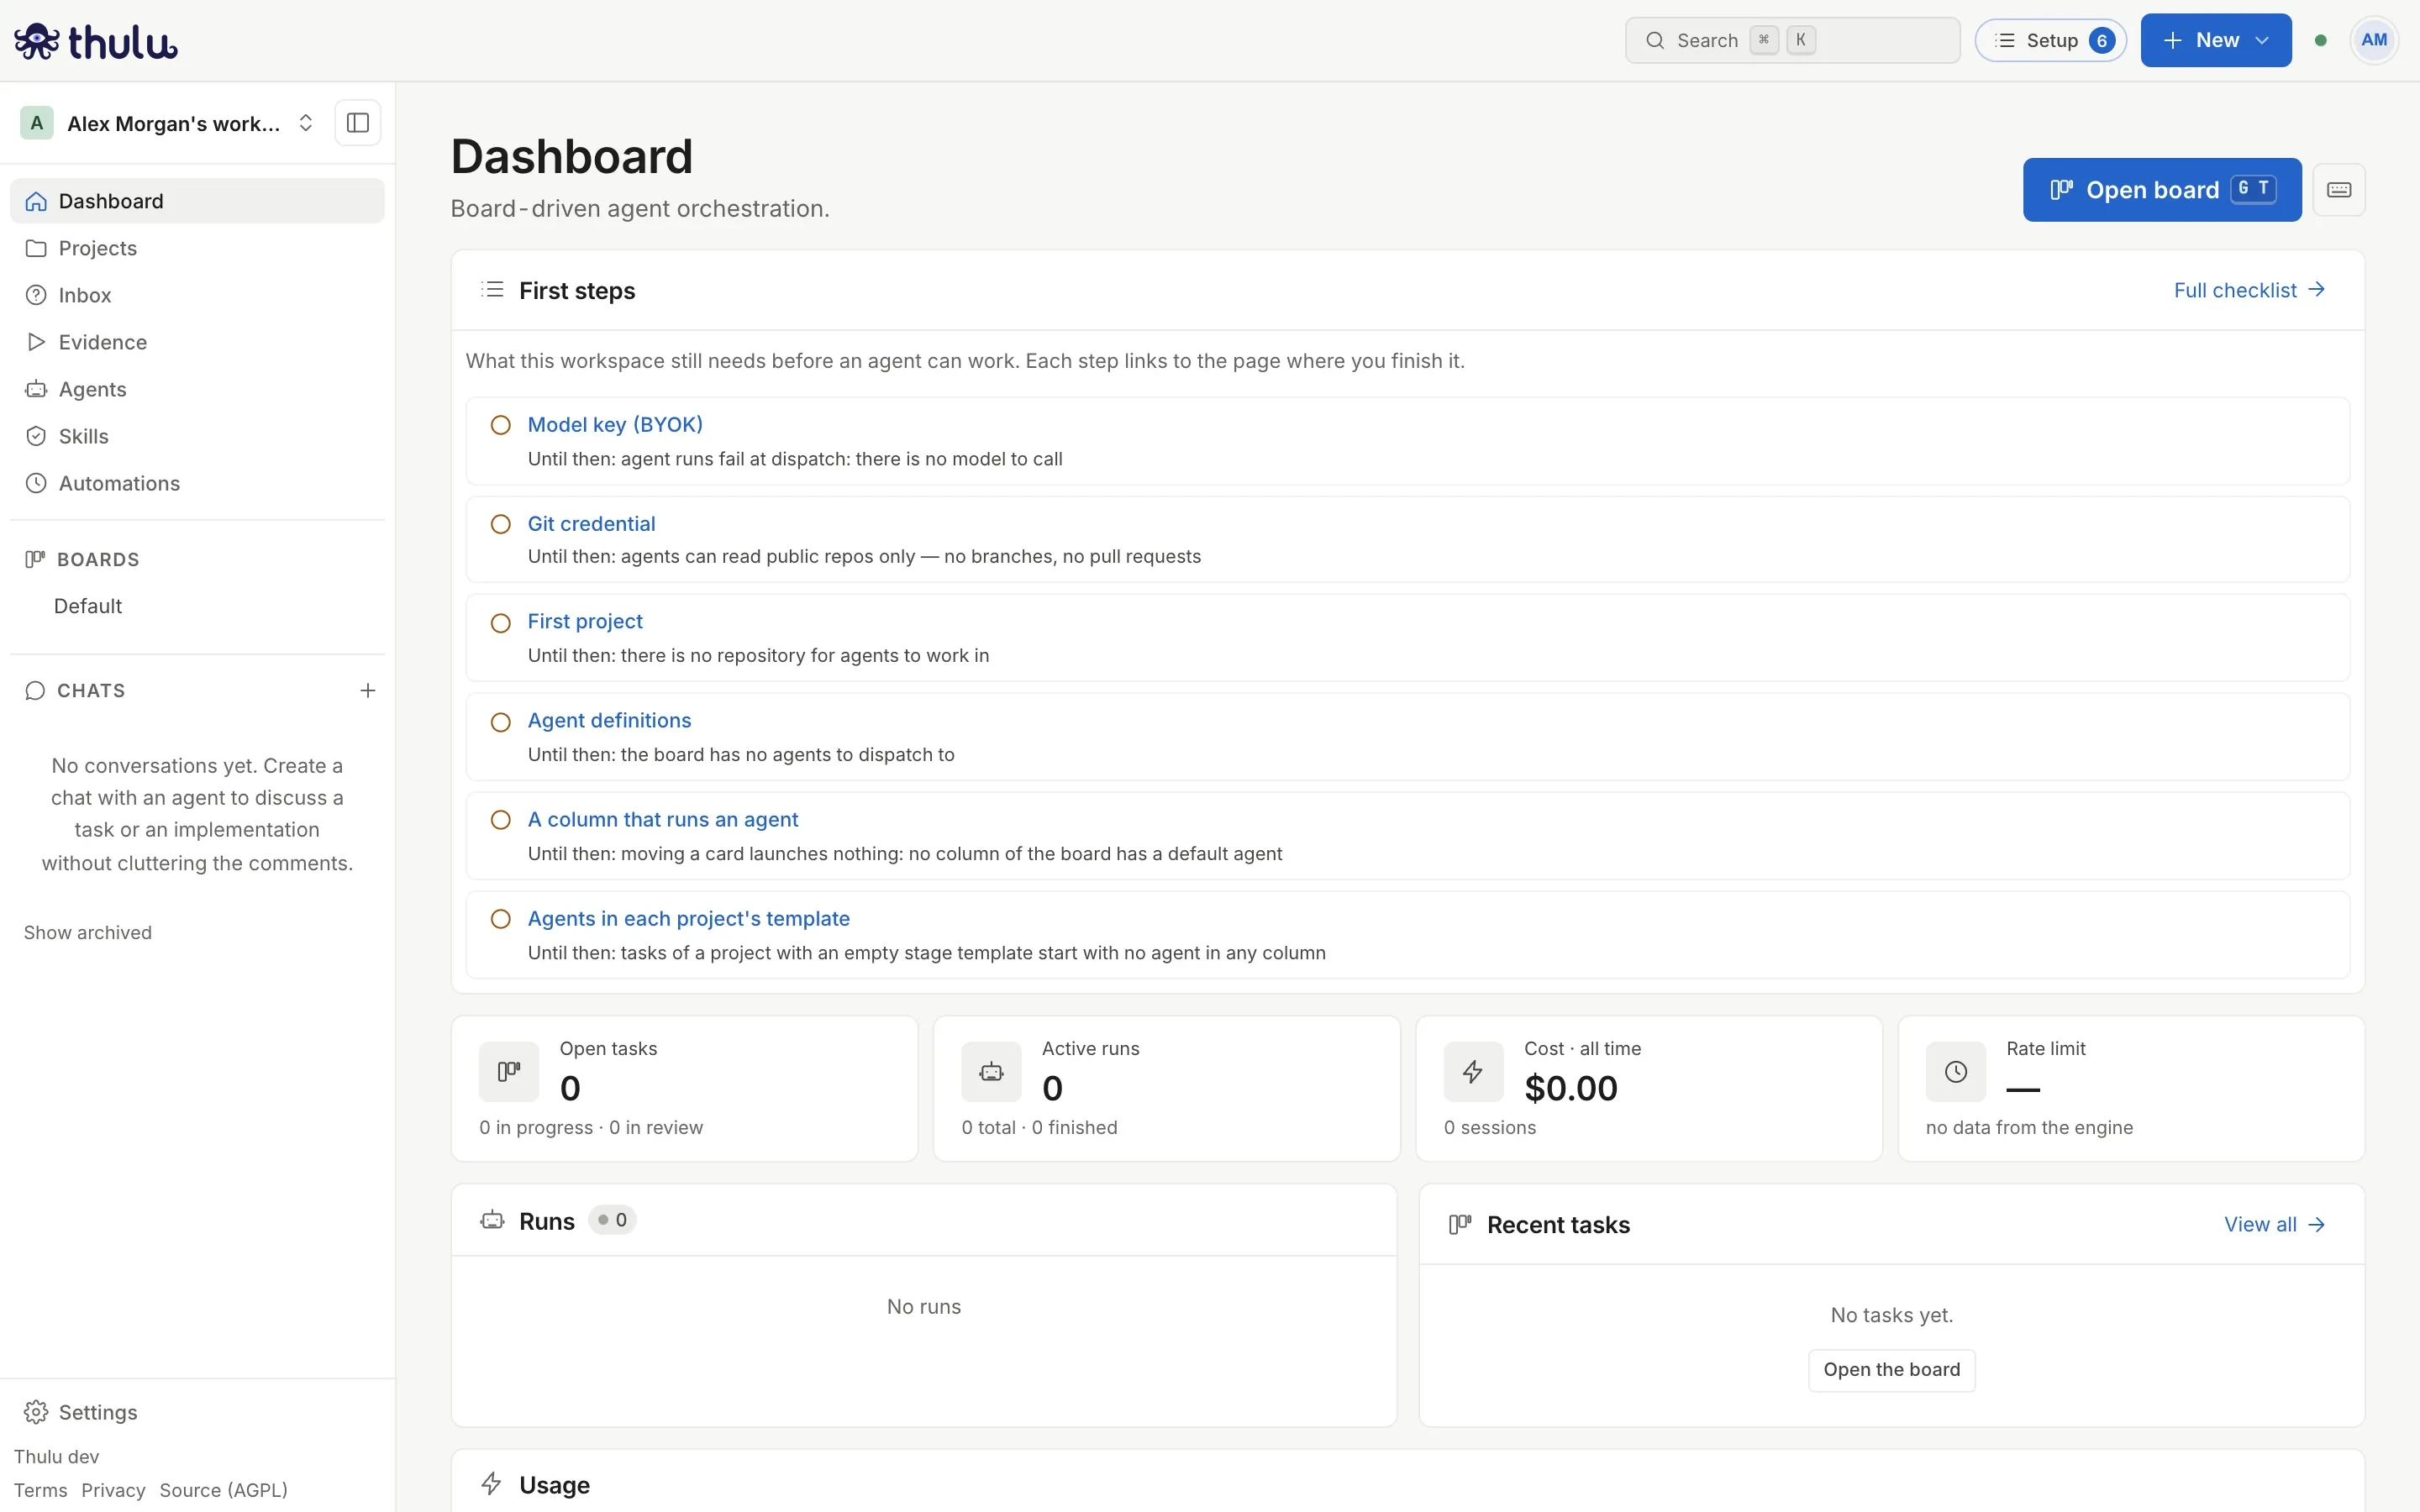
First sign-in: the number in the header is what is left to configure. -
Load the model key. Settings, “AI engines”, Claude Code card: “Set default key”, pick the provider (Anthropic API) and the “API key” credential, and paste the value in “Key”. Details in Credentials and engines.
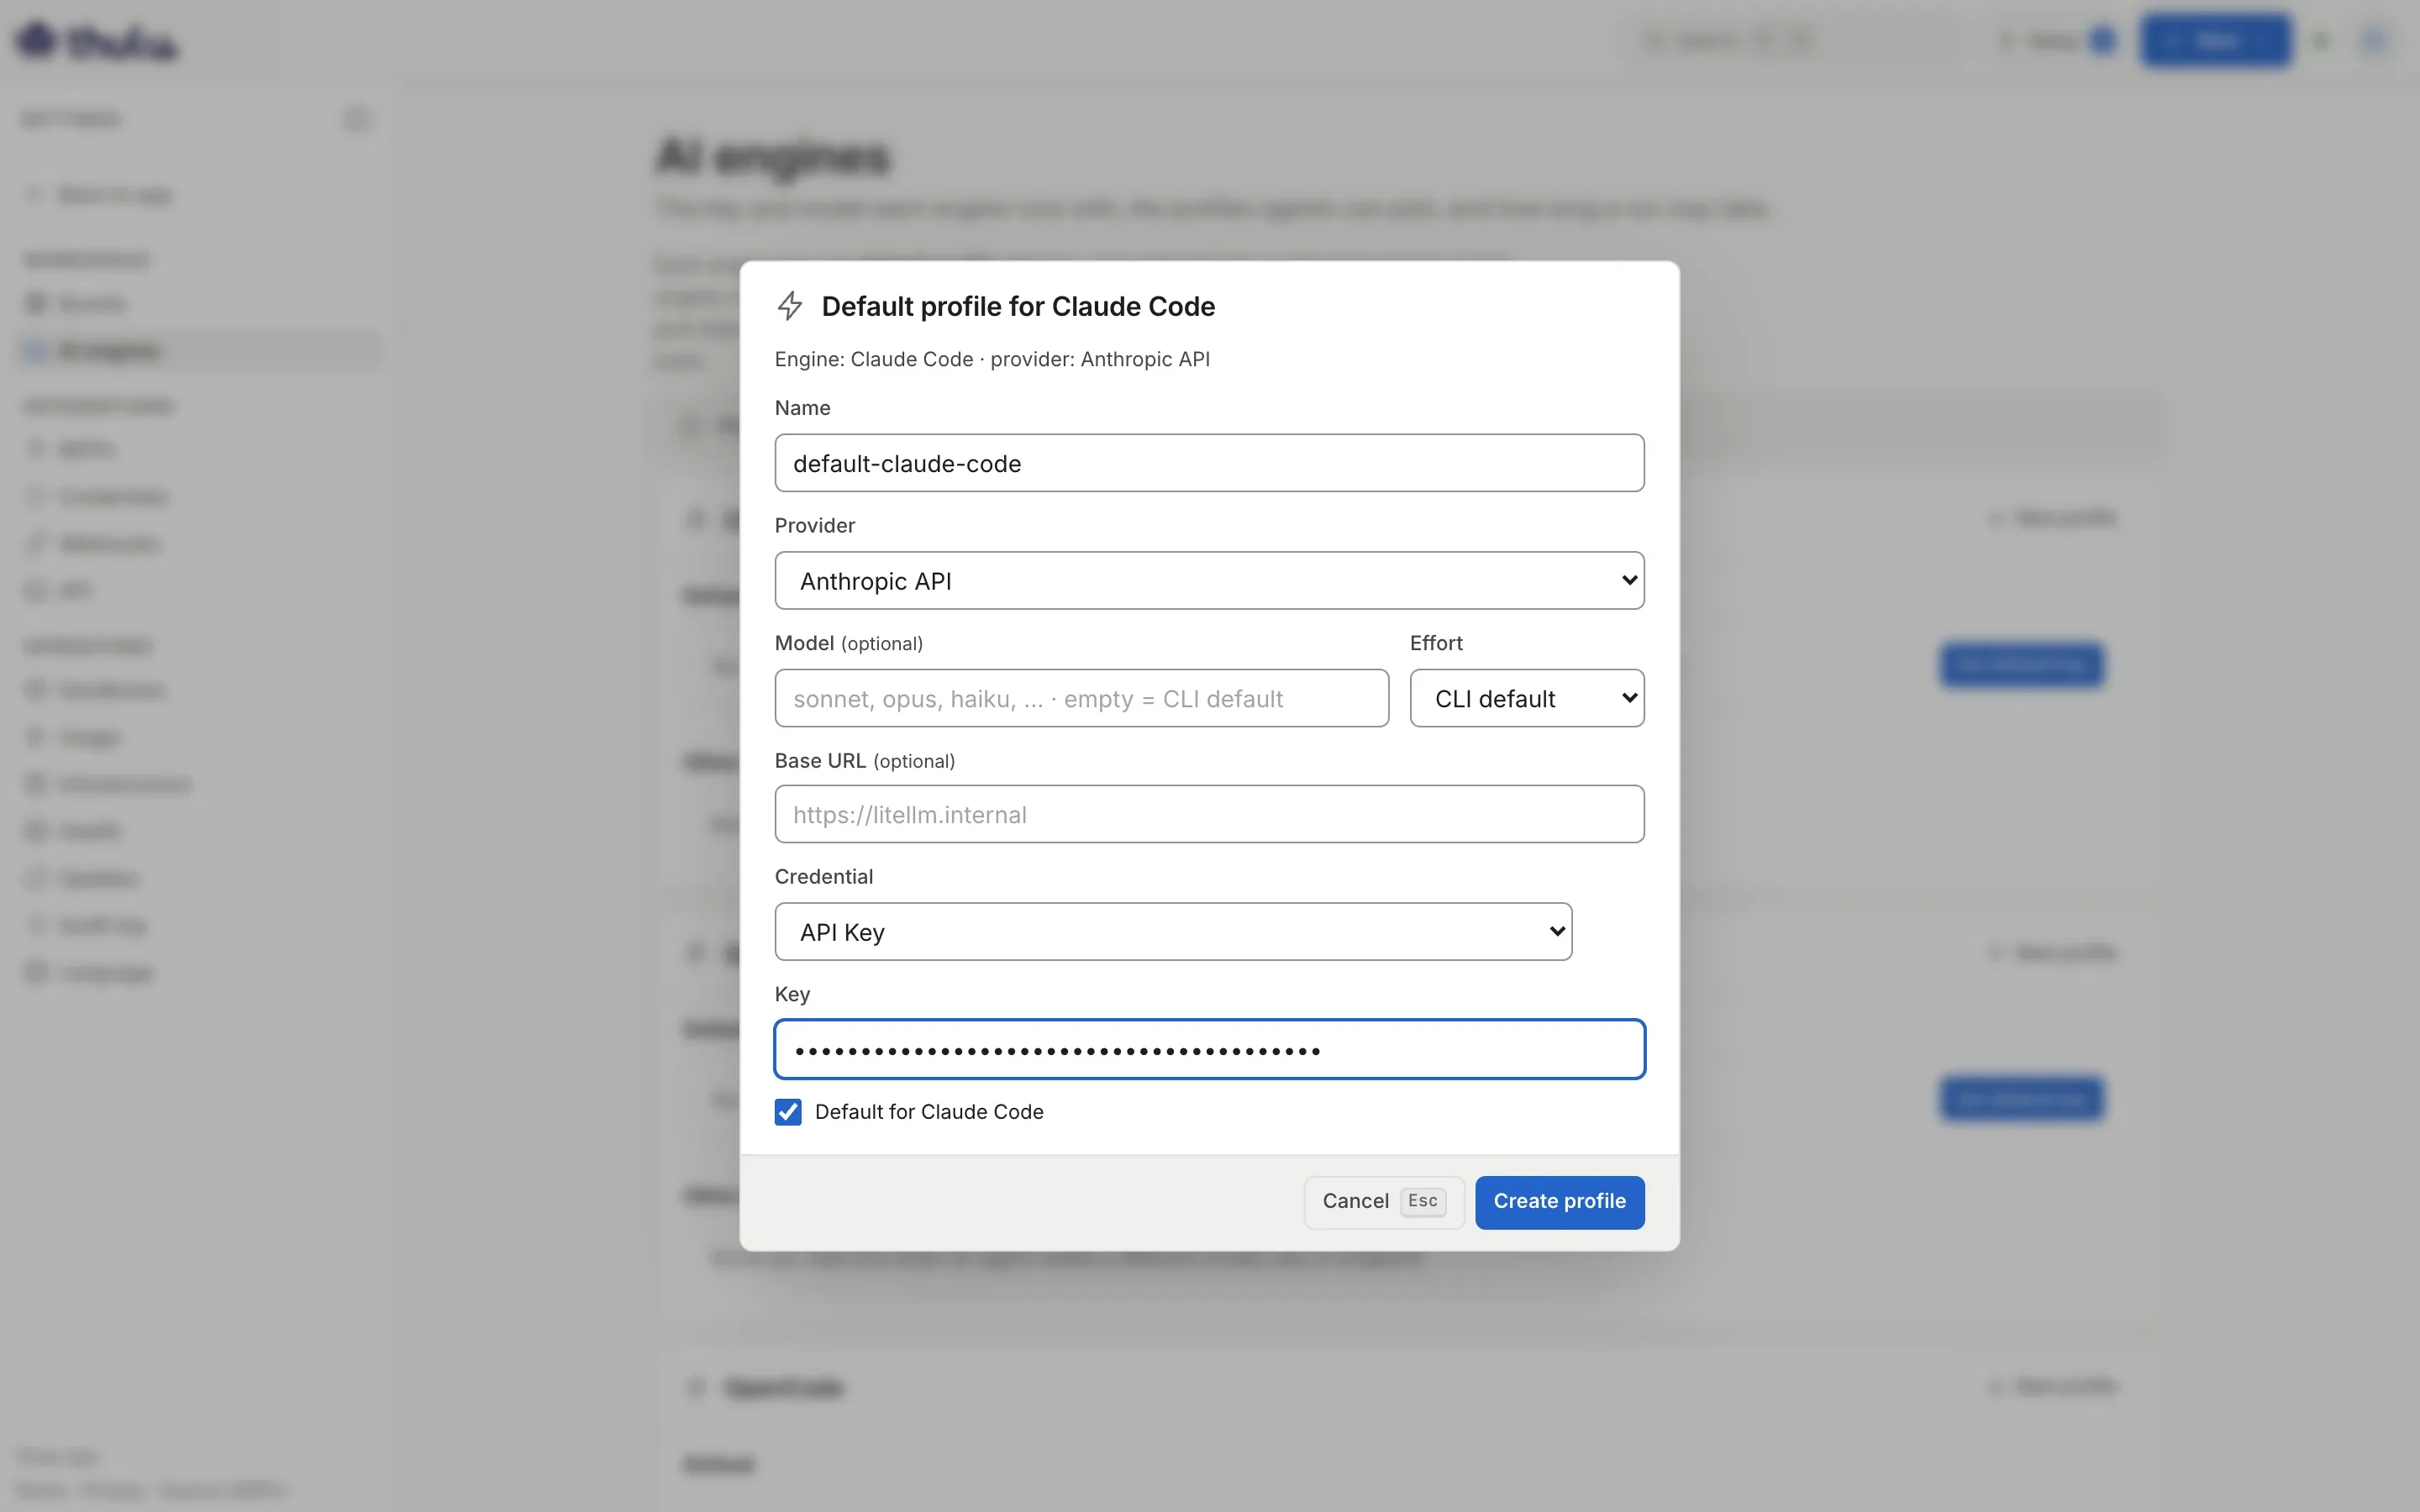
The default profile is the one agents use when they don't pick another. -
Connect GitHub and create the project. In “Projects”, “New project”, source “Git repository”, pick “GitHub App”, install it on the organization (GitHub opens and the modal comes back on its own) and pick the repo. If the code isn’t on GitHub, “Upload a folder” brings it in from your computer, but without GitHub there is no pull request. Details in Git and GitHub and Projects.
-
Create the agent. In “Agents”, “New agent”: name and description. When you create it, Thulu offers “Use in In progress”: click it and the agent gets that column in “Valid stages” and is chosen for it in the template of each project on the board. Details in Agents.
-
Set up the board. In “Edit board”, open “Behavior” for “In progress”: “Default agent” already shows your agent (if you didn’t click “Use in”, pick it here) and “Push the branch” comes turned on. Turn on “Move on when the agent finishes”. Add a “Review” column, move it between “In progress” and “Done”, and turn on “Open a pull request” on it. Details in Boards and stages.
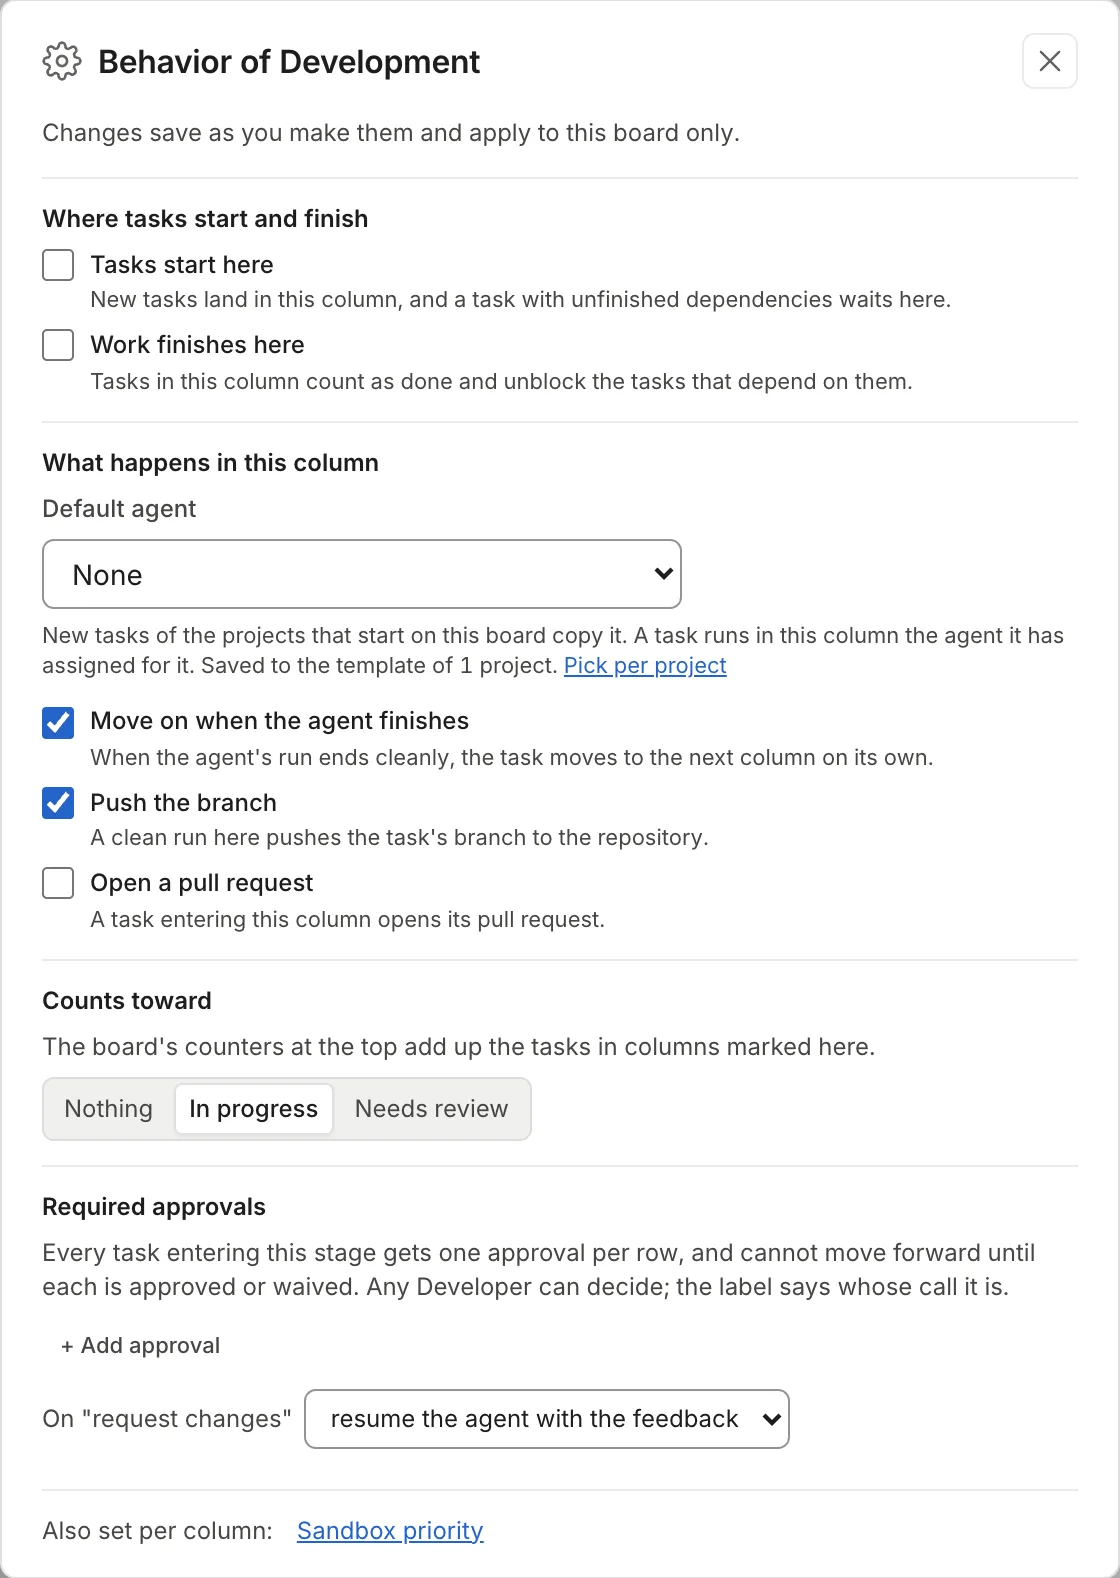
A column where an agent works: the default agent and the column's switches. -
If the project already had tasks, check them: “Default agent” writes the projects’ template, which new tasks copy. Tasks that existed before stay without an agent until you pick one in their “Agent” property.
-
Create the task with “New task” (or the N key): click the repo chip, type a title and description, and “Create”. If there is more than one board, pick in “Board” which one it lands on. The task copies the project’s template. Details in Tasks.
-
Drag the card to “In progress”. Open it to follow the run: the status, the last action, “View log” and “Open chat” to talk to it. Details in Agent runs.
-
When the agent finishes, the task moves to “Review” on its own and Thulu opens the PR. In the task panel, “Branch and PR” shows the number, the CI status and the review.
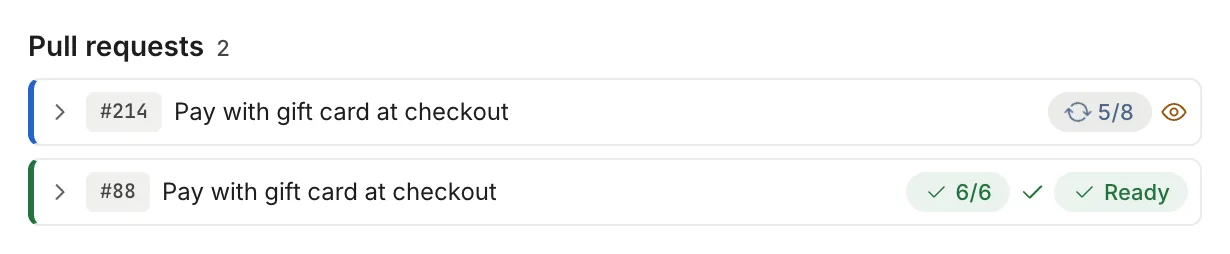
A task with two repos opens one PR in each, on the same branch.
Build your own process
Section titled “Build your own process”For when the first walkthrough has worked and you want the board to reflect how your team works: a refinement column, a development column with an agent and an auditor, and a human review with approval before closing.
-
Create the board or edit the one you have. Add the columns and order them by dragging: “Add column” puts it after the end column. Details in Boards and stages.
-
For each column where an agent works, check it in the agent’s “Valid stages” and pick that agent in “Default agent” in the column’s Behavior. Start and end columns don’t run agents.
-
Write each stage’s prompt. On the agent, “Prompts” tab, create that stage’s override; without an override, the agent uses
main.md. Details in Agents. -
Add the team’s conventions as skills. Create the skill in “Skills” and grant it to the agent on the stage, “Skills” tab. The Workshop brings an example one and is how you import the ones you exported from another workspace. Details in Skills.
-
Give the agent the tools it needs on each stage, “MCP” tab. Checking the server grants its read and write tools; merge and deploy aren’t granted by any scope: an admin names them one by one. Details in MCPs.
-
Turn on the auditor on the development stage: the agent’s “Settings” tab, “Auditor per stage”. It runs on the agent’s engine unless you pick another one there. When the run ends, it reviews the work and can send the task back with the criteria that are missing.
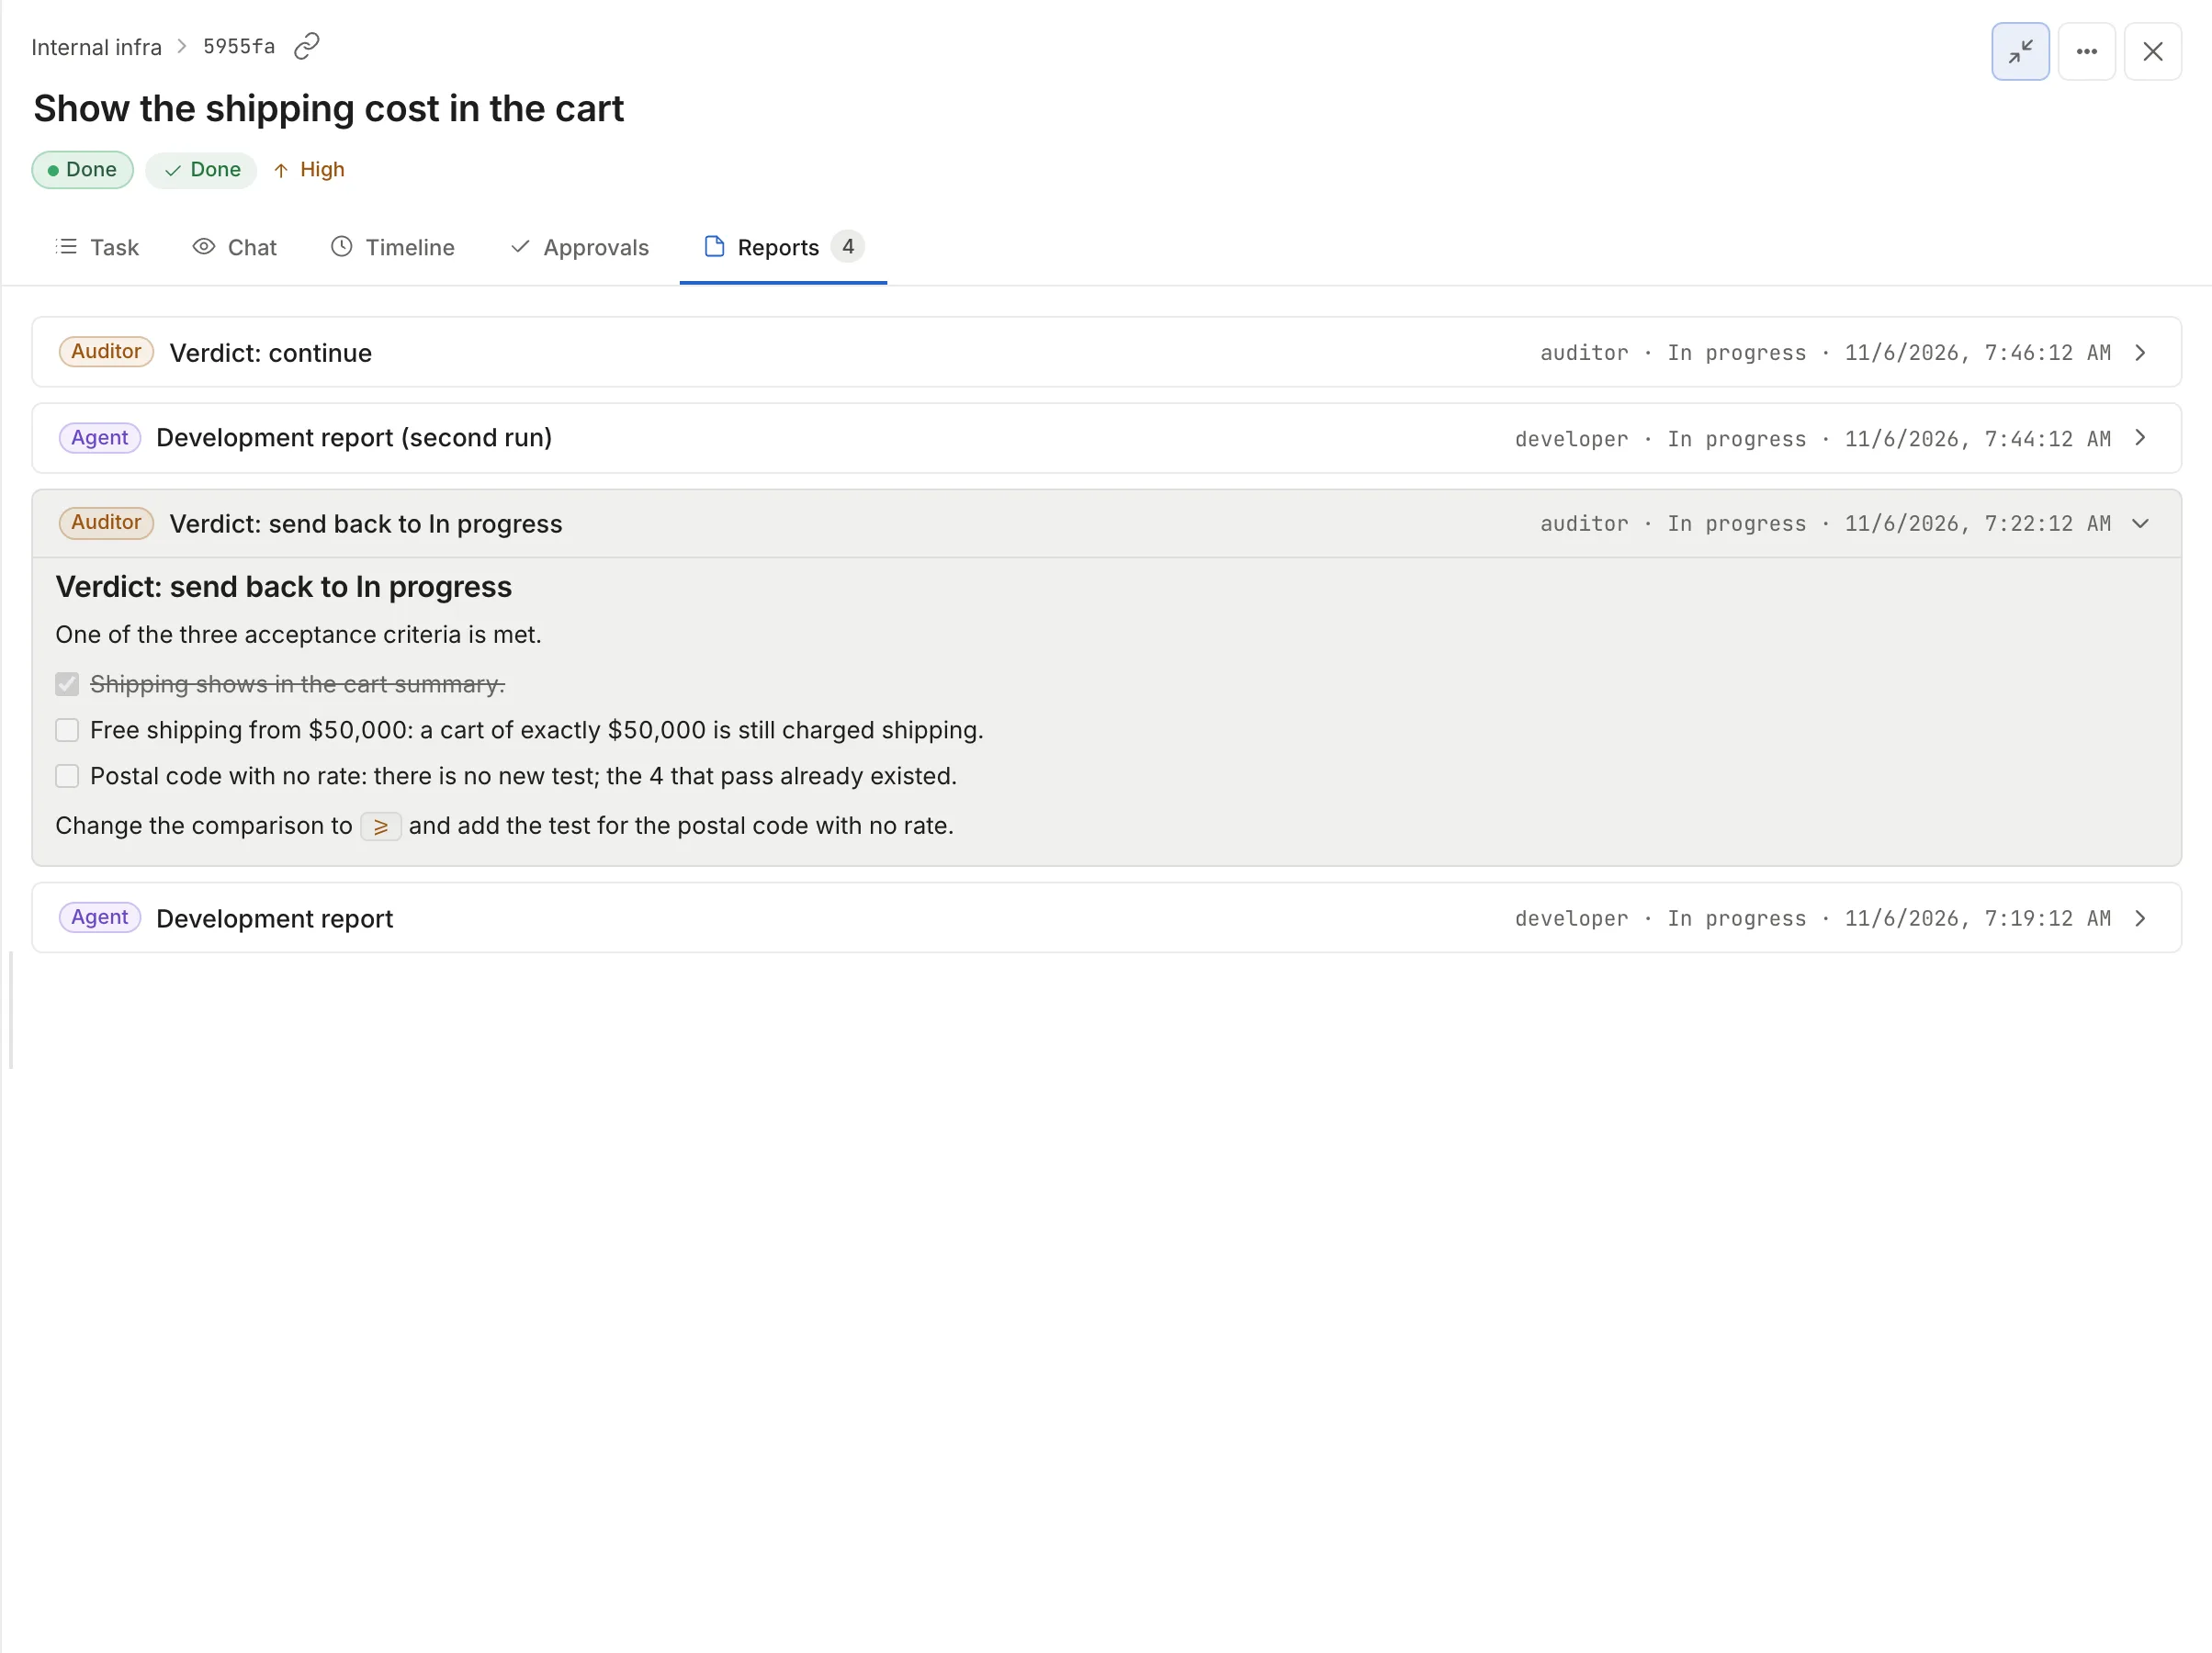
An auditor kickback: which criteria aren't met and what the agent has to do. -
On the human review column, open “Behavior” and add a row in “Required approvals”. Every task that enters that column waits for the approval in “Inbox”. Details in Inbox.
QA with filmed cases and Evidence
Section titled “QA with filmed cases and Evidence”For testing each change with a before and after video, and keeping the cases worth repeating in each environment without spending model tokens. A task’s cases are called TC-n; those in the Evidence library, EV-n.
-
In the task, “Test cases” block, write each case: title, steps and an expected result with concrete values. Details in Test cases and videos.
-
Give the testing stage’s agent the argus-browser and octopus-api MCPs, in the “MCP” tab. Without the first it can’t open the browser; without the second it can’t write to the task.
-
Click “Run cases” in the cases block: pick the agent (the list warns you if it lacks the browser), the “URL to test”, optionally another one in “Compare with” for the side-by-side video, and the cases, then “Launch”. They also run if you move the task to the agent’s column or mention it in a thread.
-
Review the result in the cases block and in the “Reports” tab.
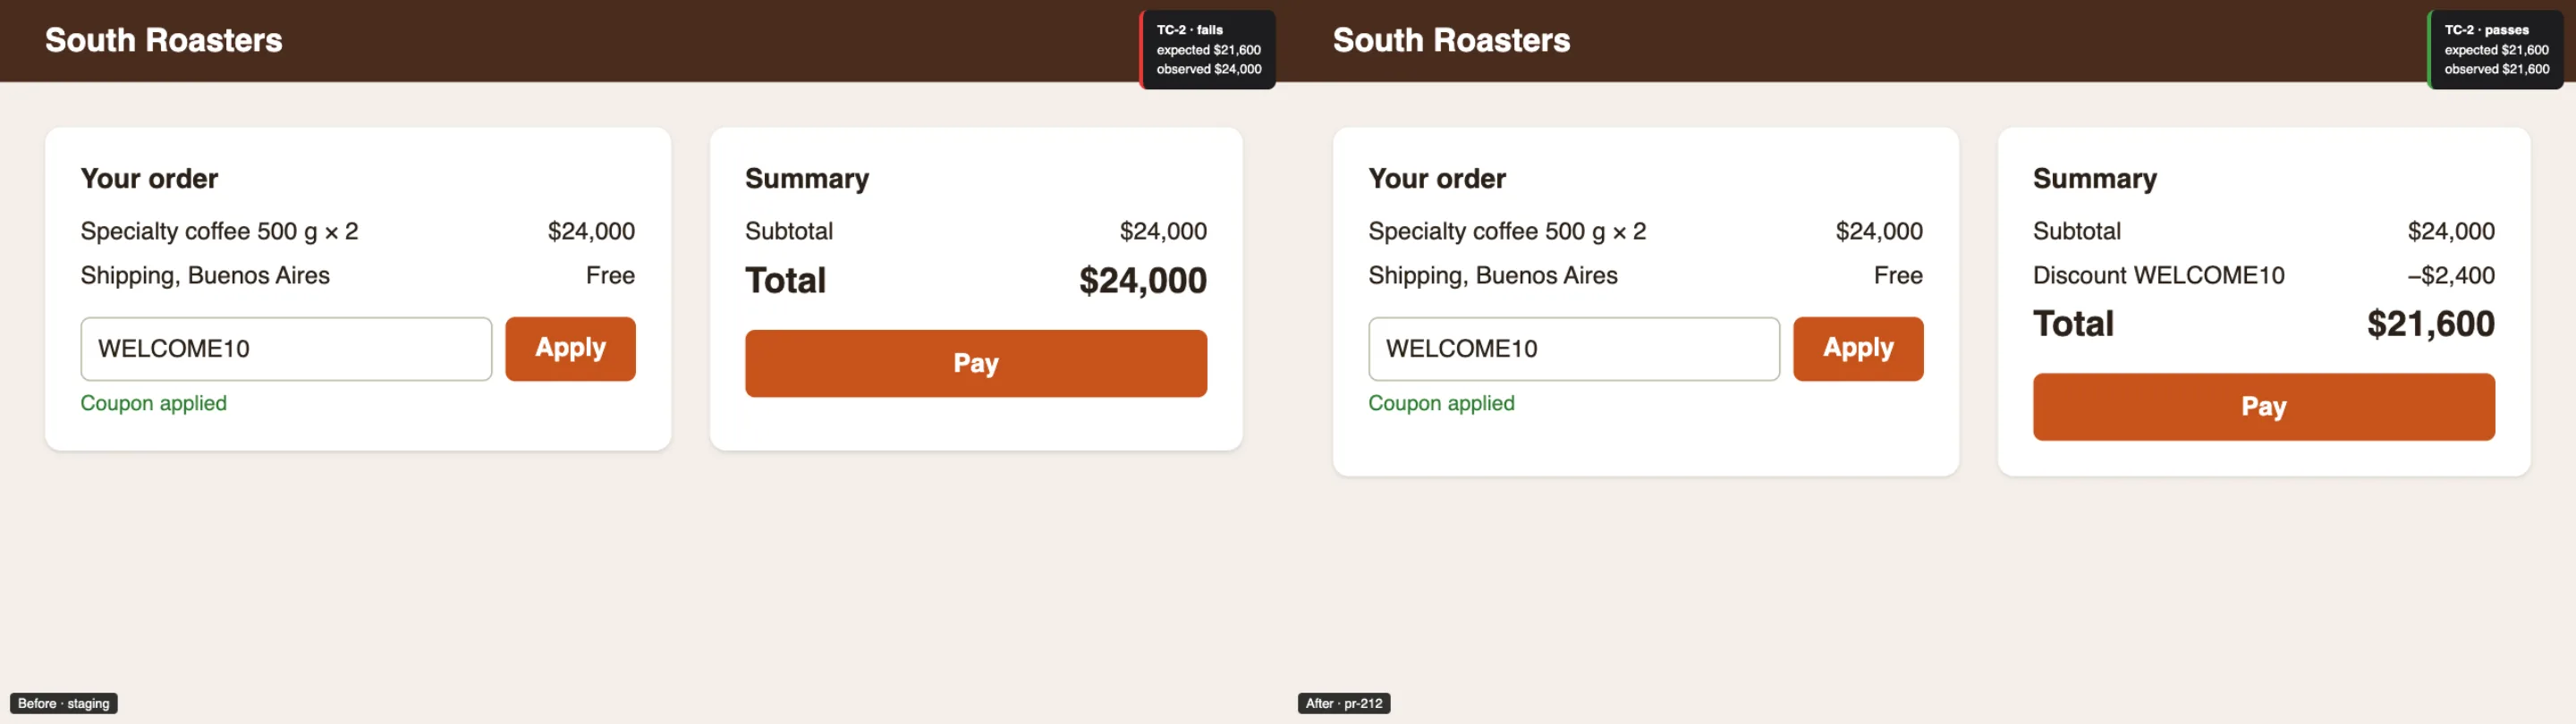
The same step against the old version and the new one. -
Move the cases you want to repeat into the library: “Evidence”, “From tasks” tab, “Add to library”. If the case had a filmed run, it is copied with its recording.
-
In “Evidence”, “Environments” tab, your projects’ environments show up on their own, with the name and address you set on the project, and each one’s Sandbox. Edit the one you want to add test logins, a schedule or “After a deploy” to. For a site that doesn’t belong to any project, “New environment”. Then, in the “Cases” tab, “Run all on…” runs the recorded cases against that environment. Evidence records and replays web applications, in Chromium. Details in Evidence.
-
To run the library from another pipeline, copy the CI command that appears when you edit the saved environment and keep an API key in
OCTOPUS_API_KEY.
Work as a team with agents
Section titled “Work as a team with agents”For adding people to a workspace where agents are already running. You need to be an owner or admin of the workspace.
-
Invite by email from the workspace menu, “Invite people”, with the right role: viewer, developer or admin. Thulu doesn’t send emails: copy the invitation link (“Copy link”) and give it to the person through another channel. On the SaaS beta, if their email doesn’t have access, the operator has to grant it separately. Details in Workspaces and team.
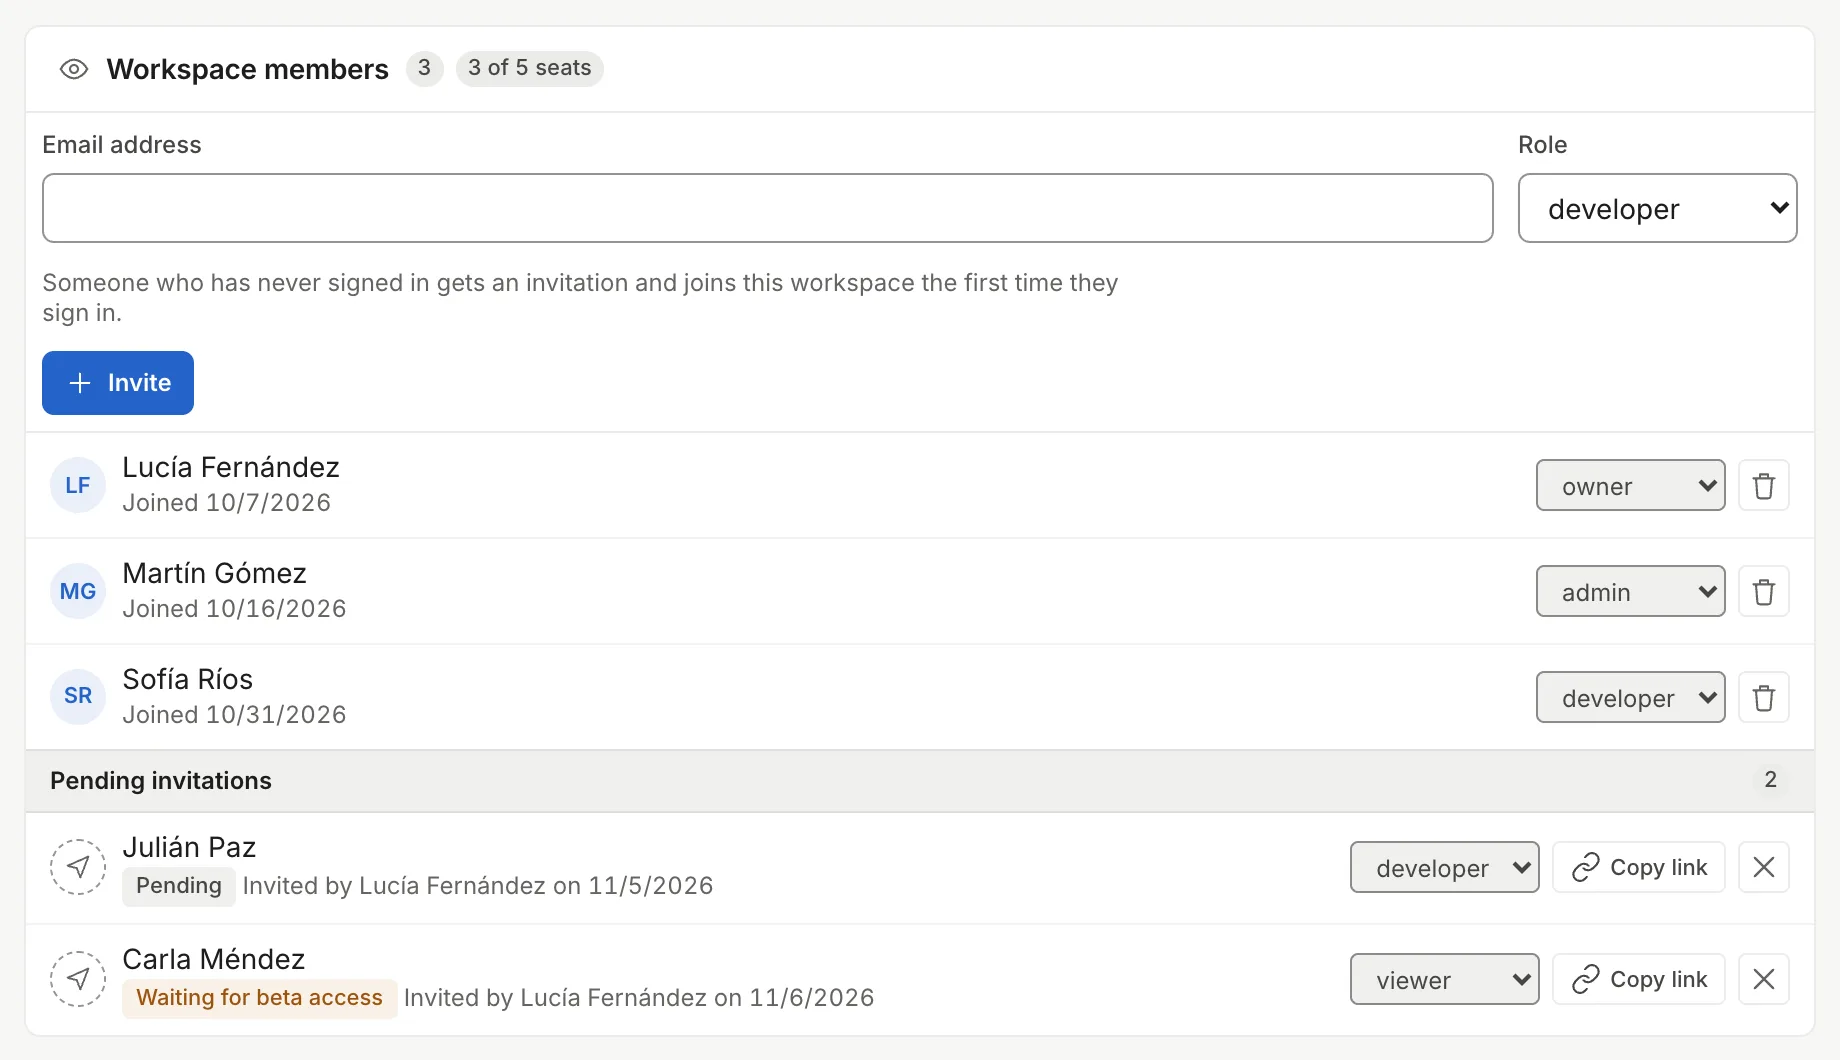
Members and pending invitations. An invitation waiting for beta access says so on its row. -
Talk to the agents in the task. In the activity, type
@and the agent’s name to open a thread; the agent answers in that same thread. Details in Conversation and threads. -
Split up the “Inbox”. The agents’ questions arrive there (with the “Blocked” mark when the agent can’t go on without an answer) and the columns’ approvals. “Request changes” sends the work back with your note. Details in Inbox.
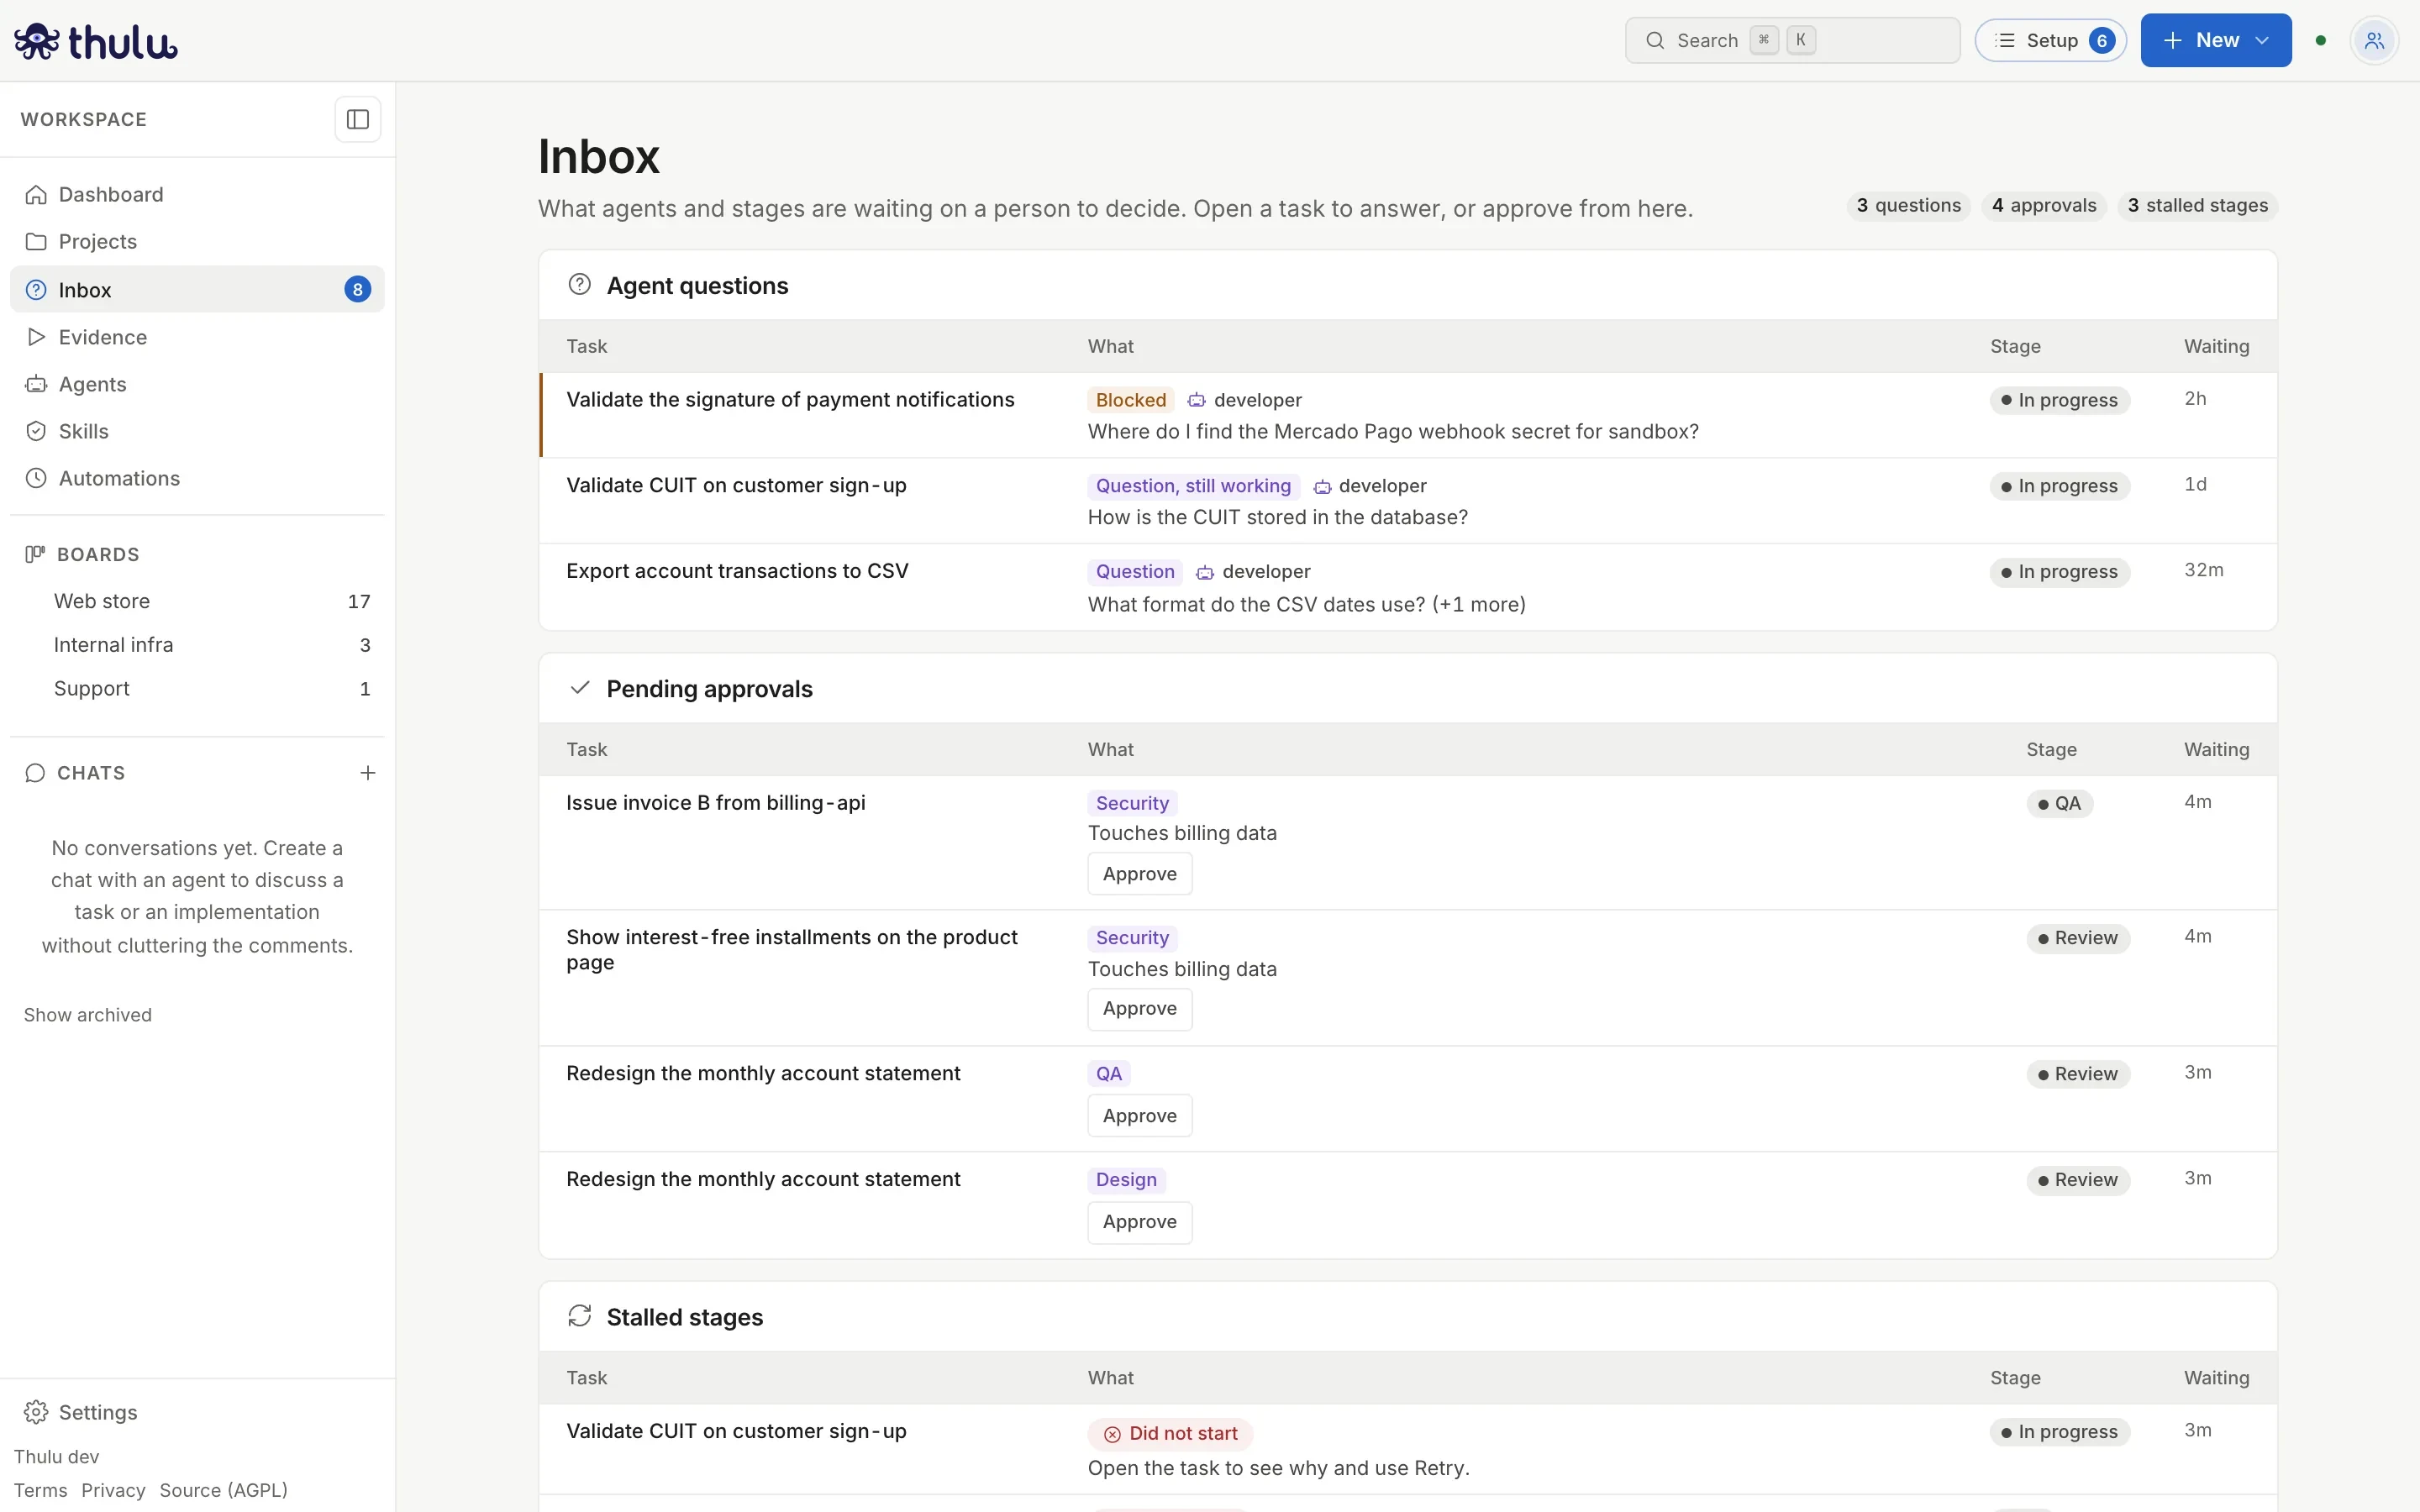
Questions and approvals in a single tray. Each row opens the task. -
For questions that aren’t about a task, use the side chat with an agent that has “Chat” among its valid stages. “Act for me” lets it work on your tasks in your name for 8 hours; anything it wants to delete waits for your confirmation. Details in Chat.
Install and operate your own installation
Section titled “Install and operate your own installation”For running Thulu on your server with Docker Compose, without login (one person or a trusted network). You need Docker running and, while the repository is private, a GitHub token with read:packages to pull the images from ghcr. With OIDC login or Kubernetes the install walkthrough is longer.
-
Download the binary and run
thulu initwith the “Quick, on this machine” install: it asks about engines, runner and GitHub, and shows a summary before writing anything. Details in Self-hosted install. -
Open the dashboard with
thulu openand complete the “Setup”: model key, git credential, first project, agent and column. From there, follow the first walkthrough from step 3.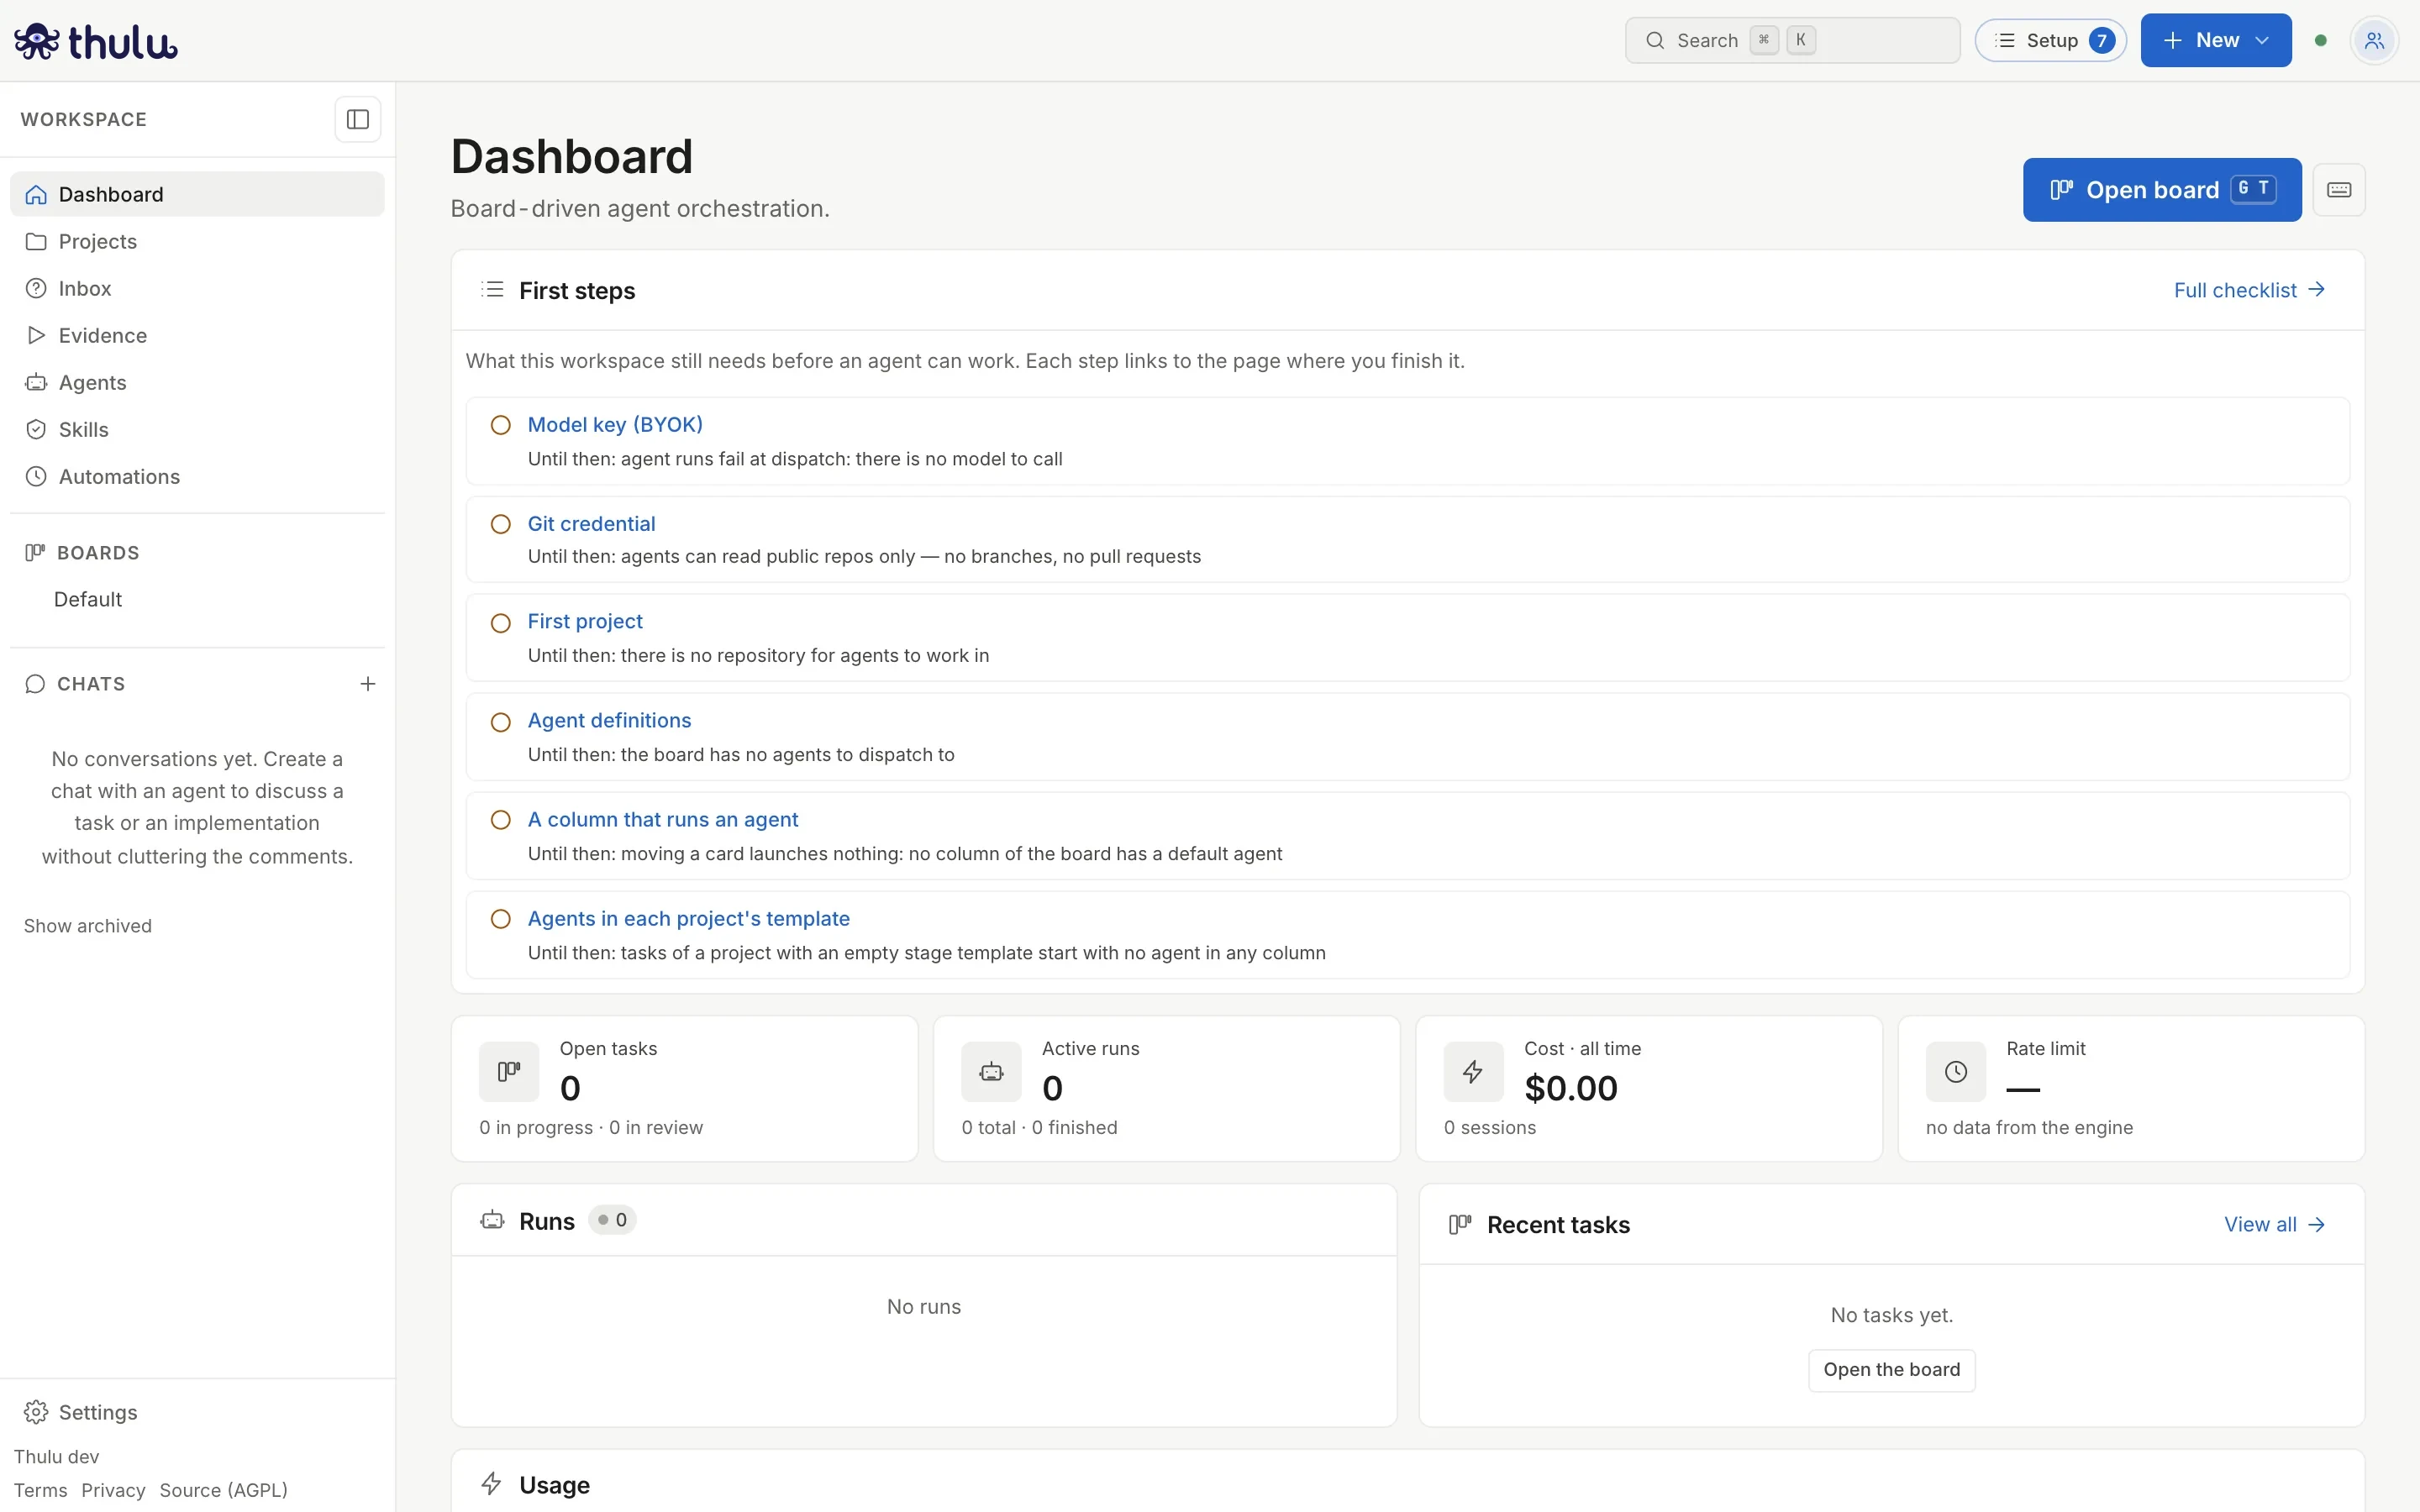
First access to an installation without login. -
Schedule the backups with a cron line on the host that runs
deploy/backup.shonce a day. Settings, “Updates”, shows the last backup and how many snapshots are kept. Restoring means stopping, running withRESTORE=1and bringing it back up. Details in Self-hosted operations. -
When the blue dot appears next to the version, open Settings, “Updates”: it says what changes, whether there are migrations, and gives you the command. Run
thulu updateon the host; it takes a snapshot and rolls back on its own if something fails.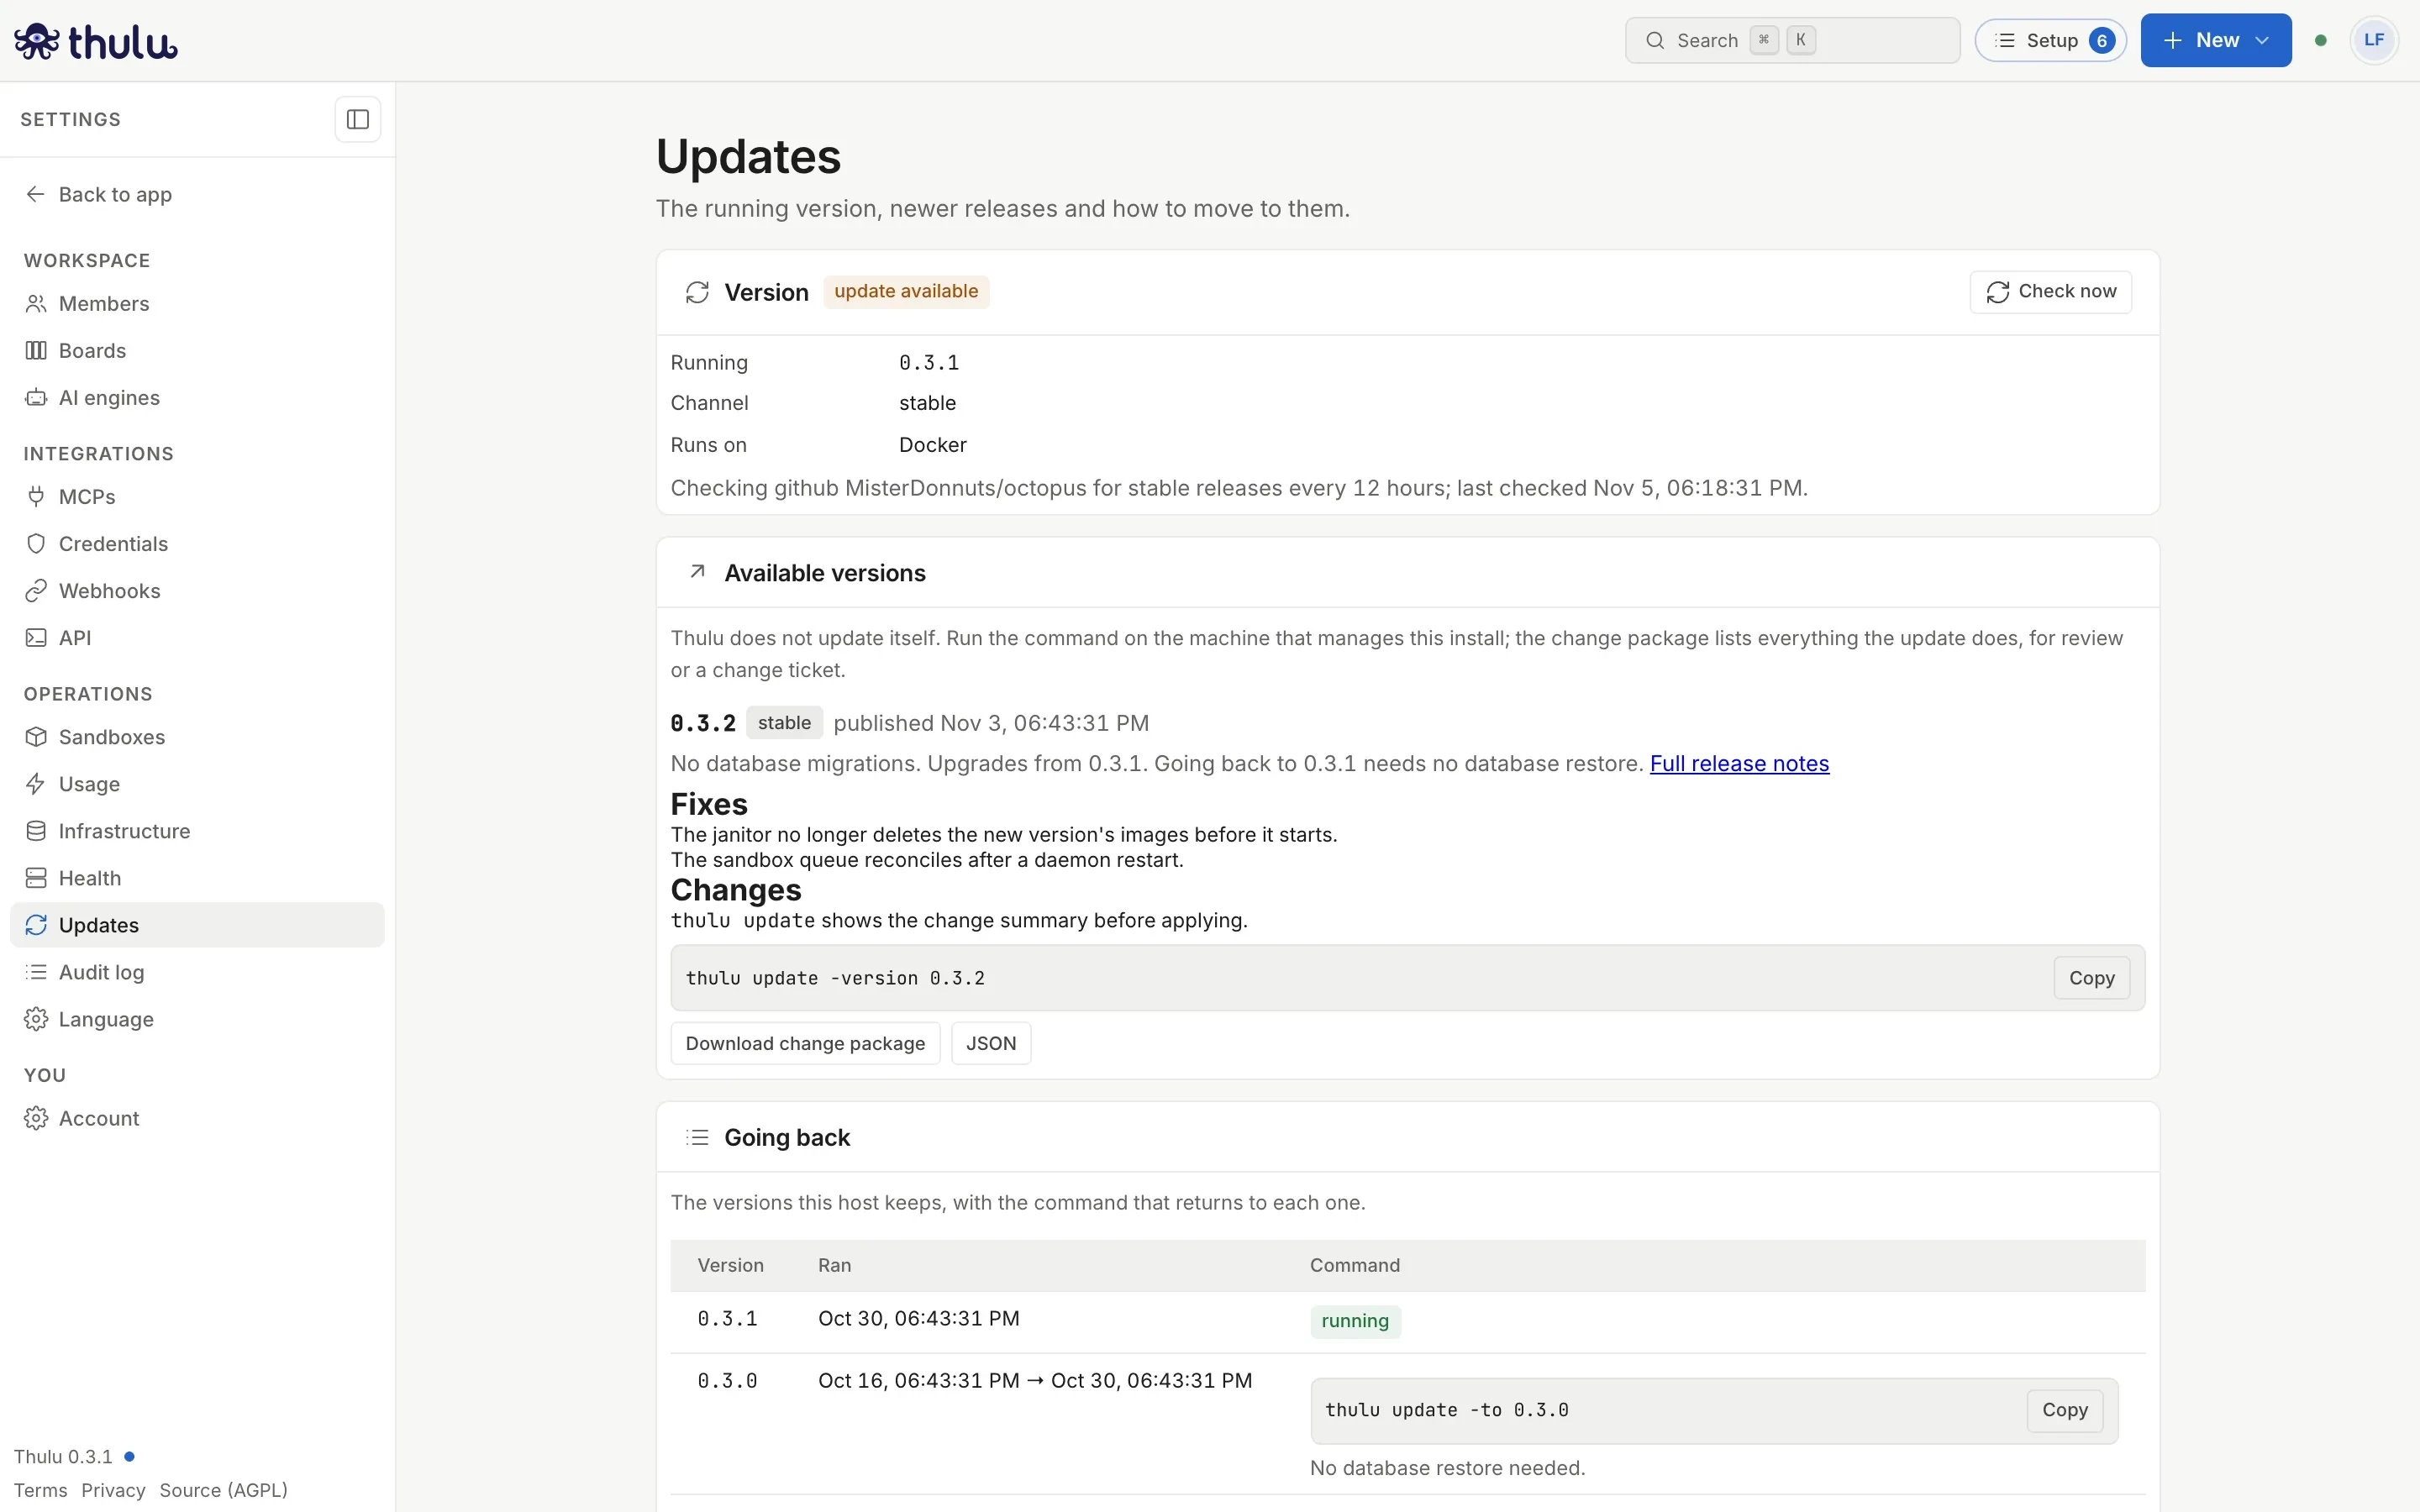
The Updates screen with the command ready to copy. -
Every so often,
thulu gclists the stopped containers, old images and leftover snapshots, andthulu gc -applydeletes them. All the commands are in Thulu CLI.
Review monthly costs and flow
Section titled “Review monthly costs and flow”For finding out how much the agents spent, on what, and in which column tasks sit still.
-
Open Settings, “Usage” (or click the Dashboard’s cost card), pick “30d” and filter by agent or project. Details in Usage and costs.
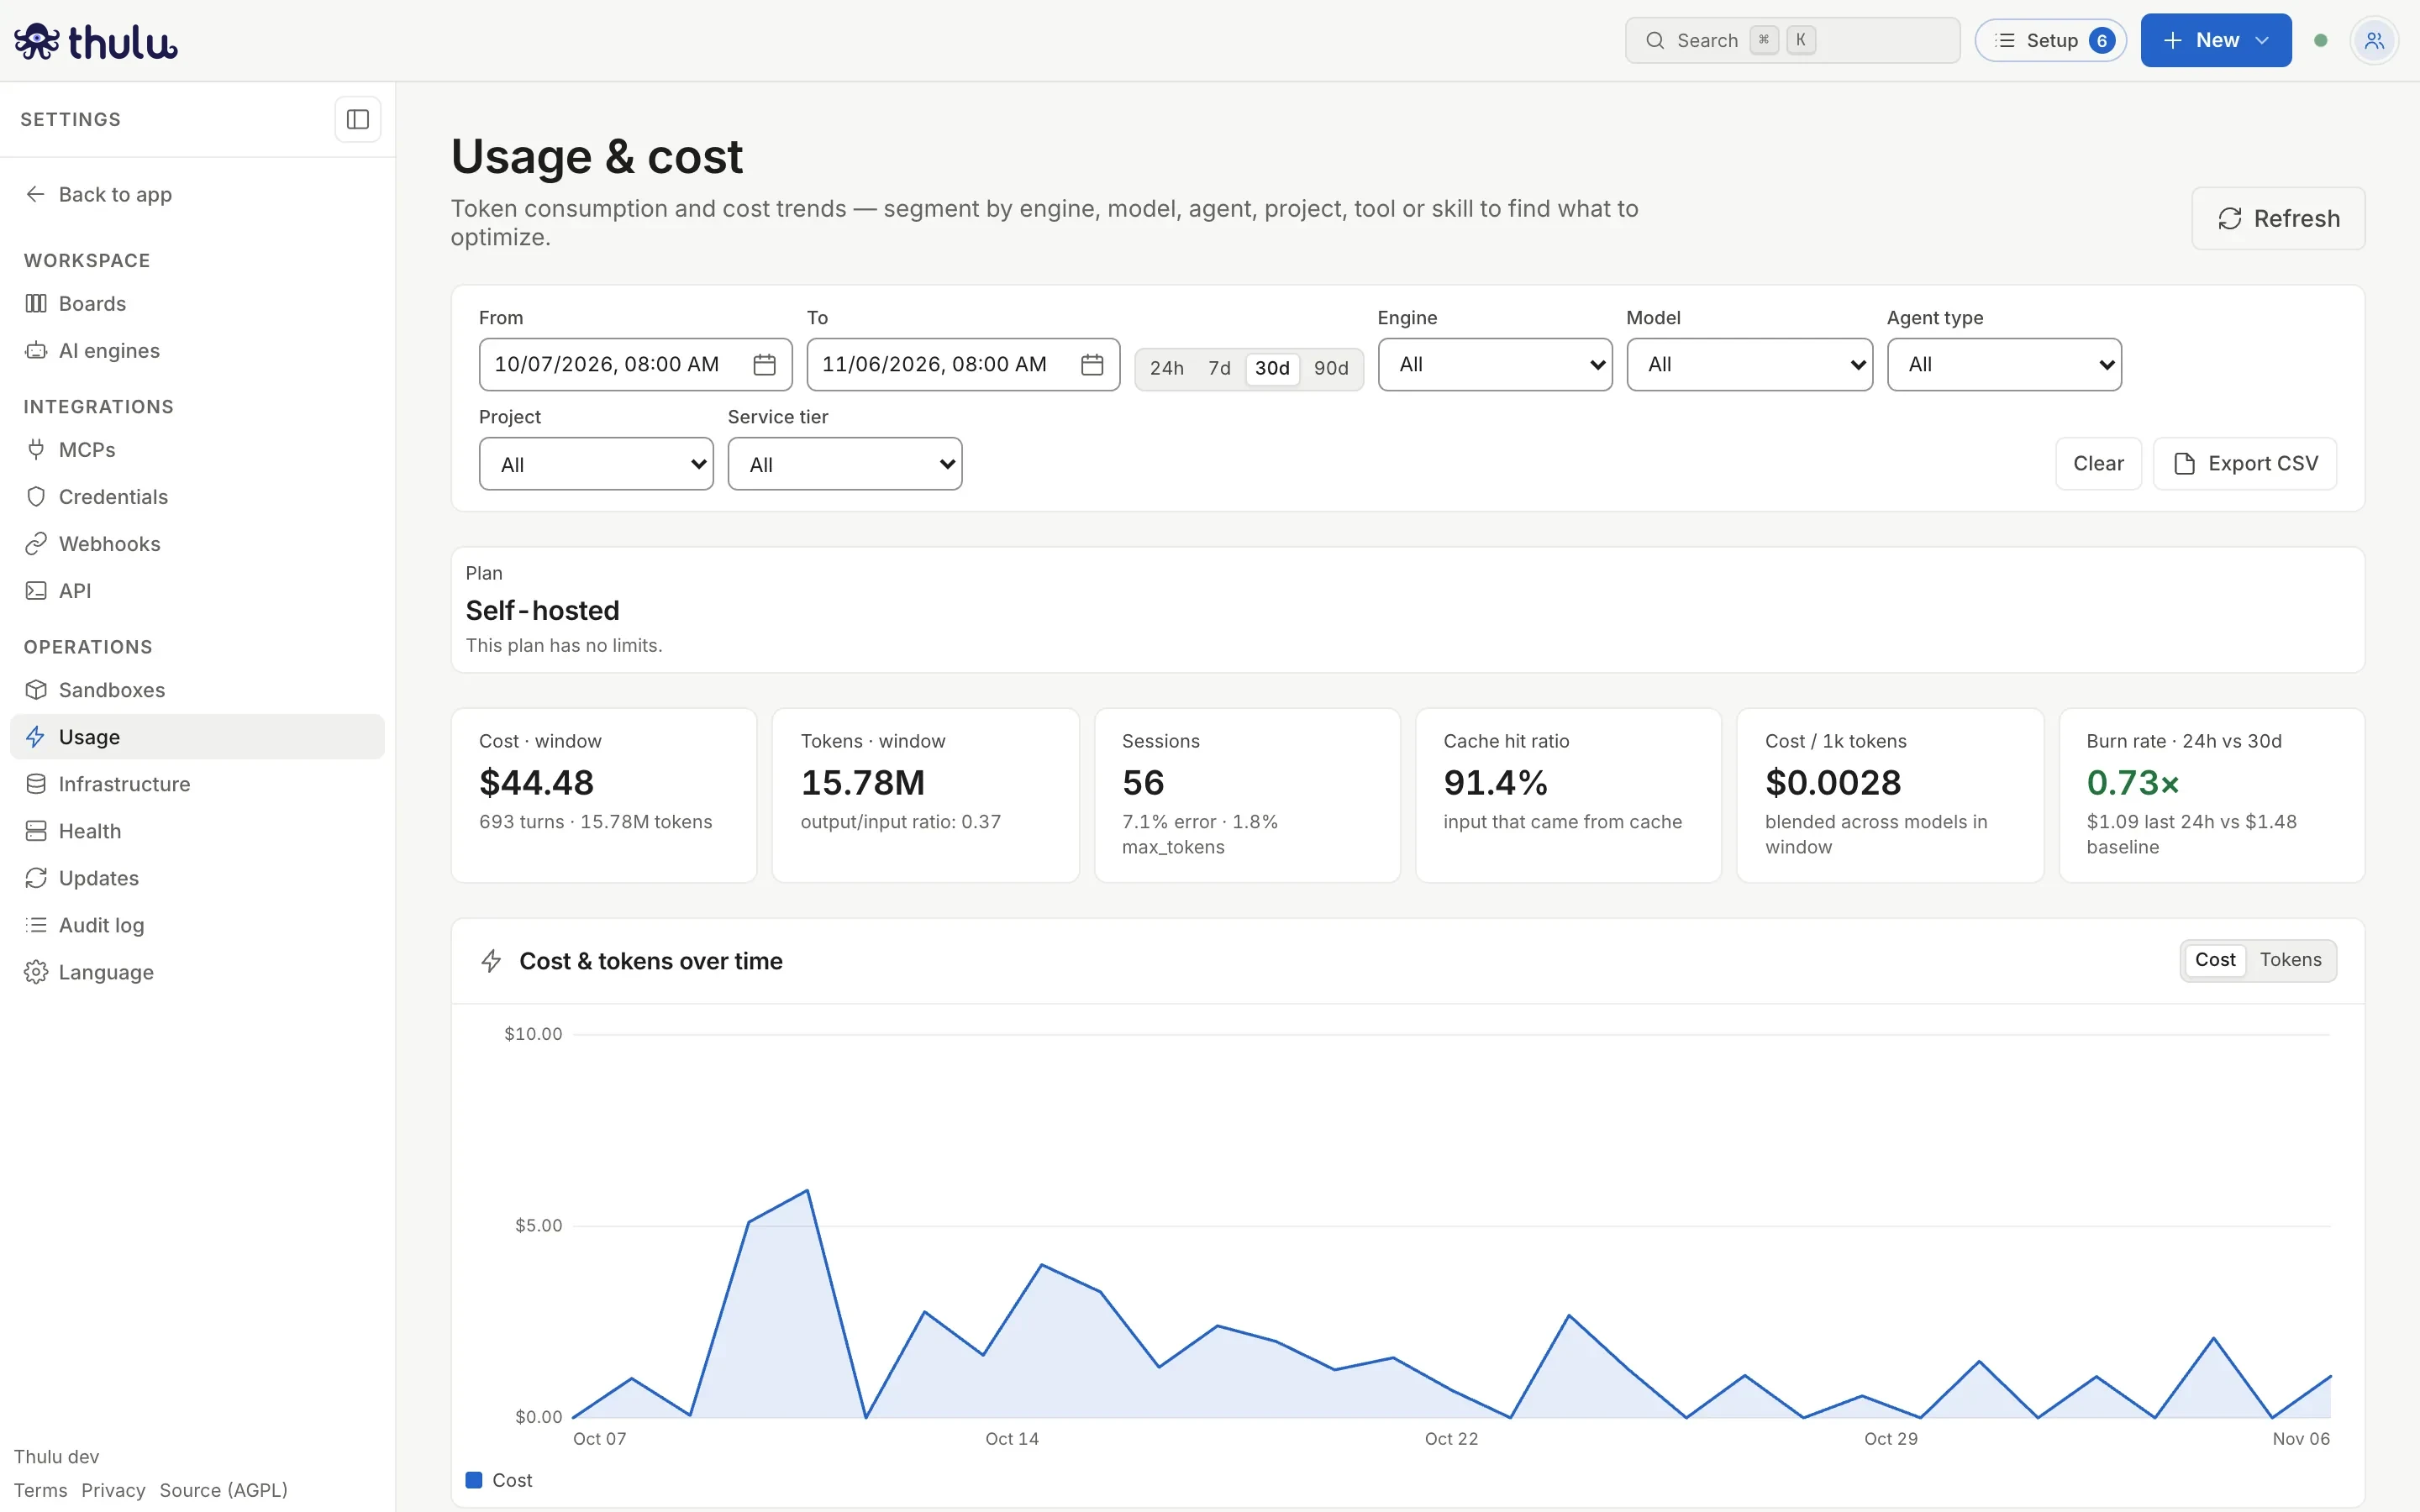
Filters, the six cards for the period and the cost per day. -
Scroll to “Top tasks by cost” to see which tasks concentrated the spend, with their title and project. Click one to open it; the task’s “Runs” property also shows its cost.
-
Open the project, “Overview” tab, to see lead time, rework, cost per task and “Where time goes” by column. Details in Metrics and dashboards.
-
If you need the detail in a spreadsheet, “Export CSV” downloads what you are looking at with the filters applied.